If you want to leverage browser caching in WordPress, you already know about the main benefit it has – it improves website loading speed.
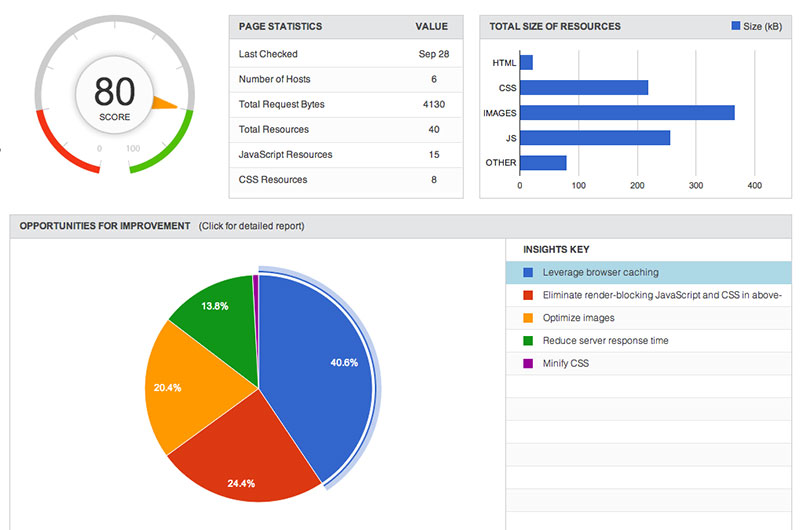
This detail is highly important for people who encounter this issue. Luckily, there are tools such as Google PageSpeed Insights or GT matrix. These can tell you exactly what you want to know about your website’s performance, what you need to change if you have or don’t have browser caching enabled already, and a lot more.

Ok, ok. So, what’s the big deal? Why do you need to leverage browser caching in WordPress?
This matter is discussed in detail below by our wpDataTables team, so continue reading and you will manage to leverage browser caching by the end of this article (fingers crossed).
Creating a visually pleasing website is no longer paramount when the loading times are so bad that they make users leave it in seconds.
You need to build a website with fast-loading pages and quality content. Every single person in contact with the Internet should know this. And the easiest way to make a website faster is if you leverage browser caching.
This concept will be explained later, but you should know that is the top recommendation of Google when it comes to loading times.
Normally, the loading speed of your website can be improved by up to 50%, as long as you use the proper methods.
What does browser caching have to do with it?
Let’s dig in.
Table of Contents
Table of Contents
- Leverage Browser Caching? What is that?
- How does Leverage Browser Caching in WordPress work?
- Differences between server caching and browser caching
- Leverage Browser Caching in WordPress
- NGINX Server and Browser Caching
- Leverage Browser Caching in WordPress using plugins
- Use Yoast SEO to edit the .htaccess file
- Caching third-party resources
Leverage Browser Caching? What do you mean by that?
For those who don’t know why you need to leverage browser caching, it’s best to explain it in simpler words.
Caching represents the amount of time that browsers locally store the cacheable resources available on a website.
These resources include images, JavaScript, CSS, and others. Whenever a person accesses the website, the cacheable resources which are stored on your computer are uploaded back. The loading speed of the website is thus improved visibly. This is the reason why people want to leverage browser caching in WordPress.
Different browsers utilize different caching mechanisms. When optimizing your WordPress site for browser caching, keep in mind that the difference between Brave and Firefox is that Brave browser prioritizes privacy while Firefox aims for a balance between privacy and performance in handling cached content.
How does Leverage Browser Caching in WordPress work?
When a person accesses a certain domain, there are multiple processes happening in the background. Everything that composes your WordPress website is transmitted to the user’s browser, making the site visible. These components of the website include content, images, stylesheets, scripts, and more. They must be moved from the website’s server to the user’s browser whenever it is required. The steps behind this process are:
- The visitor types a URL in his browser
- The browser generates a request to the server where your website is hosted (the HTTP request)
- The server puts all data together and sends it to the user. This is the step where users notice a slowdown. To prevent this slowdown, people can reduce the size of the scrips, optimize the image sizes and so on.
- Once the data is transmitted, the browser is finally able to display the website. The process repeats when visitors access other pages. The server requests can be very numerous at once, which can lead to low performance. This is why people need to optimize their website, to keep it fast.
Cache content is used in both web browsers and software applications. It is stored temporarily on your local disk. This data is called ‘ Web Cache’ or ‘HTTP Cache‘. Whenever you visit the same website, the browser will upload the information stored on your computer and download the content from the website.
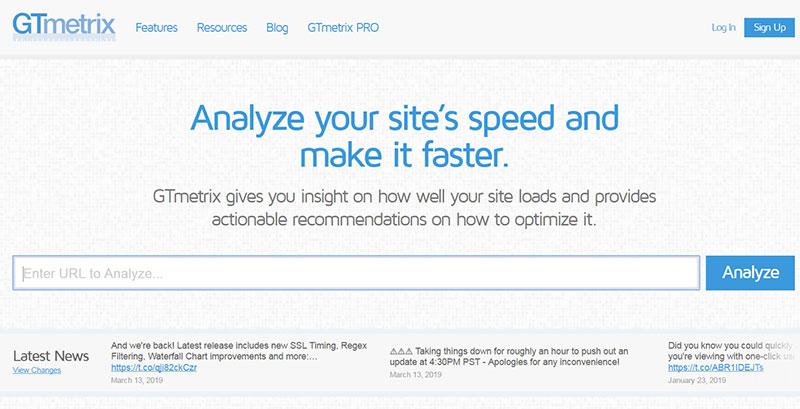
In order to check whether your WordPress website leverages browser caching correctly, you need to use a specific tool. The most popular one is Google PageSpeed Insights. Find out if everything works correctly by typing in your site’s URL.
Then, click Analyze and let the tool do its magic. PageSpeed should tell you what score your website has in terms of optimization for mobile and desktop. The score ranges from 0 to 100, and you will also get suggestions on how to improve your website after. One of the most common suggestions is to opt to leverage browser caching in WordPress.
Hey, did you know data can be beautiful too?
wpDataTables can make it that way. There’s a good reason why it’s the #1 WordPress plugin for creating responsive tables and charts.
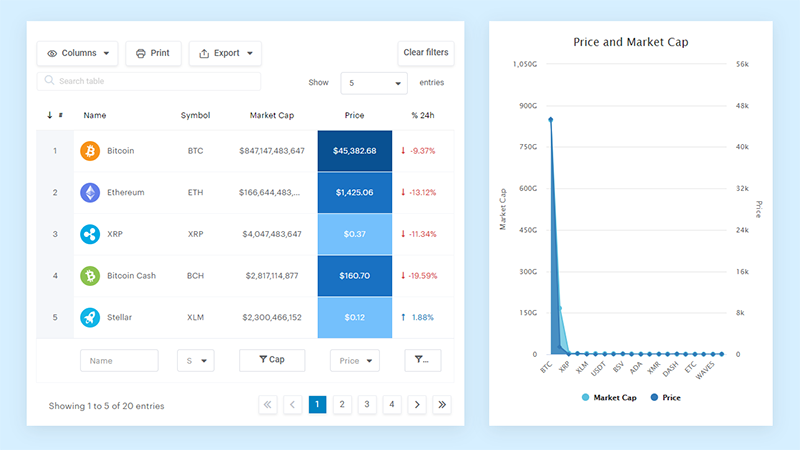
An actual example of wpDataTables in the wild
And it’s really easy to do something like this:
- You provide the table data
- Configure and customize it
- Publish it in a post or page
And it’s not just pretty, but also practical. You can make large tables with up to millions of rows, or you can use advanced filters and search, or you can go wild and make it editable.
“Yeah, but I just like Excel too much and there’s nothing like that on websites”. Yeah, there is. You can use conditional formatting like in Excel or Google Sheets.
Did I tell you you can create charts too with your data? And that’s only a small part. There are lots of other features for you.
Differences between server caching and browser caching
Any WordPress user should know more about server caching. This is a process that involves generating cached web pages for your website through the webserver. The steps above represent website caching, which is mainly on the server-side.
There are some ways in which you can improve the server caching system. The most recommended option would be updating headers on Apache. Using WordPress plugins would be the next step, and adding CDN follows it.
Leverage Browser Caching in WordPress
In order to leverage browser caching in WordPress, you need to use a bit of code. Don’t worry – it’s not as difficult as you may believe.
You just have to reach the .htaccess file, add a given piece of code and that’s it. Leveraging Browser Caching with the Htaccess file is the easiest and most effective method you should learn about.
The easiest and fastest way to make sure that your WordPress website is making the most out of both server-side and browser caching is to use a managed WordPress hosting, which pre-configures all the necessary settings for you.
Leverage browser caching in WordPress manually by doing these:
- Add Expires Headers
- Add Cache-Control Headers
- Turn ETags off
To do that, you need to follow the steps below:
-
Access the website files
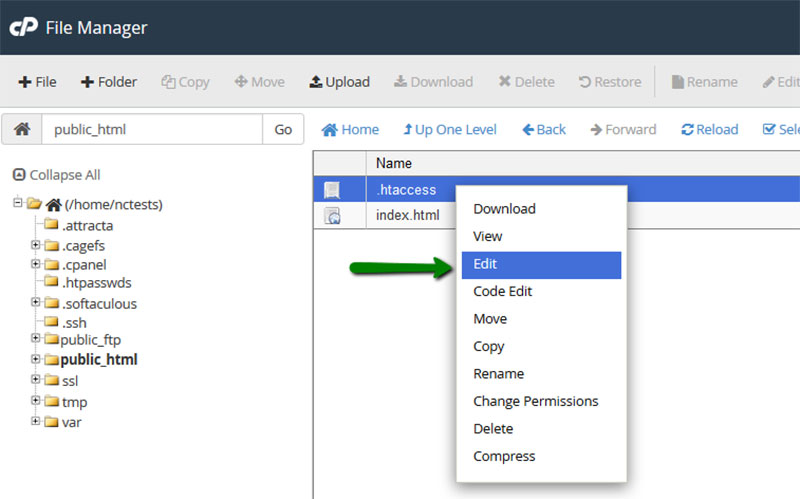
Start by logging in to your hosting account/cPanel. Navigate to the file manager. Here, you will find the website’s settings, where you need to Turn On the Hidden File option. Then, go to the website’s root directory and reach your .htaccess file.
It is usually located in /public_html/.htaccess. If the domain of your website is custom, you will find it under domainname/public_html/.htaccess. Right-click the file and edit it using the instructions you are given.
-
Add the browser caching code in your .htaccess file
The next step is the simplest. Copy the code below and paste it at the end of your .htaccess file content. Don’t make any other changes in the file.
#Customize expires cache start - adjust the period according to your needs
<IfModule mod_expires.c>
  FileETag MTime Size
  AddOutputFilterByType DEFLATE text/plain text/html text/xml text/css application/xml application/xhtml+xml application/rss+xml application/javascript application/x-javascript
  ExpiresActive On
  ExpiresByType text/html "access 600 seconds"
  ExpiresByType application/xhtml+xml "access 600 seconds"
  ExpiresByType text/css "access 1 month"
  ExpiresByType text/javascript "access 1 month"
  ExpiresByType text/x-javascript "access 1 month"
  ExpiresByType application/javascript "access 1 month"
  ExpiresByType application/x-javascript "access 1 month"
  ExpiresByType application/x-shockwave-flash "access 1 month"
  ExpiresByType application/pdf "access 1 month"
  ExpiresByType image/x-icon "access 1 year"
  ExpiresByType image/jpg "access 1 year"
  ExpiresByType image/jpeg "access 1 year"
  ExpiresByType image/png "access 1 year"
  ExpiresByType image/gif "access 1 year"
  ExpiresDefault "access 1 month"

</IfModule>
#Expires cache end
The settings included in the code above include a 600-second refresh/expiration time for HTML, and one month for CSS and JavaScript.
The purpose of this expiration period is to avoid having your visitors redownload the assets too often. If you perform changes in terms of assets more often, you can change the period according to your needs.
For people who want to leverage browser caching, altering the .htaccess file is the best option.
As you may see in the piece of code, images will expire after one year has passed. To add expires headers .htaccess, you need to change the file without damaging anything else.
However, some people don’t want to mess with their .htaccess file. If that is your situation, you can simply use a browser caching plugin. You will find out more about such plugins later in this article.
-
Add cache-control headers via Apache
Copy the code below:
# BEGIN Cache-Control Headers

<IfModule mod_expires.c>
  <IfModule mod_headers.c>
    <filesMatch "\.(ico|jpe?g|png|gif|swf)$">
      Header append Cache-Control "public"
    </filesMatch>
    <filesMatch "\.(css)$">
      Header append Cache-Control "public"
    </filesMatch>
    <filesMatch "\.(js)$">
      Header append Cache-Control "private"
    </filesMatch>
    <filesMatch "\.(x?html?|php)$">
      Header append Cache-Control "private, must-revalidate"
    </filesMatch>
  </IfModule>
</IfModule>
Setting an expiry date or a maximum age in the HTTP headers is no longer required because it was already set during the previous step, which means you don’t need to repeat it here.
-
Turn Etags off
Etags stands for Entity Tags and they refer to new versions of cached files. Because you have already set cache-control headers, there is no need to use ETags, so you can switch them off to improve the loading times. Add the following piece of code to the .htaccess file:
<IfModule mod_headers.c>
            Header unset ETag
</IfModule>
FileETag None
Save the .htaccess file and you are done!
NGINX Server and Browser Caching
If your website uses NGINX, you will need to use other pieces of code because you won’t be able to find the .htaccess file. Again, it is a very easy process that doesn’t require much tech knowledge. Go to /etc/nginx/sites-enabled/default and paste this code there:
server {
    listen       80;
    server_name  localhost;
    location / {
        root   /usr/share/nginx/html;
        index  index.html index.htm;
    }
    location ~*  \.(jpg|jpeg|png|gif|ico|css|js)$ {
        expires 365d;
    }
    location ~*  \.(pdf)$ {
        expires 30d;
    }
}

Add Cache-Control Headers (NGINX)
location ~* \.(jpg|jpeg|png|gif|ico|css|js)$ {
expires 90d;
add_header Cache-Control "public, no-transform";
}
You probably can tell that the expiry time for the image files is set to 365 days, the equivalent of one year. PDFs will expire after only 30 days. You can customize the code the way you want, just as in the previous case.
After editing NGINX, save the file and you can rest assured knowing that you activated browser caching on the NGINX server.
Leverage Browsing in WordPress using plugins
Tweaking the .htaccess file where you don’t need it can ruin your entire website. Making one single mistake will lead to blank pages and errors, so it is perfectly understandable if you don’t want to alter the file yourself.
Luckily, there are plugins that can be useful, without you needing to learn how to enable Leverage Browser Caching in WordPress
manually. Installing a plugin can be done like this:
- Download the plugin – one example can be found here
- Navigate to Dashboard, Plugins and Add New
- Find “Leverage Browser Caching”
- Click Install Now
- Activate the plugin
- Test your website
There are other plugins you can use as well, and some of them are listed below. Choose them according to your requirements:
W3 Total Cache – WordPress plugin
Fixing Leverage Browser Caching in WordPress with the W3 Total Cache can be done by following the steps listed below:
- Download and install the W3 Total Cache WordPress plugin
- Navigate to General Settings and select Enable Browser Cache
- Click save and navigate to Browser Cache Settings (top of the page)
- Choose the cache headers available
- Set expires headers, cache-control, and ETag headers (based on the settings done before)
- Save all settings and refresh your website
WP Fastest Cache
WP Fastest Cache is another plugin that you can use to enable browser caching in WordPress.
- Download and install the WP Fastest Cache.
- Go to plugin settings
- Select Browser Caching by checking the box
- Click on submit to apply the changes and that’s it
Cache Enabler – WordPress Cache
This plugin comes with more features that you might find helpful in the future: you can automate the cache cleaning process, or you can do it by hand, you can Purge Page manually, you can minify HTML and JavaScript, and many more. To use it, simply:
- Install the plugin and activate it
- Go to settings
- Click on Enable Leverage Browser Caching
Use Yoast SEO to edit the .htaccess file

You can also edit the .htaccess file in a safer method by using Yoast SEO Plugin. To ensure you don’t lose your original .htaccess file, we recommend creating a backup before making any changes. This can be done by saving a copy of the file to your hard drive, solid-state drive, or cloud storage. By doing this, you’ll have a safety net in case any mistakes are made during the editing process. The most commonly used WordPress plugin is SEO by Yoast. By using this plugin, you can edit the .htaccess file easily. If you don’t already have Yoast, you need to install it and activate it beforehand. After that, you need to:
- Access SEO, then Tools.
- Navigate to File Editor
- The .htaccess file will be opened in a text editor where you can paste the pieces of code listed above
- Save changes
After making the changes you can use Google PageSpeed Insights to check if everything is fine after making the changes. If your website leverages browser caching properly, you are good to go. If not, you should go through the process again and see what you’ve missed.
Caching third-party resources
After performing all of the changes described in this article, you might still obtain a bad score when testing your website’s speed using various tools. Google PageSpeed Insights can give you a bad score because of many third-party scripts or services that run behind your website. These scripts don’t have a long expiration time because of a multitude of reasons.
If you will still get messages to Leverage Browser Caching in WordPress after following all possible tips, there is nothing much you can do besides eliminating scripts that you don’t use. A maximum of three scripts should be just enough for a website, so make sure to clean your list.
After making this change, everything should work fine, and the loading time of your website is supposed to be as close as possible to perfection. In case you encounter a problem that is very specific, and it doesn’t have anything to do with third-party scripts, you should get informed about it and see what setting causes the issue.
FAQs about leveraging browser caching
1. What is browser caching and how does it work?
By using a method called “browser caching,” web browsers can temporarily store website files including pictures, CSS, and JavaScript on the user’s local computer. The browser obtains the files from the cache rather than requesting them from the server when a user accesses the website again, resulting in quicker page loads.
2. How can I check if my website is utilizing browser caching?
By using browser tools like Google PageSpeed Insights or GTmetrix, you can determine whether your website makes use of browser caching. You can get a report from these tools that details which files are not cached and how to rectify them.
3. Why is leveraging browser caching important for website performance?
By speeding up the loading of pages, using browser caching can greatly enhance website performance. Users can quickly get the content they need without having to wait for the server to retrieve it by caching static assets like pictures, CSS, and JavaScript files.
4. What are the benefits of leveraging browser caching?
Using browser caching has advantages such as quicker page loads, reduced server load, better user experience, and higher search engine rankings. Caching can help cut bandwidth usage and data transfer by minimizing the number of queries made to the server, which lowers hosting costs.
5. How can I leverage browser caching for static resources like images and CSS files?
You can change the expiration date of static resources to a later period in order to benefit from browser caching. This can be accomplished by setting the Cache-Control header with a max-age value or by adding an Expires header to the resource response.
6. Can I leverage browser caching for dynamic content like user-generated comments and posts?
Because dynamic material is continuously changing, utilizing the browser cache for it might be difficult. However, there are some methods that can be used to cache dynamic material, including the use of HTTP cache headers, server-side caching of answers, and client-side caching methods like local storage or IndexedDB.
7. How long should I set the expiration time for cached resources?
The frequency of updates to the resources determines when cached resources expire. A longer expiration time, such as one year or more, can be chosen for static resources that don’t change frequently. A shorter expiration time, such as a few minutes or hours, should be utilized for dynamic content.
8. What happens if I change the content of a cached resource before its expiration time?
A cached resource’s users might not receive the updated content if you make changes to it before the cache expires. Cache-busting strategies, such as including a version number in the resource URL or setting the Last-Modified or ETag headers to the most recent version of the resource, will help you avoid this.
9. Are there any downsides to leveraging browser caching?
The risk that users won’t view the most recent version of the website exists when using browser caching. The consumption of local storage space by caching might also negatively affect device performance.
10. How can I override browser caching for specific resources or pages?
Cache control headers like no-cache, no-store, must-revalidate, or max-age=0 can be used to override browser caching for particular resources or pages. Even if the resource is still valid, these headers can tell the browser to get it from the server rather than the cache.
Ending thoughts on how to leverage browser caching in WordPress
Keep in mind that you might not notice the changes you make immediately after installing a plugin. The reason behind this delay is the CSS/Stylesheet file. The browser cache you already saved in your computer will prevent you from seeing the changes you have done. To properly see the website after making several changes, it would be recommended to visit it using the Incognito function of your browser. By using this function, you won’t use cache resources and you should be able to see the changes properly.
At the end of the day, the method you choose to Leverage Browser Caching is not relevant. The only thing that matters is to see it in action. As long as Leverage Browser Caching in WordPress works as supposed, the way you got there doesn’t matter. You can choose the method that you are comfortable with and the result will be the same. Either you decide to alter the .htaccess file or use a plugin, you will get better loading times by activating Leverage Browser Caching.
If you enjoyed reading this article on how to leverage browser caching in WordPress, you should check out this one about how to speed up WordPress.
We also wrote about a few related subjects like WordPress database plugin, WordPress lazy load plugin, WordPress cache plugin options and CDN services.