You’ve already spent days or months working on your WordPress.com blog but perhaps you are starting to realize that WordPress.org would be a better choice? Worry not. You won’t have to start the process all over again to have your content migrated to the other version.
This article created by our team at wpDataTables will help you move from WordPress.com to WordPress.org in just a few steps.
Beginners usually start with WordPress.com because they find it more suitable for their purposes at the time. As their blog grows, and as traffic increases, the goals that they initially set start to change, leading them to consider the more powerful WordPress.org.
The free WordPress.com version comes with many limitations when compared to the self-hosted WordPress.org version, so the change is definitely justified.
Keep reading to learn how to easily transfer from WordPress.com to WordPress.org.
Table of Contents
Why Should You Move from WordPress.com to WordPress.org?

Why should you make this change in the first place, you might ask? Does it matter? Well, WordPress.com is the first option for people when they are creating a website for the very first time because they are not aware of or bothered about the limitations of this version.
Indeed, WordPress.com is perfectly suitable for most small blogs, but as soon as it starts to get popular, the free Com version will no longer be suitable.
Two important limitations you should know about are the limited possibility for blog monetization (with ads, etc.) and the impossibility to install plugins.
WordPress.org, on the other hand, has little to no limitations at all. You will gain full control over your blog, being able to customize it in any way that you desire. In addition, you can monetize your blog, add third-party apps and plugins, and much more.
Here are some other things that may convince you that WordPress.org is better:
- WordPress.com users are limited to just a few basic themes and plugins, so you will be able to use only a narrow range of personalization tools. Conversely, WordPress.org doesn’t set any limits when it comes to themes and plugins.
- You can customize your code using WordPress.org. If your website is going to get bigger and bigger, you may eventually encounter the need for custom development. On WordPress.com you won’t be able to make any code modifications.
- If you own an eCommerce website, WordPress.com sets a lot of restrictions that will cause your website to stagnate. When you want to expand in the eCommerce sector, WordPress.org is the only sensible choice.
Things to Know Before Getting Started
WordPress.org is a self-hosted website platform, which means you’ll need to create a separate account and domain name for it, unlike with WordPress.com where you don’t have to pay anything.
Before moving on to further steps, you should start setting up a WordPress web hosting account. In order to move from WordPress.com to WordPress.org, dealing with web hosting is simply unavoidable.
Besides paying for a hosting account on WordPress.org, you also need to get yourself a domain. Of course, most of the best domains are already taken (especially .com domains). Even so, you can always use your previous blog name and pair it up with one of the new Top-Level Domain extensions like .expert or .news.
To move your files and content from your WordPress.com account to your WordPress.org account, you’ll have to follow the steps listed below.
How to Move from WordPress.com to WordPress.org
Export Your Blog
To transfer WordPress.com to WordPress.org, export your blog first. To do this, go to WordPress.com and log in to your account. Navigate to your dashboard and look for the WP Admin link that sends you to the settings panel.
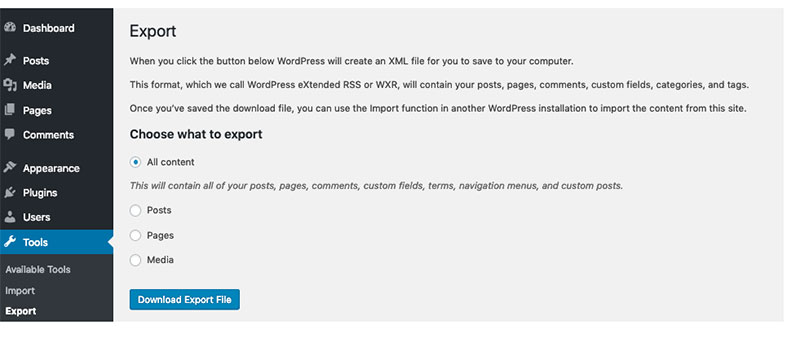
Once you get there, navigate to the Tools tab and go to Export. On this page, you’ll be required to choose what content you desire to export.
Because you want to move your entire WordPress account from Com to Org, you should do a full export. This export will include posts, pages, media files – everything.
Check all the boxes and proceed to download the export file. Store this file safely until you need to use it again. This is an XML file in the WXR (Windows eXtended RSS) format.
Fresh WordPress Install
Once you have your file ready, you must install a new self-hosted WordPress site on your web hosting account. If your web host gives you the option for a 1-Click WordPress install, you can go with that to make things easier.
After going through all installation steps, you will have a fresh WordPress copy to work with. This is where you will import your content and set up a self-hosted site.
Import Your Blog
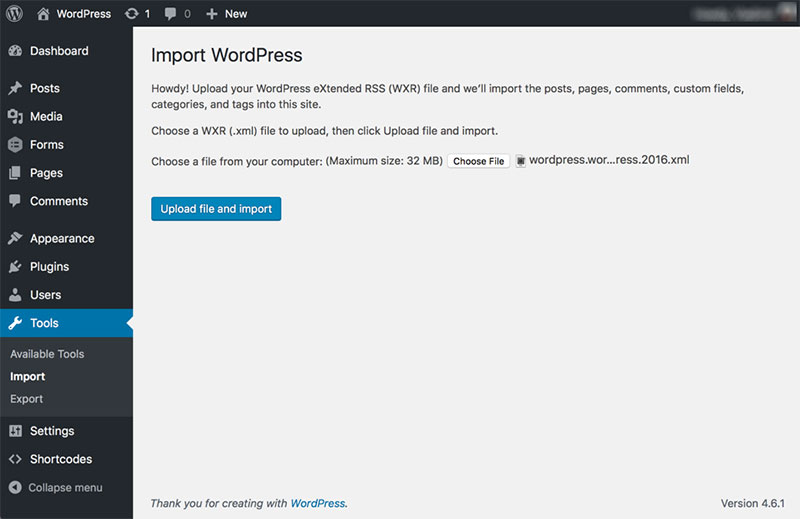
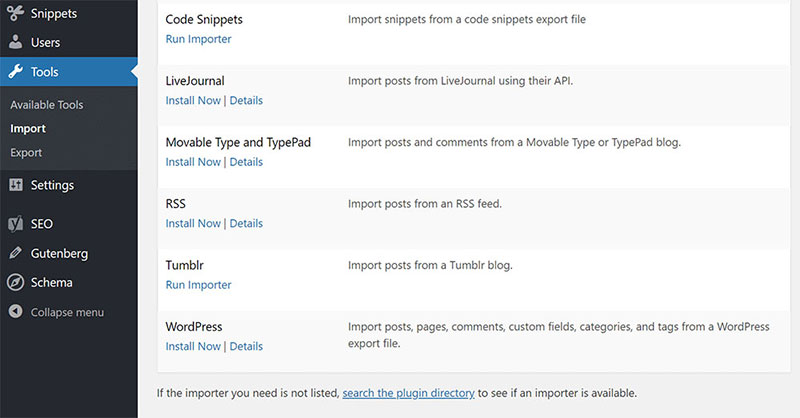
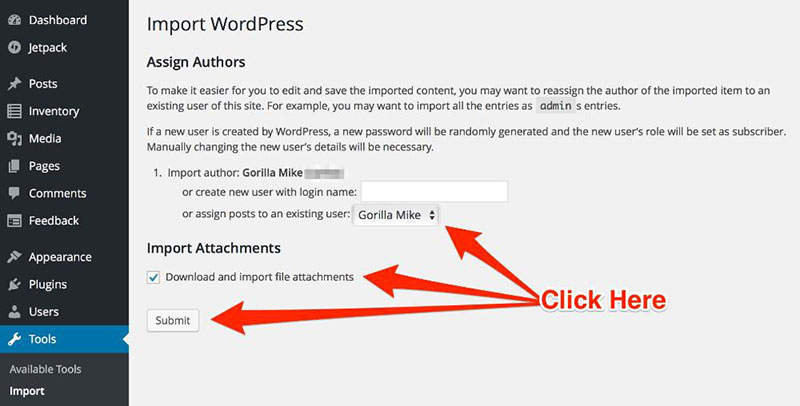
To import the XML file you’ve previously created, go to Tools and then hit Import. Choose the file and upload it. The process should take a few minutes and all of your content will be transferred to your new site.
Don’t panic if the process seems to last longer than expected. Two of the aspects that could affect the time required for importing your blog are your internet connection speed and the size of the XML file.
Check Your Files
The data migration process is not always successful. This is a problem that many people encounter when they move from WordPress.com to WordPress.org, for one reason or another. To make sure that you’re not a victim of any errors too, check all your files manually.
Pay attention to the files you’ve uploaded. If anything is missing it means that the process failed, and you’ll have to upload those missing files separately.
Set Up a Redirect

Last, but not least, you need to set up a redirect link to notify your users that your website is no longer a WordPress.com one and is now self-hosted on its own separate domain.
For a slight period of time, all of your traffic will go to your old address, so it would be a shame to lose it by skipping this step.
The redirect link will help them access your new domain, so you won’t lose visitors. You can use the Site Redirect service that WordPress offers to users. Unfortunately, this service does incur a slight fee, but it’s absolutely worth it if you want to keep your previous audience.
To use the Site Redirect service, access your blog’s dashboard, look for Settings and access “Site Address”. Click on “Redirect” and provide the new address of your blog.
Save the changes and you’re done. Keep in mind that you should use the redirect service for at least one year after you’ve migrated from WordPress.com to WordPress.org. This should give your users enough time to memorize your new address.
Extra tip: check your content thoroughly and replace your internal post URLs for SEO purposes.
FAQ on Moving from WordPress.com to WordPress.org
Why Make the Jump from WordPress.com to WordPress.org?
Oh, I get it; it’s a big leap! But you know, WordPress.org opens up this whole world of possibilities. You’ve got more control, and you can just go wild with customizations.
Themes, plugins, you name it. It’s like moving out of a rental apartment into your own house. More responsibility? Yeah, but totally worth it!
How’s the Whole Migration Process Going Down?
So here’s the lowdown: it’s a bit like moving houses. First, you gotta pack up your content on WordPress.com—there’s an export tool for that.
Then, you set up your new pad on WordPress.org with your hosting provider, get WordPress installed, and unpack everything using the WordPress import tool. Don’t forget to point your domain to the new place if you have one!
What’s the Deal with Hosting on WordPress.org?
Think of it like choosing a new apartment. There are loads of WordPress hosting options out there. You’ve got shared hosting, VPS, dedicated; it’s all about what fits your needs and budget.
This is your website’s new home, so choose wisely. And hey, a good host can make a world of difference!
Any Chance I Could Lose My Content During the Move?
Not gonna lie, there’s always a risk when moving stuff. But hey, if you follow the steps carefully, backup everything, and use the right WordPress migration tools, you should be golden.
Just take it slow, double-check everything, and you should be able to move your WordPress site without losing a byte.
Will My Website Go Down While I’m Making the Move?
Okay, real talk? There might be a bit of downtime. It’s kinda like when the Wi-Fi goes out for a bit when you’re setting up at a new place.
But if you plan it well, do it during off-peak hours, and follow the website migration checklist, it’ll be back up in no time. Just a little patience, and you’ll be back in business!
What’s the Score with My Old WordPress.com Domain?
So here’s the drill: if you had a custom domain on WordPress.com, you can totally bring that with you.
You just need to update your domain settings and point it to your new WordPress.org site. If you had a free domain, though, you might need to upgrade and get yourself a custom one.
What About My Themes and Plugins?
Alright, buckle up because this is big. Moving to WordPress.org? You’ve just hit the jackpot for themes and plugins.
You can keep the ones you had if they’re available, but man, there are so many more options on WordPress.org. Just dive in and start exploring. It’s like a theme and plugin paradise!
Is This Going to Cost Me a Fortune?
Well, here’s the deal: WordPress.org is free, but you gotta pay for hosting and maybe a domain. The costs can vary, right? But the cool part?
You’ve got options. From budget-friendly to high-end. And honestly, the investment? Totally worth it for the freedom and control you get.
What If I’m Not a Techie? Can I Still Make the Move?
Hey, no worries! You don’t have to be a WordPress wizard to make this move. There are plenty of WordPress migration services and plugins that can help you out.
Plus, there’s a ton of tutorials and WordPress support forums. So, you’ve got this. Just take it step by step, and you’ll be fine.
What Happens to My SEO When I Move?
Okay, so SEO, right? It’s like the reputation you’ve built up. You don’t want to lose it during the move.
Make sure to set up redirects, update your URLs, and inform search engines about the change. It might take a bit of time, but if done right, your SEO shouldn’t take a hit. Stay on top of it, and you’ll be back to ranking in no time!
Ending thoughts on how to move from WordPress.com to WordPress.org
Now you know how to move from WordPress.com to WordPress.org. As you may have noticed, there is not much effort involved. You just have to know when this change is required and whether it is worth the investment or not.
When moving from Com to Org, you will start paying for hosting services, as well as investing more money into various aspects of your site with add-ons. This is a small price to pay for the success that comes with a great website.
If you enjoyed reading this article about moving from WordPress.com to WordPress.org, you should read these as well:
- 12 Best WordPress Fonts You Did Not Know You Needed
- How to Stop a DDoS Attack on Your WordPress Website?
- Mixed Content Warning in WordPress: Quick Fixes