Nothing is more frustrating than hitting a wall during a software setup, especially when you encounter the dreaded installation failed, could not create directory error. Whether you’re a seasoned developer or just trying to get your new app running, this issue can bring your progress to a grinding halt.
Understanding the root causes—be it directory permissions, user access levels, or a stubborn installation script error—is crucial. I’ve faced these challenges firsthand, and I know how to navigate through the maze of file system errors and permission denied messages.
In this article, you’ll learn how to fix this installation error step-by-step. By the end, you’ll know how to troubleshoot directory access issues, adjust system configuration, and ensure your installation process goes smoothly.
We’ll dive into the key areas of concern, including file permissions, directory paths, and user permissions. Let’s get your installation back on track and your project moving forward.
Table of Contents
The Web Server Must Own the Directories
The first step to getting rid of this error message is to ensure that your web server owns the directories where WordPress is installed.
To do this, you will have to enter some lines of code. The first line of code is used to access your username if you don’t know it.
# ps aux | egrep '(apache|httpd)'
This code will list all processes that are running, with the names of the user in the brackets. The next step would be to allow WordPress access(or ownership) of all the directories where WordPress is installed.
# chown -R apache /var/www/html/
Option 1: Update Folder Permissions With cPanel
The permissions for folder usage depends on the rights that each user has. Within the web hosting server, each server will have permission to read, write and execute. These will depend on the permission levels based on user permissions.
For this option to work for you, you will need cPanel access and internet connection. Here are the steps that you should follow.
- Login to your cPanel account.
- Once logged in, search for “file manager” and open the first search option.
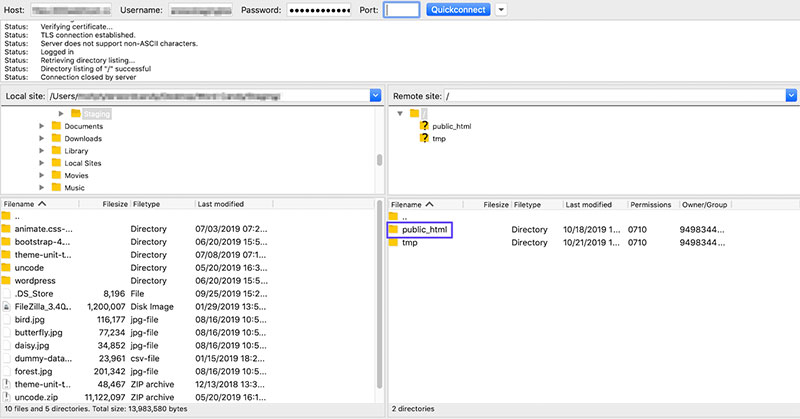
- To view files of your website, open “public.html.”
- Select all files under the root directory, right-click, and open “file permissions.”
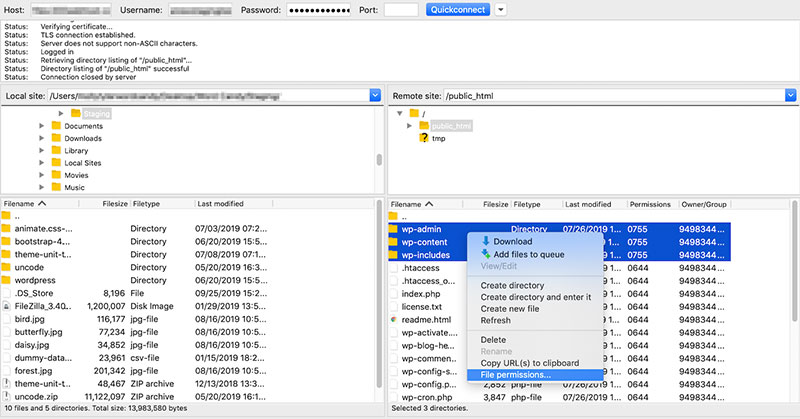
- Under the “permissions” button at the top of the page, click on the “change permissions” option.
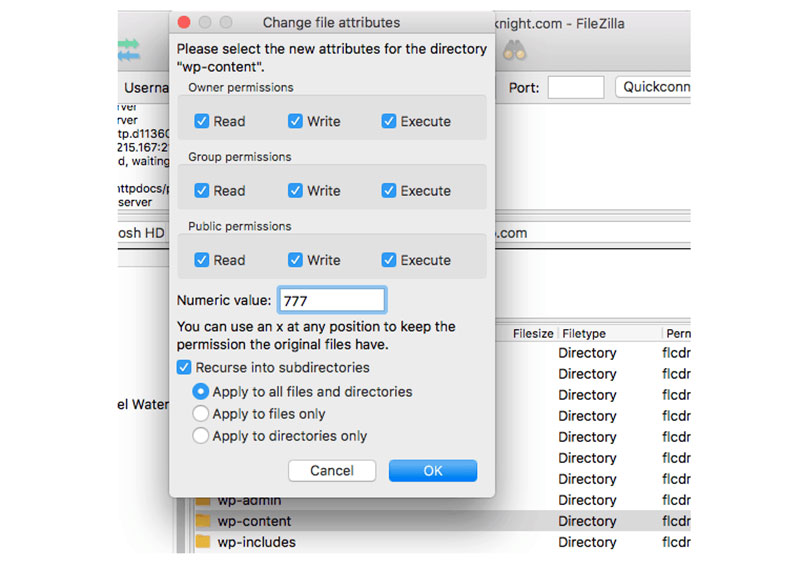
- Then, a dialog box will open. Under the numeric value field, enter the number “755”. Next, check the “Recurse into subdirectories.” checkbox and select the “Apply to directories only.” option. Click on OK and wait for the FTP client to finish the process. It might take some time.
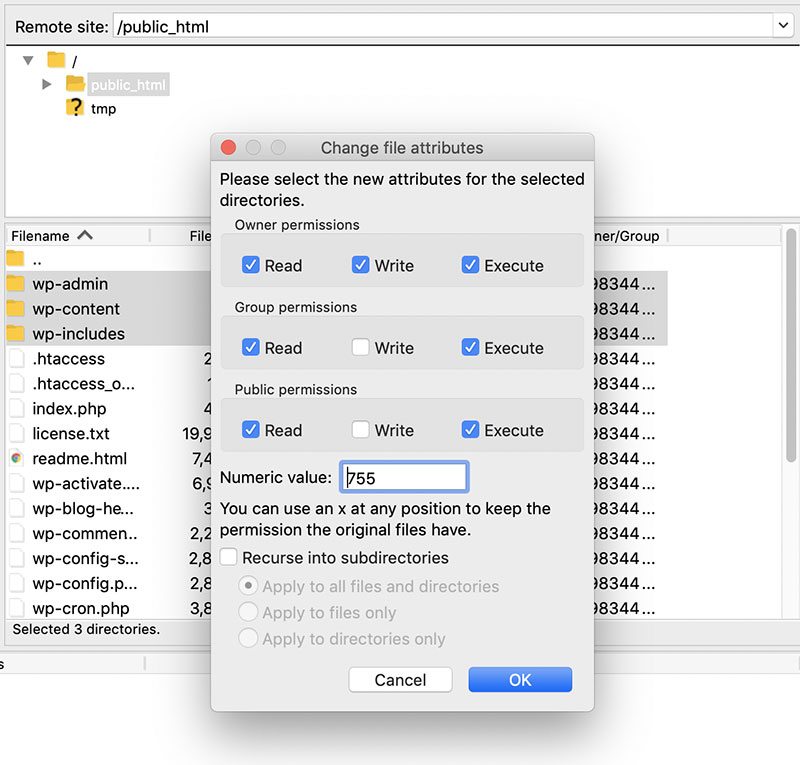
NOTE: The 755 setting means the following things:
- Read, write and execute for the owner, which can be you or anyone who logs in with your name.
- Read and execute options for groups (mostly applicable to Linux, where users are organized in groups)
- Read and execute permissions for the rest of the users (for example, readers of your website).
- The next step after the process is done, is to select all files under the root directory again and right-click, select “File permissions.”, and a dialog box will pop up.
- This time you will have to enter the number “644” under the numeric value field. Click on “Recurse into subdirectories.”, and select “Apply to files only.”
- Confirm the changes.
- Clear browser cache and try to install a plugin or a theme. Now, the “Installation failed, could not create directory.” error message should not occur again, and you should be able to install plugins and themes going forward.
Option 2: Configure FTP Permissions In The “wp-config.php” File
Another way to get rid of this error message, if the first option was unsuccessful, is to try to change the FTP permissions by configuring the “wp-config.php” file.
This option can fix the error message, as your server might not have permission to write new files. This is why the operation fails each time, and you can change it by configuring the “wp-config.php” file.
This process is quite simple. Here are the steps to fix the “Installation failed, could not create directory.” error.
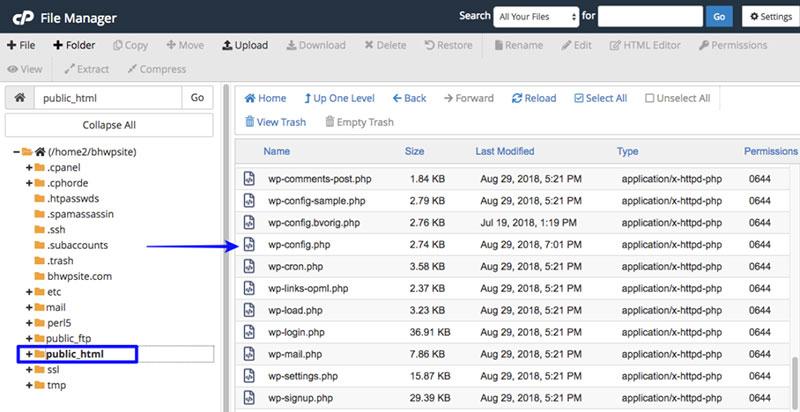
- From your web hosting account, open the “File Manager”.
- Within the root folder, locate the “wp-config.php” file and open it.
- In your “wp-config.php” file, enter the following passage of code.
NOTE: Replace the information in brackets with your information.
define(‘FS_METHOD’, ‘ftpext’);
define(‘FTP_BASE’, ‘/pathtorootofyourblog/’);
define(‘FTP_USER’, ‘ftpusername’);
define(‘FTP_PASS’, ‘ftppassword’);
define(‘FTP_HOST’, ‘yoursite.com’);
define(‘FTP_SSL’, false);
- Save the “wp-config.php” file.
- Return to your dashboard and try to install the plugin or upgrade once again. This time, it should be done without any problems.
Other Possible Fixes
Although it seems unlikely, the error “Installation failed, could not create directory.” might be caused by insufficient disk space in your server. It is a common issue if you are using shared hosting.
Ensure you have enough space for the new files to be installed. Also, you should not store your backups in the same folder as your server, as you are risking your reserves with this method. Instead, use a cloud service provider like Dropbox.
Having sufficient disk space is the first prerequisite for new files to be installed. Given that disk sizes are bigger nowadays, this issue is often ignored. It will be an issue if, however, your disk space is small. You can check it as another option if the previous ones haven’t worked.
More About File Permissions
As mentioned above, several file systems use file permissions, and they allow files and folders to read, write, and execute processes. In the same way, WordPress gains access to your data for the website, and it needs permission to moderate files within the “wp-content” folder.
Servers use software for accessing and managing files. This software can access data for your website, which may be stored locally on your computer if the site is self-hosted, or it may be on another computer.
If you have a local server installed, then the issue of folder permission will likely occur. Usually, the permissions are handled by the hosting company. However, if this is the case, you will have to configure the permissions settings on your own to ensure the security of your files. This is why the “Installation failed, could not create directory.” error message frequently occurs.
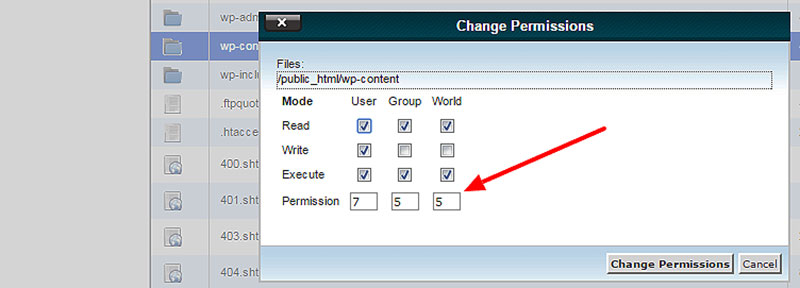
Usually, a set of numbers dictates who can use which directories. Earlier, with the first option, numbers like 755 and 644 were used for handling permissions. These numbers tell the server what licenses are in place for specific files and folders. When installing plugins with WordPress, the server will need access to your folders. For this, they will need permission from your part.
These digits are not just random numbers, but are, in fact, a set of “instructions” that give permissions to the server. The first digit tells the software what the user of the account can do with the files, the second specifies what the group can do, and the third tells us what everyone else can do.
Managing permissions is essential for fixing the “Installation failed, could not create directory.” error. Hopefully, you can fix the issue with these options.
Let us know if this worked for you.
Hey, did you know data can be beautiful too?
wpDataTables can make it that way. There’s a good reason why it’s the #1 WordPress plugin for creating responsive tables and charts.
And it’s really easy to do something like this:
- You provide the table data
- Configure and customize it
- Publish it in a post or page
And it’s not just pretty, but also practical. You can make large tables with up to millions of rows, or you can use advanced filters and search, or you can go wild and make it editable.
“Yeah, but I just like Excel too much and there’s nothing like that on websites”. Yeah, there is. You can use conditional formatting like in Excel or Google Sheets.
Did I tell you you can create charts too with your data? And that’s only a small part. There are lots of other features for you.
FAQs about the “installation failed could not create directory” error
What causes the “installation failed, could not create directory” error?
Answer:
This error often occurs due to directory permissions issues or user access levels. Your system might deny write access to the installation directory. Incorrect file permissions or an improperly configured installation script can also trigger this error, halting the software setup process.
How can I check directory permissions?
To check directory permissions, right-click the directory, select Properties, and navigate to the Security tab. For CLI users, the ls -ld command reveals permissions. Ensure you have the necessary write permissions to the file path where the directory creation failed.
How do I change directory permissions?
Modify directory permissions using the chmod command in CLI: chmod 755 directory_name. This grants write access. For graphical interfaces, adjust permissions in the directory’s Properties under the Security tab, ensuring the user has full control to avoid installation errors.
Why is my user account causing installation issues?
Your user permissions might restrict write access, causing installation errors. Ensure your account has administrative rights or use an account with higher privileges. Admin rights are often necessary to modify or create directories during software installation.
What is an installation script error?
An installation script error occurs when the script responsible for setting up the software encounters issues, like lacking permissions or incorrect directory paths. These errors halt the installation, often requiring script modification or running the script with elevated privileges.
How can I run an installation script with elevated privileges?
For Windows, right-click the installation file and select Run as administrator. On macOS or Linux, prepend the command with sudo. Elevated privileges ensure the script can modify necessary system directories and installation directories, preventing permission-related failures.
What if the directory path is incorrect?
An incorrect directory path in the installation script or settings can prevent directory creation. Double-check the path for typos or inaccuracies. Verify that the specified path exists and that the installation process targets the correct directory within your file system.
How can I use system logs to diagnose installation errors?
System logs provide detailed information about installation errors. Check logs in the Event Viewer on Windows or /var/log directory on Linux. Look for entries related to file permissions or directory creation issues to pinpoint the exact cause of the error.
What role do configuration files play in installation?
Configuration files define settings used during installation. Errors in these files, like incorrect file paths or insufficient permissions, can cause the “could not create directory” error. Review and correct these settings to ensure a smooth installation process.
Conclusion
Dealing with the “installation failed, could not create directory” error can be a frustrating roadblock, but knowing how to fix it transforms a daunting challenge into a manageable task.
By addressing directory permissions, ensuring correct file paths, and verifying user access levels, we can resolve this issue effectively. Modifying configuration files and running installation scripts with elevated privileges are crucial steps. Understanding the role of system logs and possibly adjusting antivirus software settings can also play a significant part in the solution.
Key Takeaways:
- Check and modify directory permissions to ensure write access.
- Verify and correct directory paths to prevent errors.
- Run installation scripts with admin rights for proper execution.
- Review system logs to diagnose and address specific issues.
- Adjust antivirus settings if they interfere with the installation.
Implementing these strategies ensures a smoother software installation process, eliminating the common hurdles that prevent directory creation. Now, armed with this knowledge, you’re ready to tackle any installation error that comes your way.
If you enjoyed reading this article on how to fix the “installation failed, could not create a directory” error, you should check out this one about WordPress plugin update failure.
We also wrote about a few related subjects like WordPress links not working, how to fix “your connection is not private”, how to fix the site is experiencing technical difficulties, and how to fix sorry, this file type is not permitted for security reasons and the link you followed has expired.