The frustration of encountering the “The link you followed has expired” error in WordPress can halt your workflow in its tracks. Imagine you’re in the middle of an important task, like uploading a new theme or activating a crucial plugin, and suddenly, this message pops up, leaving you stranded.
This error isn’t just a minor inconvenience; it’s a signal that something is off in your WordPress configuration.
But fear not, because by the end of this article, you’ll be equipped with the knowledge to resolve this error efficiently.
We’ll dive deep into PHP settings, server configurations, and essential tweaks in wp-config.php and .htaccess files to get your uploads back on track.
We’ll also cover critical adjustments to file permissions, PHP memory limits, and maximum upload sizes.
Get ready to tackle this head-on and restore seamless functionality to your WordPress site.
Table of Contents
Why am I seeing ‘The link you followed has expired’ error message?
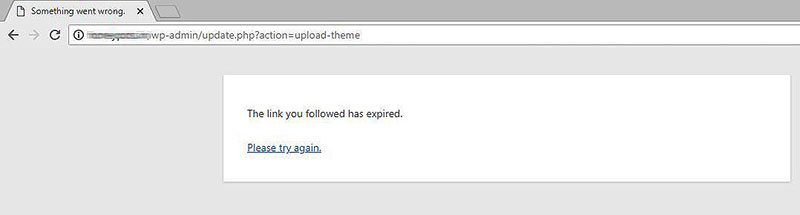
The message, ‘the link you followed has expired,’ is most often received when you’re uploading either a WordPress plugin or theme.
With all standard WordPress installations, there is a server setting that limits the upload of files over a certain size. There is also a setting that prevents scripts from running for too long,causing any script that exceeds the limit to timeout.
This means that when you try to upload a file that’s over the size limit, or the upload takes too long, you’ll get an error message. This is the one that reads “the link you followed has expired”.
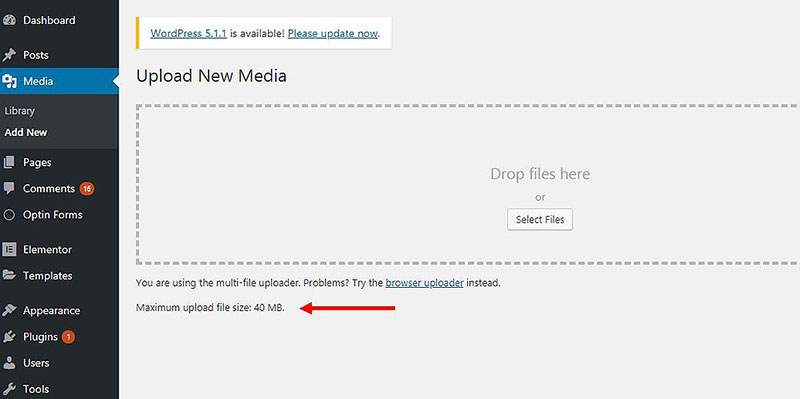
To find out the size of the upload limit, you can go to the Media section of the WordPress dashboard, then click ‘Add New’. At the bottom of this page, you will see the text: “Maximum upload file size: …”
The default file size limit is usually pre-configured at 2MB which is quite low, especially for WordPress theme uploads. In the following sections, we’ll show you how to change this to a higher value, as well as set a more reasonable script timeout limit.
How to Fix the Error
So, if the link expired, what do you do? The answer is clear —if the setting is too low, you need to increase the limit. Luckily, this is not too tricky to do, even for a beginner.
There’s more than one way of increasing the limit to avoid ‘the link you followed has expired’ message. Don’t get scared, but they all include adding some code. This isn’t as hard as it sounds —if you can copy and paste, then you have all the necessary skills.
At the same time, we’ll also be increasing the time your site allows a file to execute (in this case, how long it takes to upload a file, theme, or plugin).
We will provide a step by step guide, making this as easy as possible. Follow along and make sure you complete all the steps for the method you are attempting. Try the methods one at a time.
If a method doesn’t work you will need to undo what you did before trying a new method. This is important to make sure your website continues working smoothly.
Method 1: Change the functions.php file
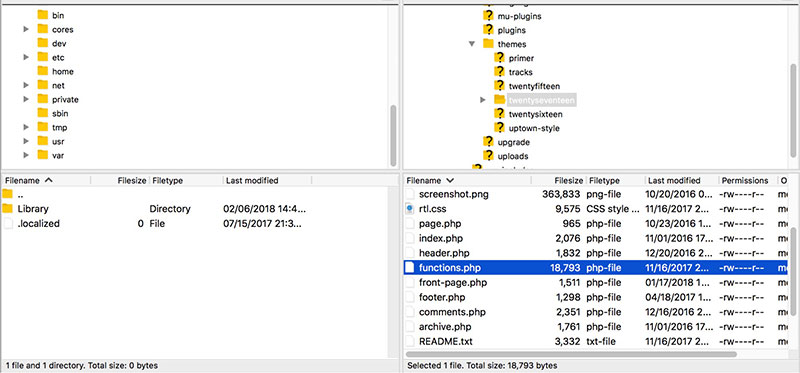
The functions.php file is a core file for WordPress sites. Do remember that the file is linked to the theme you use. So, if you change your theme later, you’ll need to repeat this method to increase the upload size.
It’s a simple file to edit but if you’re considering a new theme, try a different method. Solve the ‘link you followed has expired’ error with the following steps.
Steps
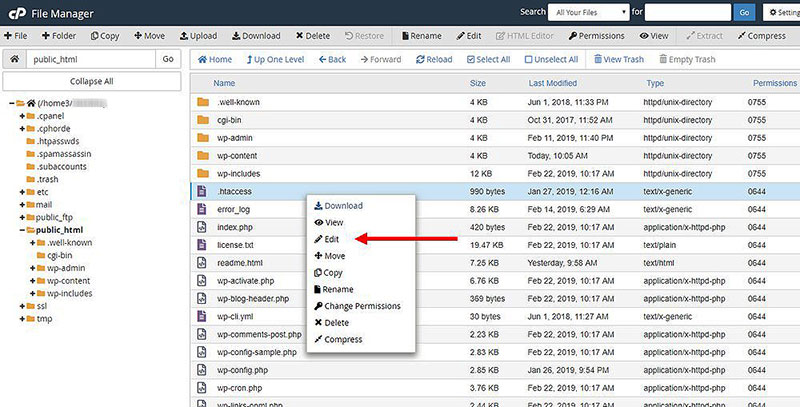
- Find the php file (either via FTP or inside your Admin dashboard at Appearance > Theme Editor)
- Paste this code into it:
@ini_set( ‘upload_max_size’ , ‘100M’ );
@ini_set( ‘post_max_size’, ‘100M’);
@ini_set( ‘max_execution_time’, ‘300’ );
- Change upload_max_size and post_max_size in the above to the size required
- Look at the max_execution_time and change it if it’s not long enough
- Save changes
- Check if the error still occurs
It might be tempting to make these limits massive but be careful as hackers can use this against you. If the timeout value is really high and they get into your website, they could run all sorts of dangerous, long-running scripts. In other cases, a bug might cause a script to take abnormally long to process, which can slow your site down to a standstill.
Method 2: Increase limits in the .htaccess file
It’s also possible to change the .htaccess file to solve your issue.
Here are the steps:
- Find the.htaccess file (usually hidden in the root directory of your WordPress installation)
- At the bottom, add this code:
php_value upload_max_filesize 128M
php_value post_max_size 128M
php_value max_execution_time 300
php_value max_input_time 300
- Save the file
- Check if the issue is resolved
Method 3: Edit the php.ini file
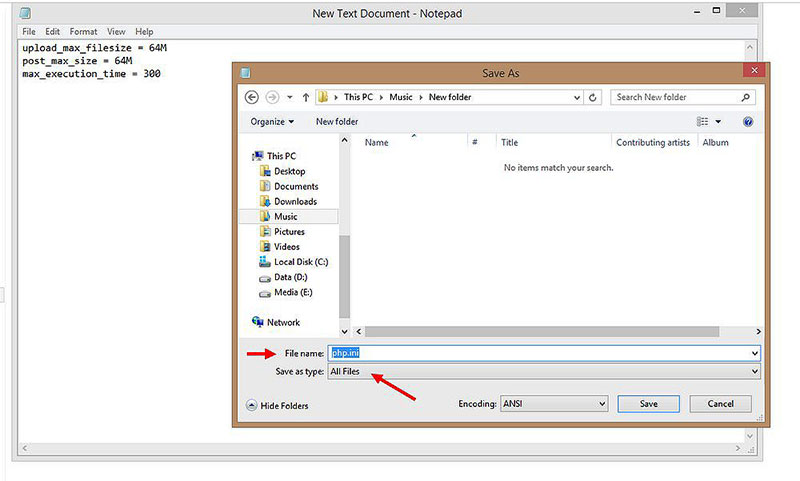
If you can’t find the functions.php or .htaccess files or don’t like to edit them, there’s another method. To solve the issue of “the link you followed has expired”message, you can edit the php.ini file, which contains settings for your server’s implementation of PHP.
Some shared website hosting companies don’t give access to the file, which may be a roadblock for you. If that’s the case for you, it’s best to contact your hosting provider directly.
If you’re sure you have access, you can perform the following steps:
- Access the ini file using anFTP program
- Create a backup copy before editing
- Open the file and search for the following lines which are scattered throughout the file:
memory_limit
upload_max_filesize
upload_max_size
max_input_time
post_max_size
max_execution_time
- Preferably, edit them to the following values:
memory_limit = 256M
upload_max_filesize = 64M
upload_max_size = 64M
max_input_time = 1000
post_max_size = 64M
max_execution_time = 300
Method 4: Contact your hosting provider
You can always contact your host provider to change these settings. They’ll likely ask for a screenshot of the ‘the link you followed has expired’ message so ensure you take one when it happens. If you didn’t, you can recreate the error to get a screenshot.
You could also choose to send them an email explaining the issue. Request that they increase the limits of the following:
memory_limit

upload_max_size

post_max_size

upload_max_filesize

max_execution_time

max_input_time
Try again to see if your file will now upload.
FAQ on ‘the link you followed has expired’ error
What causes “The link you followed has expired” error in WordPress?
This error typically occurs due to file upload limits set by your WordPress configuration or server settings. It often happens when trying to upload large files, install themes, or activate plugins. The PHP settings, particularly memory limit and maximum upload size, play a crucial role here.
How do I increase the maximum upload size in WordPress?
To increase the maximum upload size, modify the PHP.ini file. Locate upload_max_filesize and post_max_size, and set them to higher values. Alternatively, add php_value upload_max_filesize and php_value post_max_size in your .htaccess file. These changes help resolve upload errors.
Can I fix this error using the wp-config.php file?
Yes, you can fix this error using wp-config.php. Add define('WP_MEMORY_LIMIT', '256M'); to increase the PHP memory limit. This adjustment helps in handling larger files during uploads and prevents the link expiration error.
How can .htaccess file changes resolve the issue?
Modifying the .htaccess file can resolve the error by increasing PHP settings. Add directives like php_value upload_max_filesize 64M and php_value post_max_size 64M. These changes ensure your server configuration supports larger uploads, thus fixing the error.
Is there a way to fix this through CPanel?
Absolutely. Use CPanel to access the PHP settings. Navigate to the PHP Selector and increase values for upload_max_filesize, post_max_size, and memory_limit. These settings directly affect your WordPress upload limits, resolving the expired link issue.
Can FTP access help in resolving this error?
Yes, FTP access can be useful. By accessing your site files via FTP, you can manually upload larger files to the appropriate directories, bypassing WordPress upload limits. This method is effective if direct uploads result in the expired link error.
How does the hosting provider influence this error?
Your hosting provider influences this error through server limits on file uploads and memory usage. Contacting your provider for higher limits on PHP memory and upload sizes can resolve the error. They can adjust server settings to support your WordPress needs.
How can I use plugins to fix this error?
Plugins like Increase Maximum Upload File Size can automatically adjust PHP settings and server configurations. Install and activate the plugin, then configure it to increase your maximum upload size and memory limit. This approach simplifies resolving the expired link error.
Are there specific server settings that need adjustment?
Yes, specific server settings need adjustment. Focus on upload_max_filesize, post_max_size, and memory_limit in your PHP.ini and .htaccess files. Adjusting these ensures your server can handle larger file uploads, preventing the expired link error.
What role do file permissions play in this error?
File permissions play a significant role. Incorrect permissions can block uploads, causing the error. Ensure that your WordPress upload directories have the correct permissions, typically 755 for directories and 644 for files, to facilitate successful uploads.
Conclusion
Resolving the issue of how to fix “The link you followed has expired” Error in WordPress can transform your site management experience. This error, often rooted in PHP settings, file permissions, or server configurations, is manageable with a bit of know-how.
Incorporate changes to your wp-config.php, adjust your .htaccess, and leverage FTP access to ensure smooth file uploads. Don’t hesitate to tweak PHP memory limits and maximum upload sizes through CPanel or consult your hosting provider for optimal settings.
By addressing these areas, you’ll ensure that your WordPress environment is robust and efficient. Armed with these insights, you’re prepared to tackle not just this error but also optimize your site’s overall performance. Dive into the details, make the necessary adjustments, and witness a seamless, error-free WordPress experience.
Remember, comprehensive solutions lie in understanding and tweaking your WordPress configuration and server settings. This proactive approach will keep your site running smoothly and efficiently.
If you enjoyed reading this article on “the link you followed has expired”, you should check out this one about WordPress plugin updates failing.
We also wrote about a few related subjects like how to fix sorry, this file type is not permitted for security reasons, how to fix the site is experiencing technical difficulties, how to fix installation failed, could not create a directory, WordPress links not working and how to fix “your connection is not private”.