Ever found yourself locked out of your WordPress admin panel with no way to disable those pesky plugins? Don’t panic. There’s a hidden trick that involves diving into your MySQL database and leveraging phpMyAdmin to regain control. This guide will show you how to disable WordPress plugins from the database, a crucial skill for any serious site owner.
Imagine your site suddenly crashing due to a plugin conflict. You need a solution, and fast. By the end of this article, you’ll know exactly how to access the wp_options table and manually deactivate those troublesome plugins, ensuring your site’s health and security.

We’ll cover the following:
- Accessing your WordPress database using phpMyAdmin
- Locating and editing the wp_options table
- Safely disabling plugins to troubleshoot and resolve issues
Ready to become a WordPress troubleshooting pro? Let’s dive into the details and get your site back on track.
Table of Contents
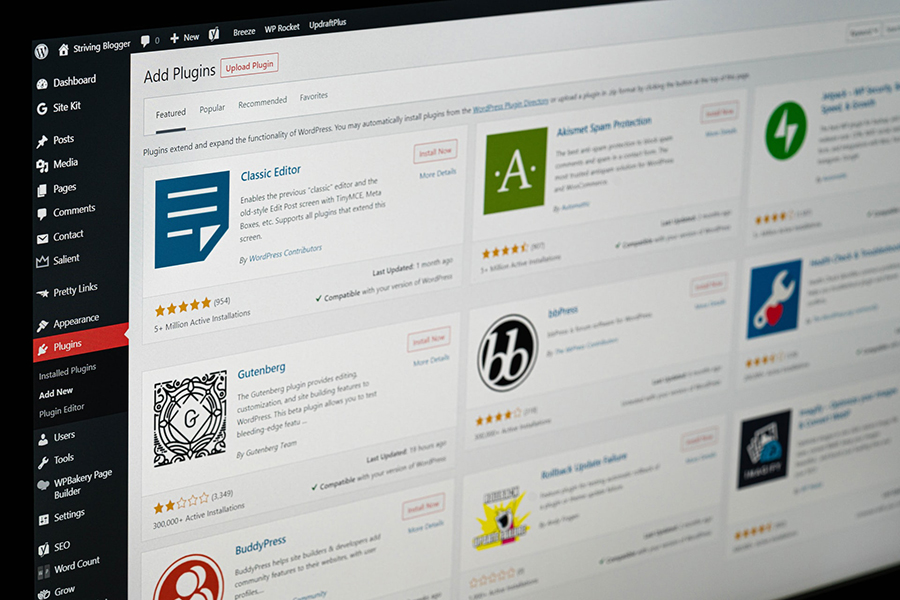
Why Disable a WordPress Plugin

This post discusses the main reason above. WordPress plugins can stop working for some reason and cause the whole site to stop working.
So, preventing website downtime is the primary reason to deactivate a plugin. Sometimes it’s necessary to do this before a plugin starts causing trouble.
Related to this are website security reasons. A malfunctioning plugin can cause a breach in the safety of a website.
Besides eliminating a plugin, WordPress offers the option of deactivating one. Uninstalling a plugin is not always the best option, especially if the plugin is useful in the short term.
If the plugin is not needed for some time, turning it off is a good option. Deactivating a plugin is also a practical approach to finding out if it is the root cause of problems on a website.
If the problems disappear after deactivating a plugin, it is clear that that one is the culprit. The next step is then deleting it.
The problem caused by a faulty plugin may be so deep that the WordPress dashboard becomes inaccessible.
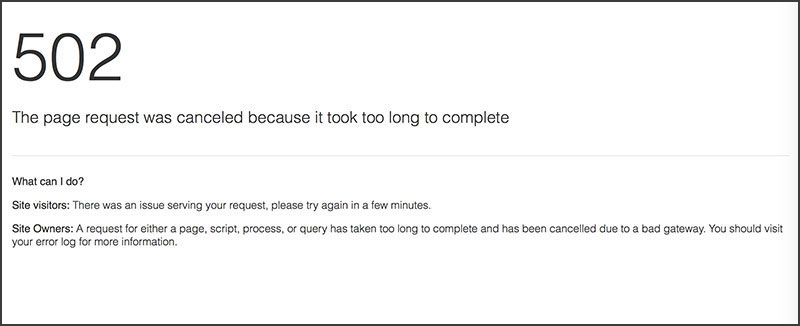
Some errors, like 502 and 504, are not straightforward to fix. Again, it could be a plugin that is causing them.
Generally speaking, whenever a plugin is failing it is a good idea to try and deactivate them.
When identifying which of the plugins is at fault, the easiest and fastest approach is to deactivate them one by one. This approach is better than deactivating them all at the same time.
Deactivating them all at the same time makes the identification process harder. It may even cause more problems with the WordPress site.
Disable Plugin via the Database

The WordPress Database plays a central role in the functioning of a WordPress site. It contains all the basic information for its functioning.
The status of plugins is also controlled from there. So, disabling a plugin is quite straightforward using the database.
All that is necessary is a program like phpMyAdmin. This is available from the web host’s control panel and allows access to the database.
Why through the Database
The main advantage of making changes through the database is that it does not alter the file structure.
Changing the name of the plugins folder will also deactivate them. But it has many other unwanted side effects too.
So, the backdoor solution of disabling plugins in the database is much faster and sager.
Quick Steps
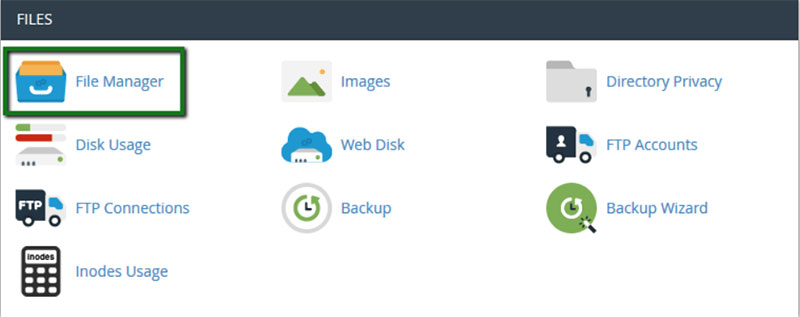
- Login to cPanel
- Go to File Manager
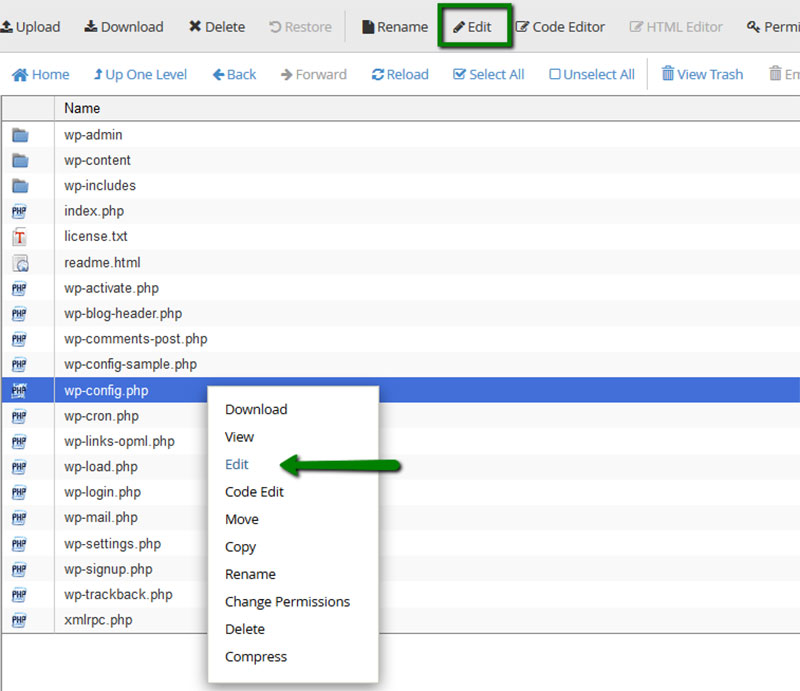
- Use the wp-config.php configuration file to identify the database in question. The wp-config.php is in the website’s root documents.
- Go to phpMyAdmin.
- Select the Database
- Click the table with the label wp_options
- Go to active_plugins
- To disable a plugin change its option_value to a:0:{}
- Save the changes
Access the Database
The phpMyAdmin is a popular tool for accessing a WordPress Database. Most hosts include it in their control panels and it is what this article uses too.

The wp-config.php file contains most of the configuration settings of the website. It contains a variable DB_NAME that specifies the database name.
Check it if in doubt about the exact name that is in use for the specific website.
Usually, this file is in the document root directory. Use the File Manager under Site Tools to open it.
After opening phpMyAdmin go to the left panel to select the WordPress database.
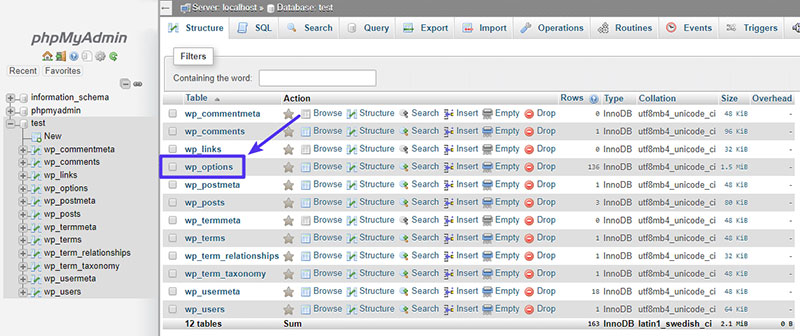
Open options Table
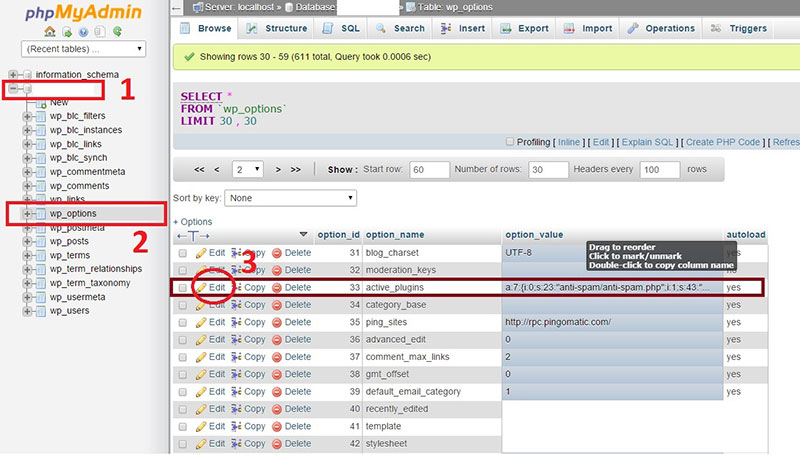
To make changes to the database, open phpMyAdmin through cPanel. Locate the desired database and click the +-sign next to it.
This will unfold a menu that shows all the tables in that database. Go to the table with the name wp_options.
It is possible that the name’s prefix is different, for example, wppa_options.
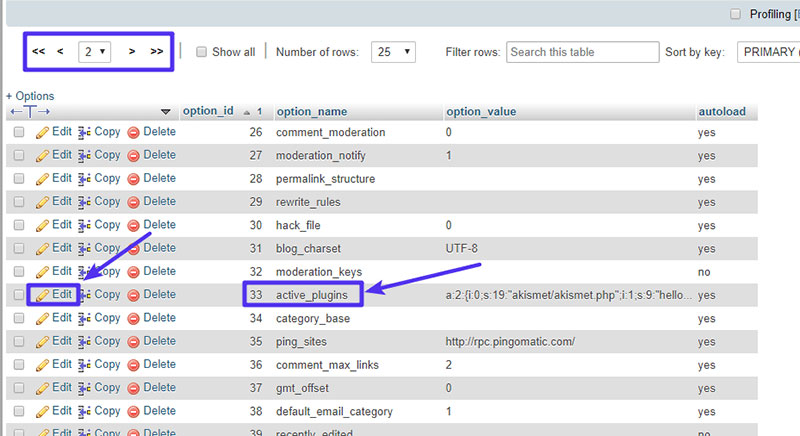
Now, on the right, a list of table rows will appear. In this list find active_plugins.
It will be on the second page under option_name.
For each plugin, there is an option_value section. Copy this part and save it somewhere.
This makes it easier to return to the original value. Having completed these steps it is time to make changes.
Edit active_plugins Value
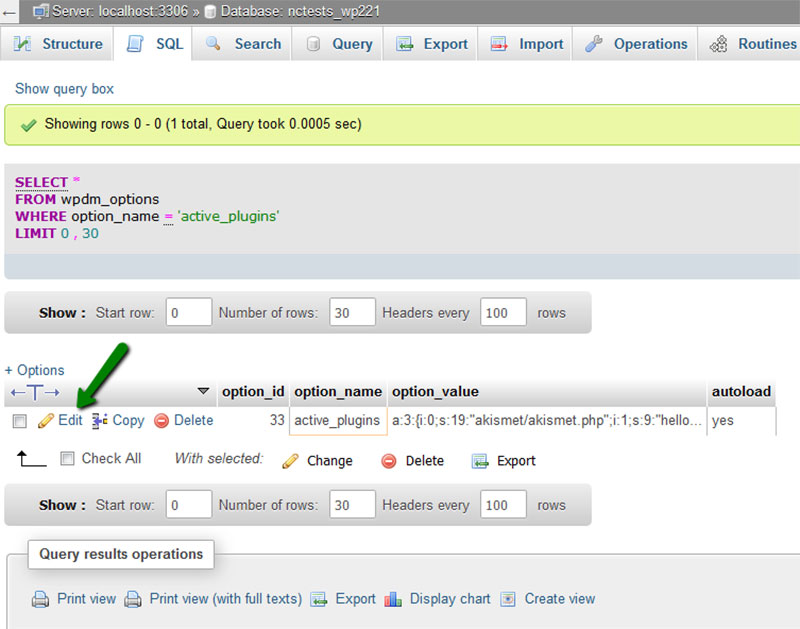
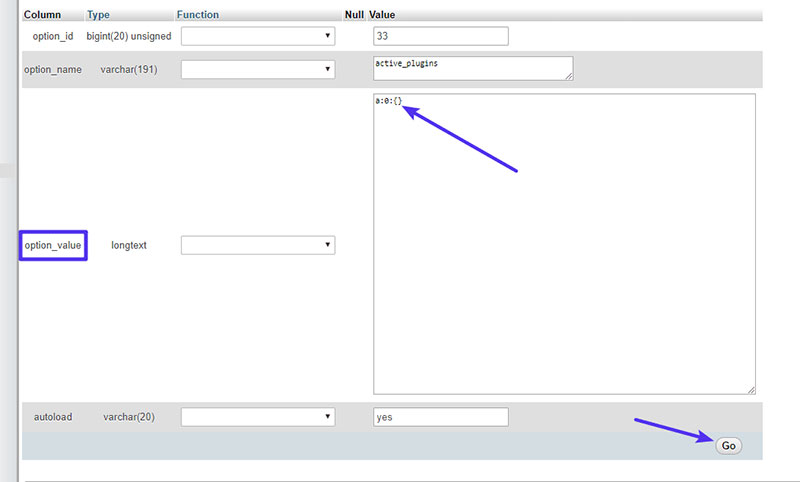
Now one can start editing. To start editing, click the Edit button for the specific row.
There is also a red X button. Clicking the red button will delete the whole row.
This does not mean that it will delete the whole plugin, but it does deactivate them. Use WordPress to enable them again.
To disable the plugin replace the content under option_value with a:0:{}. The number after “a:” is the number of plugins that are currently enabled.
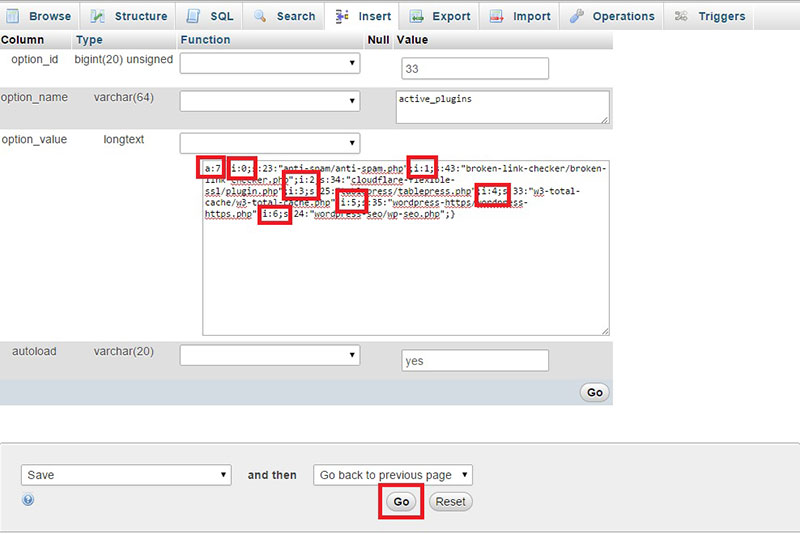
So, if there are two active plugins, the option_value should start with a:2.
That means that, if disabling one plugin, the value should change from a:n to a:n-1, where n is the number of active plugins. Below is a practical example, where the number of active plugins is 5:
a:5:{i:0;s:19:”akismet/akismet.php”;i:1;s:33:”classic-editor/classic-editor.php”;i:2;s:9:”hello.php”;i:3;s:23:”loginizer/loginizer.php”;i:4;s:24:”wp-central/wpcentral.php”;}
To deactivate all plugins use the value a:0:{}.
Below is the same line where one plugin, the Akismet plugin used in the example above, is turned off:
a:4:{i:1;s:33:”classic-editor/classic-editor.php”;i:2;s:9:”hello.php”;i:3;s:23:”loginizer/loginizer.php”;i:4;s:24:”wp-central/wpcentral.php”;}
After making all changes, save them. The plugin or plugins are then deactivated.
It is important to note that the prefix of the table’s name does not always start with wp_.
Use the phpMyAdmin tool to check the correct prefix. It will appear after selecting the WordPress database.
Now open the website. If the broken plugin was deactivated, the website should function correctly now.
That means that the dashboard should also be accessible again.
This is handy to reactivate the plugins again one by one. If the website stops functioning again, this identifies the guilty plugin.
Return to the database to disable WordPress plugins to reactivate the site again. Then uninstall the plugin and look for a replacement.
FAQ on disabling WordPress plugins from the database
How can I access my WordPress database to disable plugins?
First, log into your hosting account and open phpMyAdmin. Select your WordPress database from the left panel. This tool lets you manage your MySQL database. Navigating here is the first step to accessing the wp_options table where plugin settings are stored.
What is the wp_options table, and how does it relate to plugins?
The wp_options table holds various settings for your WordPress site, including active plugins. By editing this table, you can manually disable problematic plugins. Look for the row with the active_plugins option name to make changes.
Can I disable all plugins at once from the database?
Yes, you can. In phpMyAdmin, locate the active_plugins row in the wp_options table. Edit its value by deleting the contents of the option_value field. This action deactivates all plugins without accessing the WordPress admin panel.
How do I disable a specific plugin from the database?
Find the active_plugins row in the wp_options table. Modify the serialized array in the option_value field. Remove the line corresponding to the plugin you want to disable. Save changes, and that specific plugin will be deactivated.
What should I do if I don’t see the wp_options table?
Ensure you’re in the correct MySQL database for your WordPress installation. Sometimes the table prefix might differ, such as wp123_options. Check your wp-config.php file to confirm the table prefix used by your site.
Can disabling plugins from the database cause issues?
Generally, no, but it’s essential to back up your database before making changes. Incorrect modifications can disrupt your site. Always ensure you follow the steps accurately to avoid potential issues.
How do I back up my database before disabling plugins?
In phpMyAdmin, select your WordPress database and click on the Export tab. Choose the Quick export method and download the SQL file. This backup ensures you can restore your site if something goes wrong.
Why might I need to disable plugins from the database?
Sometimes, plugin conflicts or errors can lock you out of the admin panel. Disabling plugins via the database is a reliable way to regain access and troubleshoot issues without waiting for external help.
What are common errors that indicate a need to disable plugins from the database?
Common errors include the White Screen of Death, 500 Internal Server Error, and site crashes post-plugin update. If you face these, disabling plugins through the database helps in diagnosing and fixing the problem.
Can I re-enable plugins from the database after disabling them?
Yes, you can. Reverse the process by editing the active_plugins row in the wp_options table. Add the necessary plugins back into the serialized array in the option_value field. This will reactivate the plugins you need.
Conclusion
Disabling WordPress plugins from the database can seem daunting, but it’s an essential skill for resolving plugin conflicts and restoring site access. By understanding how to disable WordPress plugins from the database, you gain control over your site’s functionality, even when locked out of the admin panel.
Key Takeaways:
- Access phpMyAdmin through your hosting account.
- Locate and edit the wp_options table.
- Modify the
active_pluginsrow to deactivate plugins safely.
This approach ensures your WordPress site remains operational, regardless of front-end access issues. Backup your database before making any changes to avoid potential data loss. This method allows for precise troubleshooting, helping you identify and resolve problematic plugins efficiently.
By following these steps, you’ll enhance your ability to manage your WordPress site, ensuring smooth operations and quick resolutions to common plugin-related problems. This proactive approach to WordPress plugin management safeguards your site’s stability and performance, keeping your online presence robust and reliable.
If you enjoyed reading this article on disabling WordPress plugins from the database, you should check out this one about how to make a phone number clickable in WordPress.
We also wrote about a few related subjects like how to check the WordPress version, how to upload an HTML file in WordPress, how to embed a Facebook video in WordPress, where are WordPress pages stored, why is WordPress so hard to use, how to hide the author in WordPress and how to delete WordPress themes.