It is not an easy task to set up an online store. But, luckily there is WooCommerce! This is an efficient and customizable eCommerce platform, one of the best currently available. This is the most common choice by many to create a profitable eCommerce shop. It converts the standard WordPress operating system into a fully functional eCommerce store.
It is an eCommerce platform for building your online business. In other words, WooCommerce is a kind of WordPress plugin.
If you want to sell any kind of product, especially the physical ones, one of the essential components to think about is shipping methods. Shipping is one of the main things in doing online business. Customers who want to purchase goods online look for a way to spend the least amount of money possible. Plus, they want their order to arrive as soon as possible and without any damages. It is essential to have a simplified shipping method. Shipping is, after the product price, the second thing all customers look for.
To make all this easier and to ensure everything goes smoothly, we will teach you how to set up shipping in WooCommerce. In this article, you will find out some important information about WooCommerce shipping, shipping classes, shipping zones, different shipping methods, free shipping, flat rate, different WooCommerce shipping options, and much more.
Table of Contents
Backup and Update Your Store
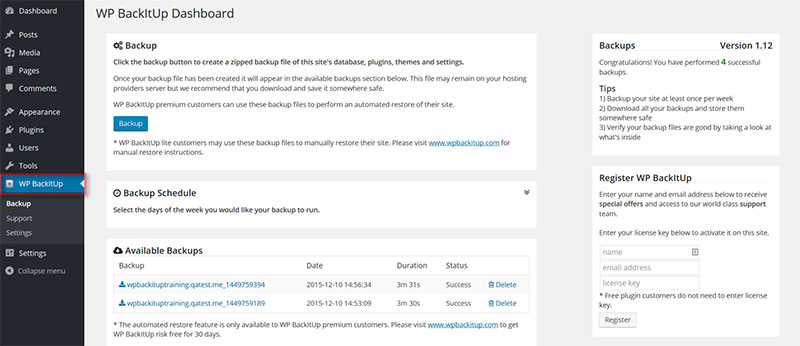
Do you already have your store opened for work and business running? If yes, be sure you do a full backup before you make any significant changes. This way, if something goes wrong, you will have your backup safely stored to restore it if needed. We recommend you use Jetpack Backup to do this.
After you finish with the backup, update your WordPress, WooCommerce, theme, and all the plugins you are using at the moment. This is important so you make sure they are compatible with any new extensions you might start using in the future.
Configure WooCommerce Settings
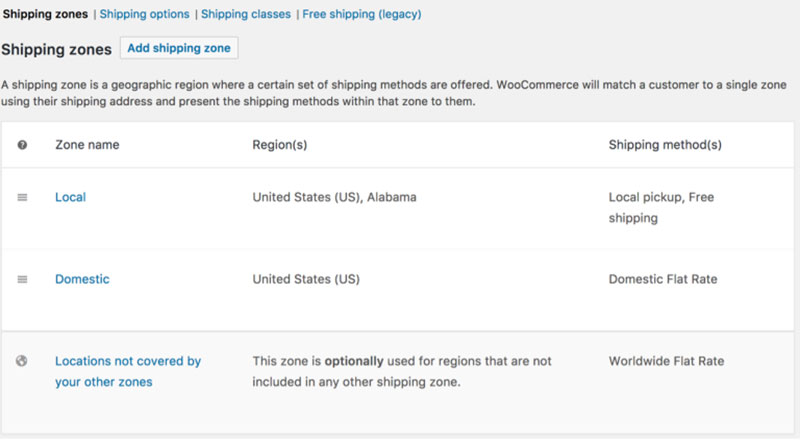
If you want to know how to set up shipping in WooCommerce, you have to learn how to set up some basic configurations. This is essential for setting the shipping method for your shop. The three main aspects to consider are shipping classes, shipping zones, and shipping methods.
Shipping Classes
The WooCommerce shipping classes are designed to take less of your time. It will make setting up shipment methods and fees quicker. You should know, the fee depends on the weight, amount, and specific traits of product customers are ordering. Shipping class cost may vary from group to group.
With shipping classes, you will be able to sort resembling products in groups. After they are sorted into these groups (or shipping classes) you assign a shipping method for an entire group of similar goods.
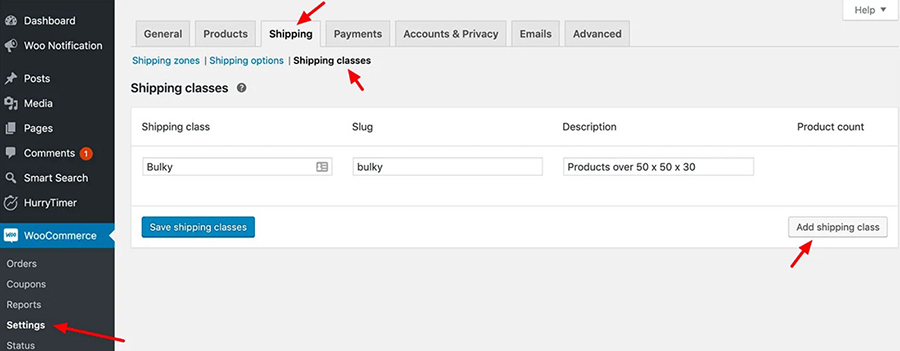
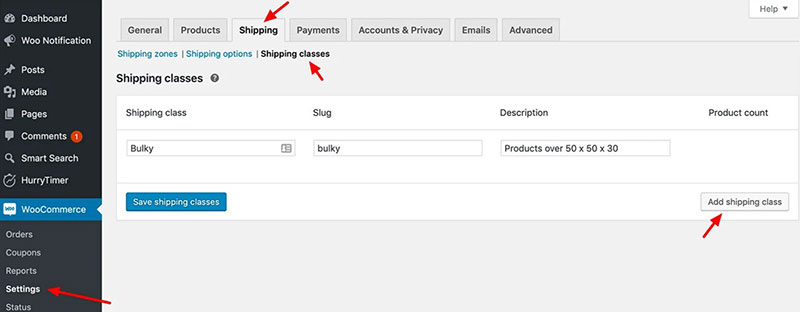
Here is the explanation on how to add shipping class:
- Find Setting in Woocommerce
- Click on Shipping Classes
- Click on Add Shipping Classes
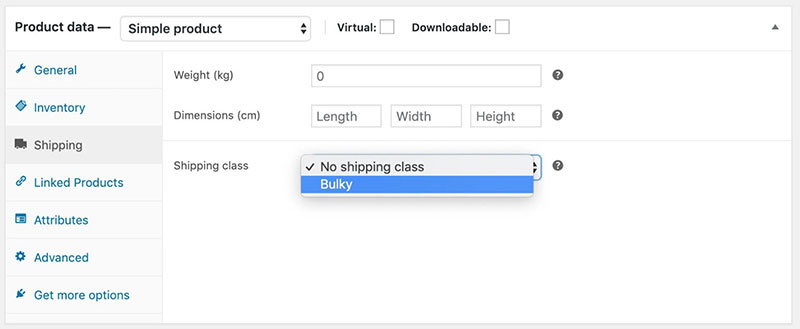
- A new line will pop up. Here you can type in a shipping class name, ID and a description.
- Click Update to save your changes and publish them.
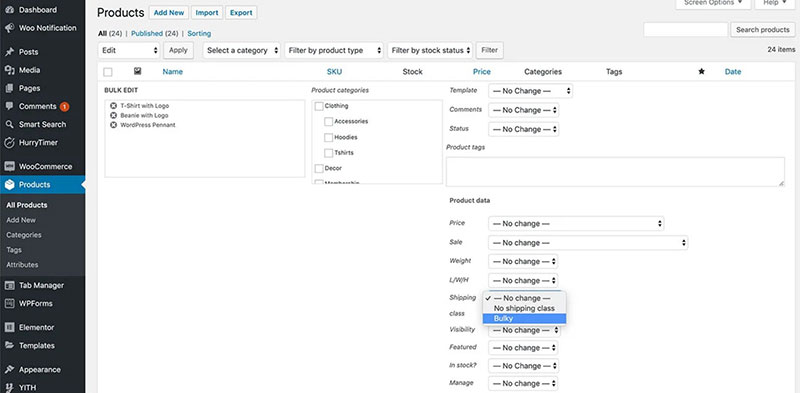
- Sort products in suitable groups/classes
Shipping Zones
One of the main components when learning how to set up shipping in WooCommerce is the shipping zones. Shipping zones are referring to specified locations to which orders will be shipped and delivered. The shipping zone can be either city, country, a location on the other side of the planet Earth. Different shipping zones mean different shipping rates.
But, as you probably already know, there are different rules for different regions. One shipping zone might be further than your location, and the other can be in your country. Further the customer’s location, the higher the shipping cost.
Once again, WooCommerce eases the process of setting these various options for different regions. The best thing is, with the use of WooCommerce, you won’t need any additional plugins or extensions.
With the use of Woocommerce, you will be able to determine shipping charges according to the location a customer sets on their profile. This will give clear information to customers and put off any high delivery prices in different shipping zones.
Here is what you need to do to add shipping zone:
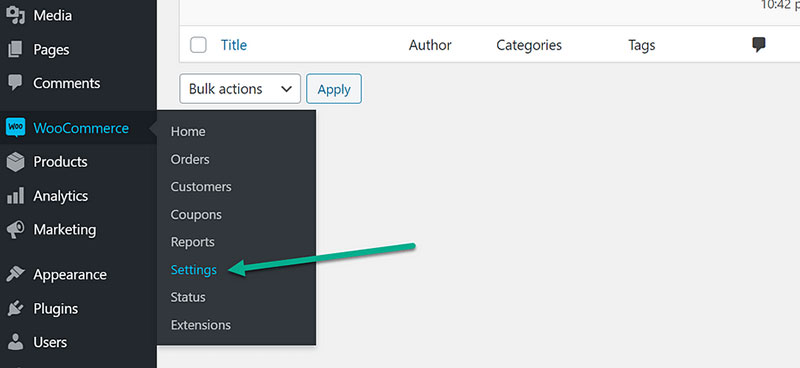
- Go to WooCommerce and click on Settings
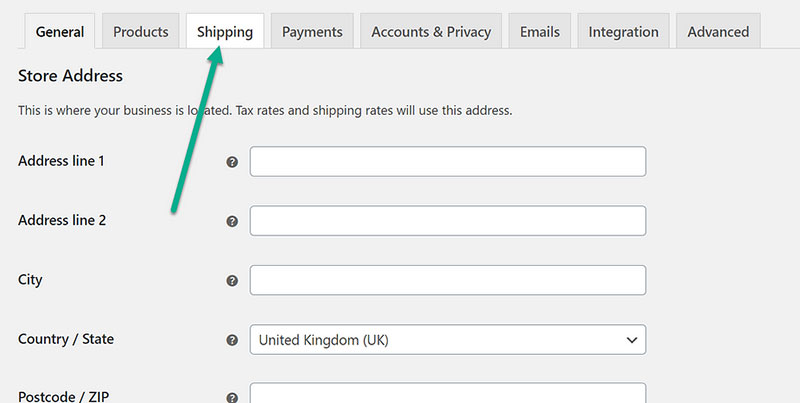
- Click Shipping and find the add Shipping Zone option
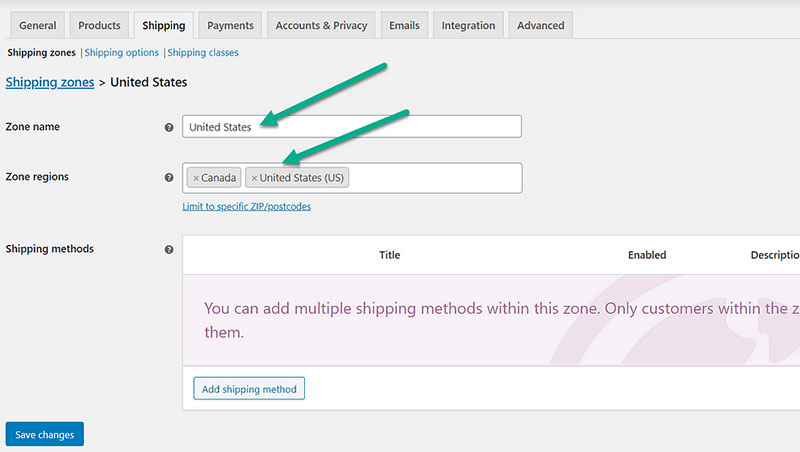
- In a new window, you will be asked to enter the name of the zone and to mark geo-location.
- Click on Add Shipping Method and select the shipping option you want to assign to this specific zone
Sometimes, the customer will enter their shipping address and there won’t be any shipping methods for their zone. For example, you are living in southern Europe and you want to have something delivered from the USA. It is not a rare case shipping rate to be too high or not to have any shipment method offered.
Shipping Methods
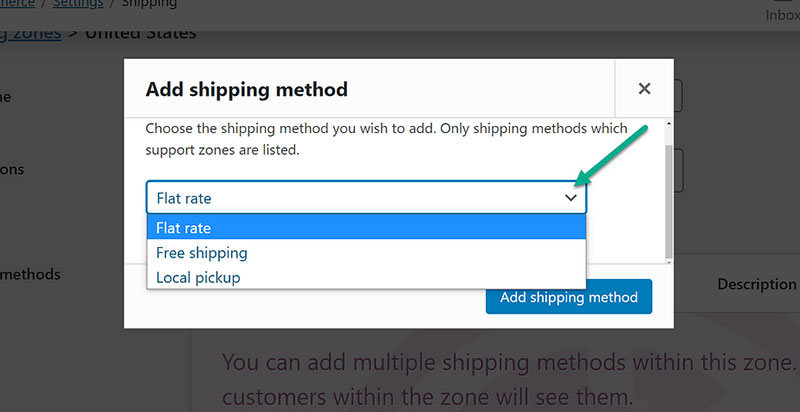
If you want to optimize your client’s experience, it is good to offer them some extra shipping options. Shipping methods refer to offering various ways in which you may deliver goods to your buyers. It also determines shipping costs for different customers. The shipping costs depend primarily on their location compared to yours. Implementing delivery dispatch software can help you seamlessly manage these shipping options, ensuring efficient order fulfillment and enhancing the overall satisfaction of your customers.
There are three basic and most common shipping options provided by WooCommerce. You can assign with ease them to any of the shipping zones:
1. Free Shipping
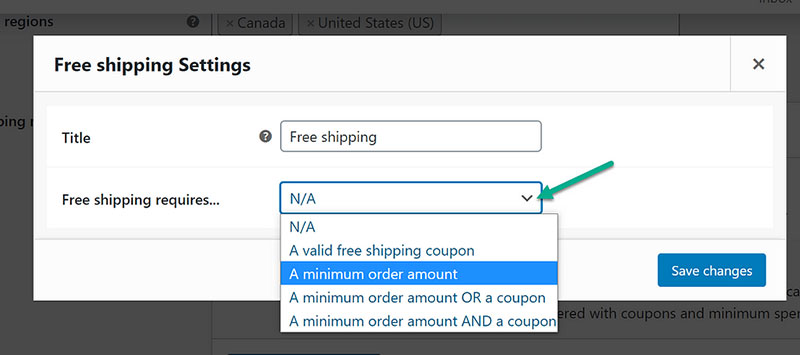
This shipping method is the customer’s favorite one! If you decided to use this shipping option, there is no fee when delivering products. No shipping costs! If you can offer free shipping in your business, this might get you a lot of customers.
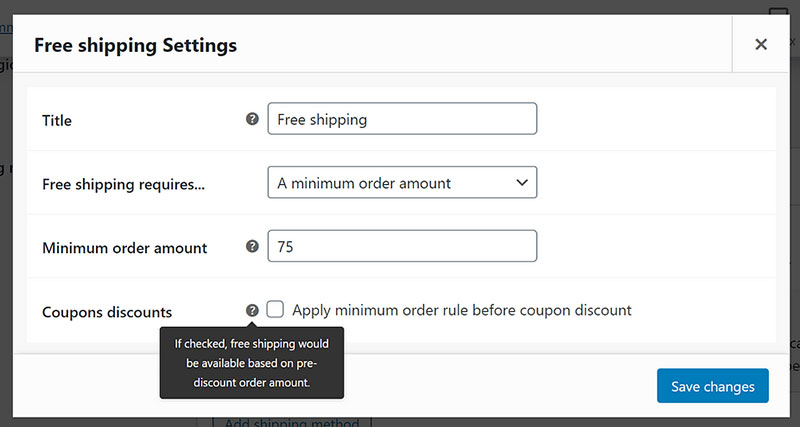
They might not pay the shipping cost, but you will sell more and get the buyer’s attention. This could bring you a to of benefits so come up with a good plan. For example, if the shipping cost is very low, you might deliver these products for free.
2. Flat Rate Shipping
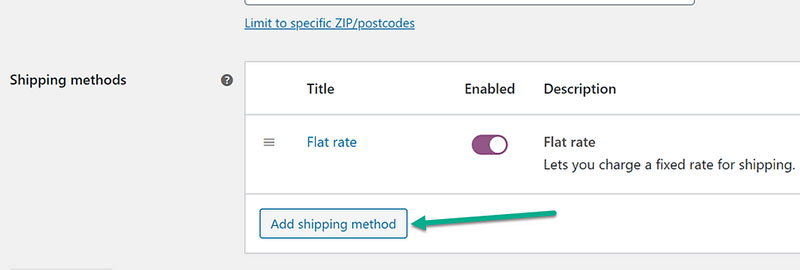
This option entails charging a set amount for shipment anywhere within a specific shipping zone. This shipping method is good if you want to set a shipping charge for one item only or a minimum and a maximum number of products bought.
3. Local Pickup
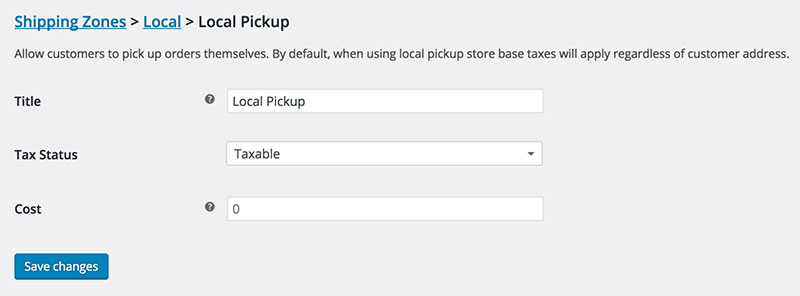
This shipping method is actually no shipping at all. If you choose this option, customers will come to you on their own and pick up their orders. They may pick it up at your store or distribution center. YOu might also be a partner with a certain store and receive products buyers can pick up at any time.
Install Plugins and Activate Shipping Extensions
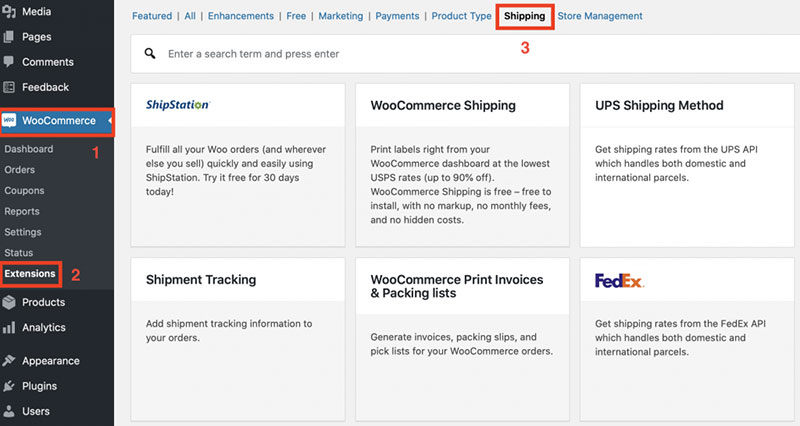
Label printing, tracking numbers, and warehouse syncing are just a few of the features that you may add if you use extensions. We recommend you begin by getting a WooCommerce Marketplace addon.
One of the great traits of WooCommerce is that you can customize your default settings to make them more intriguing.
The same goes for shipping options. You can drastically boost up and improve the efficiency of your delivery plan.
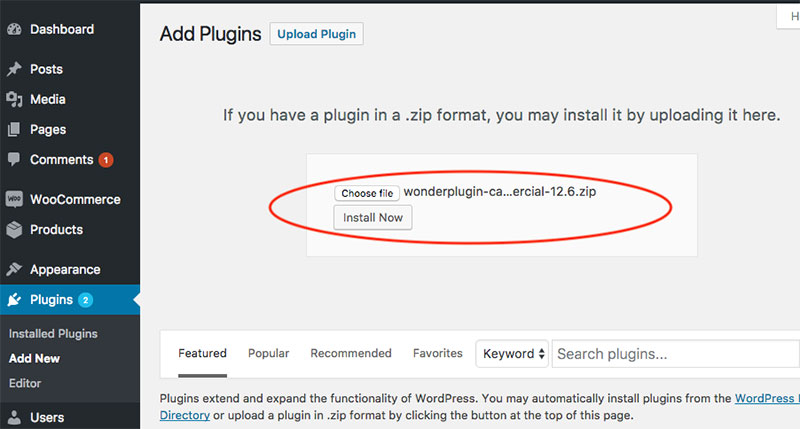
Go to your WordPress dashboard and search for Plugins Add New option. Once you do, select Upload Plugin. To enable it in your online shop, choose the extension ZIP file stored on your PC and click Activate.
Adjust Shipping Setting to Meet the Need
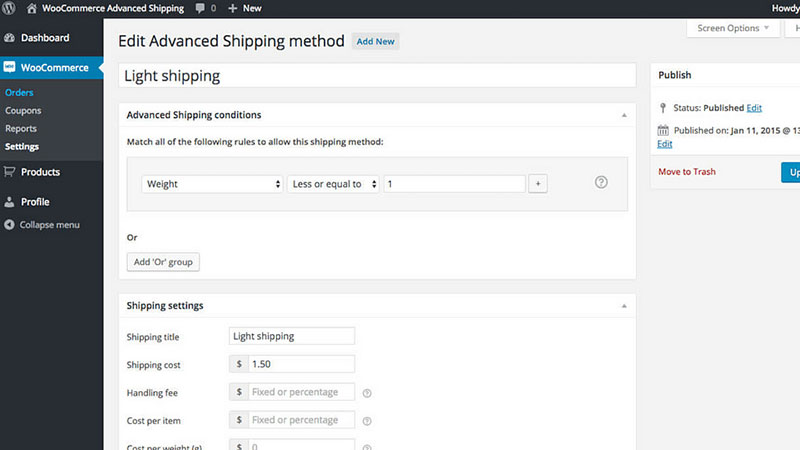
To make your setting more interesting, WooCommerc allows you to customize the default settings however you like. Because every extension has its own options in the offer, there is a slight difference in the instructions on how to use each of them. You can also improve your shipping methods by using various plugins.
When offering different shipping plans, you must look for the best shipping services possible. Tracking packages is essential for high-quality WooCommerce shipping services. Nowadays, online shopping cannot even be imagined without tracking the order option.
Including tracking in your shipping method will save your time and energy. You will avoid answering tons of emails or calls by people asking about their orders. WooCommerce offers a Shipping Map option too. With this feature, customers can track their orders via Google Maps.
Test Your Shipping Strategy
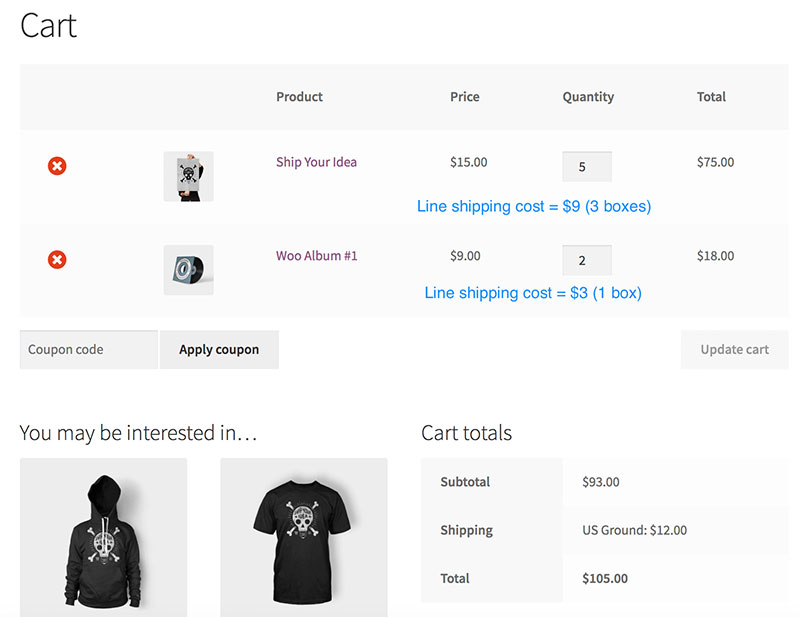
You must make sure your website works perfectly. If it doesn’t, customers will lose their interest fast, even if the products in your store are great. This is why we recommend you test out your WooCommerce shipping methods before you offer them to the customers.
It is good to these all the aspects of your website before you publish it online. So here are some of the things to pay attention to:
- Test a product from every shipping class and shipping zone you have included.
- Test various combinations of products and different cart sizes. Double-check are the shipping methods are applied correctly.
- Go through the checkout process from beginning to end. Check if the shipping method synchronized correctly, especially if your site uses a third-party tool.
- Always attach tracking numbers to the emails sent to your customers. Also, make sure they are visible on their account pages.
- In the case of live rates, check if the carrier’s cost and the cost buyers see are the same.
- Go through shipping and return policies.
- Check if discounts and free shipping options are visible and clear to your customers.
When you run an online business, shipping is one of the most critical components. This is why knowing how to set up shipping in WooCommerce is useful and important to learn. If your shipment options are not clear, troublesome, or the is no tracking option, this might chase away many potential customers. Just think about all the negative reviews you might get.
Shipping is the most complicated aspect of running an online store. This is why it is very important to learn or the essential aspects of the shipping process. Starting from the shipping classes, various shipping methods, organizing shipping zones, determining shipping costs, free shipping benefits…
Building your online business is a challenge, but WooCommerce will help you in this aspect. WooCommerce, the most customizable platform to help you in running an online store. We hope this article was helpful if you had any trouble setting up shipping options.
FAQ on setting up shipping in WooCommerce
How Do I Start with WooCommerce Shipping Settings?
Alright, diving straight in, the first thing you wanna do is go to your WooCommerce dashboard, then click on ‘Settings’ and hit the ‘Shipping’ tab.
Here, you’ll find options to add shipping zones, which is basically grouping regions together based on how you want to charge for shipping. It’s all about setting the right WooCommerce shipping zones and methods to make sure everything’s smooth sailing for your customers.
Figuring Out the Whole Shipping Zones Thing
Now, when we talk about WooCommerce shipping zones, think of it as creating different buckets for different places. You’re basically telling your store, “Okay, for these areas, I wanna charge this much, and for those areas, another amount.”
You set it up based on regions, countries, or even zip codes. It’s kinda like creating little shipping clubs, and each club has its own rules.
Setting Up Different Shipping Methods, What’s the Deal?
Alright, so you’ve got your zones ready. Next up? Deciding how you’re gonna send stuff out. That’s where WooCommerce shipping methods come in.
You can choose from flat rates, free shipping, or local pickup. It’s kinda like choosing different vehicles for different trips, and each one has its own cost and rules. You can even add WooCommerce shipping plugins for more options.
What If I Want to Offer Free Shipping?
Ah, everybody loves free stuff, right? Now, setting up WooCommerce free shipping is pretty straightforward. You create a new shipping method in your zone, choose ‘Free Shipping,’ and then decide the conditions.
Maybe it’s for all orders, or maybe just the ones over 50 bucks. It’s like throwing a little party for your customers and picking up the tab on the delivery.
Can I Charge Based on How Much Stuff Weighs?
Absolutely, you can! WooCommerce weight based shipping is all about charging customers based on how heavy their order is.
You might need to add a plugin or extension to get this set up, but once you do, it’s like having a little scale in your store, weighing everything and figuring out the shipping cost.
How About Calculating Shipping Costs Automatically?
So, you’re looking for the WooCommerce shipping calculator vibe, huh? There’s a bunch of extensions and plugins out there that can hook up to carriers like USPS, FedEx, or UPS, and they’ll calculate the shipping costs in real time.
It’s like having a little assistant in your store, doing all the math and telling customers what the deal is with shipping.
Speaking of Carriers, How Do I Add Them?
Wanna get the big guys like WooCommerce USPS shipping, or FedEx, or UPS into your store? You’re gonna need to get some specific extensions for each carrier.
Once you’ve got those installed and set up, it’s like giving your store a direct line to the shipping gods, and they’ll take care of the rest.
How Do I Print Shipping Labels?
So you want to turn your WooCommerce store into a little post office, huh? There are extensions out there that’ll let you print WooCommerce shipping labels right from your dashboard.
You just gotta get your settings right, and then it’s as easy as click, print, and slap that label on the box.
I’ve Got Local Customers; Can I Set Up Delivery for Them?
Setting up local delivery in WooCommerce? Absolutely doable. You can set up a shipping zone that’s just for your local area, and then create a local delivery shipping method. It’s like telling your store, “Hey, these are our neighbors; let’s make sure they get their stuff quick and easy.”
Something’s Not Working Right; How Do I Fix It?
Ran into some WooCommerce shipping issues, huh? Don’t sweat it. First thing to do is check your settings, make sure everything’s set up right. If that doesn’t fix it, there might be a plugin causing trouble, so try deactivating them one by one and see if that sorts it out. Worst case, hit up the WooCommerce support or a developer, and they’ll get you back on track.
If you enjoyed reading this article on how to set up shipping in WooCommerce, you should check out this one about how to make a phone number clickable in WordPress.
We also wrote about a few related subjects like WooCommerce payment gateways, best WooCommerce plugins, WooCommerce vs PrestaShop, the best free WooCommerce plugins, and PayPal vs Stripe in WooCommerce. By the way, we liked this article with WooCommerce shipping plugins. Not ours, but still good.
