A WordPress site is not a static thing. To maintain steady growth, regular upgrades, modifications, and new features are vital.
When updating a WordPress site it is wise to test it before making it available for everyone. This is also true when integrating new plugins or themes.
Failing to do so can result in a poor user experience.
When making these tests, many users create a copy of their site. For someone without experience, making a copy of a live WordPress site may seem daunting.
But making a local copy of a WordPress site is not hard to do. It will only take a few minutes.
This article describes in a few simple steps how to create a local copy of a live WordPress site. Following these steps will result in a copy of the live site in a few moments.
All of this without taking the website offline.
Table of Contents
Preparations for Moving a Site to a Local Server
Applications like WAMP and MAMP create a local server environment. This is very useful.
Users can install packages like WordPress and develop and build a site on a local computer. Then when the site is ready on the local computer, they can transfer it to the live server.
Before going live, many first transfer it to a local server. From there they test plugins, themes, and WordPress updates.
To do that the whole site must be moved to a localhost environment. Do this by going to phpMyAdmin in a browser:
http://localhost/phpmyadmin/
http://localhost:8080/phpmyadmin/
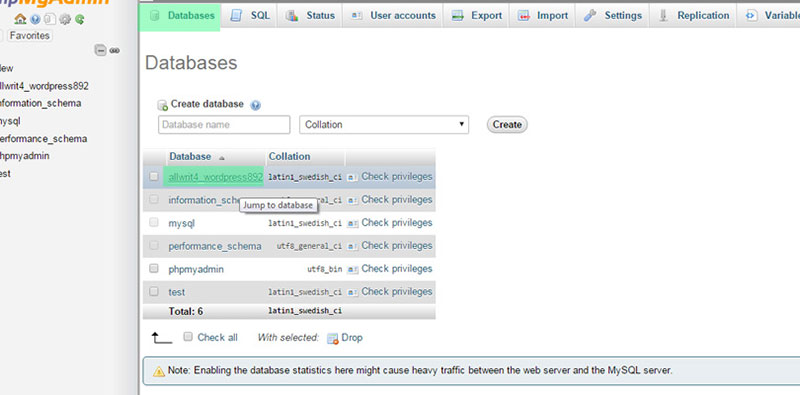
In phpMyAdmin go to Databases and create a new database. This is necessary later for unpacking the site data.
Download Live WordPress Site Files
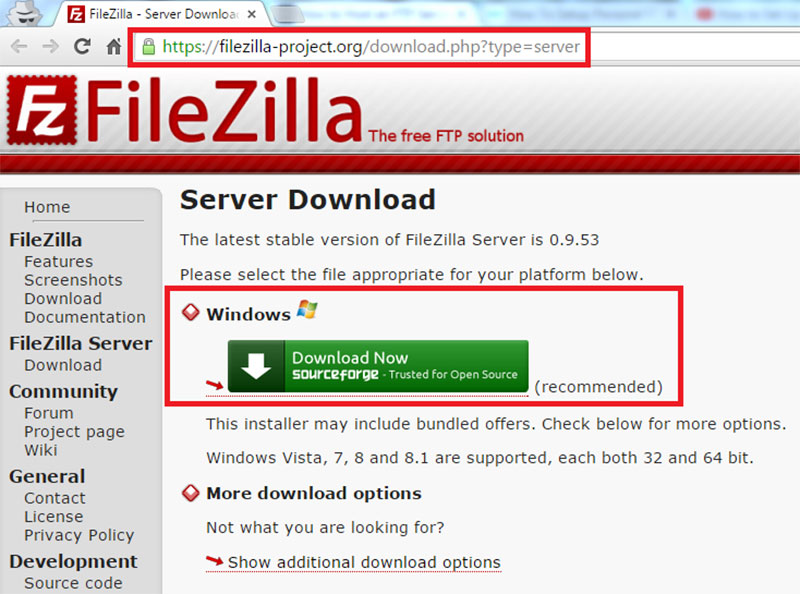
With that done, download the WordPress site’s files. Use an FTP client to connect to the live site.
A well-known and often used FTP client is FileZilla. Open the client, connect to the hosting server, and download all files of the site to a local computer.
Usually, WordPress uses a /public_html folder for the website’s files but the name can differ. WordPress allows the user to change to a different folder name during installation.
The download time depends on the size of the site and the number of files, but it can take a while. It is possible to continue with some of the subsequent steps while the site is downloading.
Therefore, it is smart to start with this step.
In FileZilla choose the location on the local server to save the files to. Under the Remote Site section, select the files to download and then click Download.
The download option is in the menu which appears after right-clicking with the mouse.
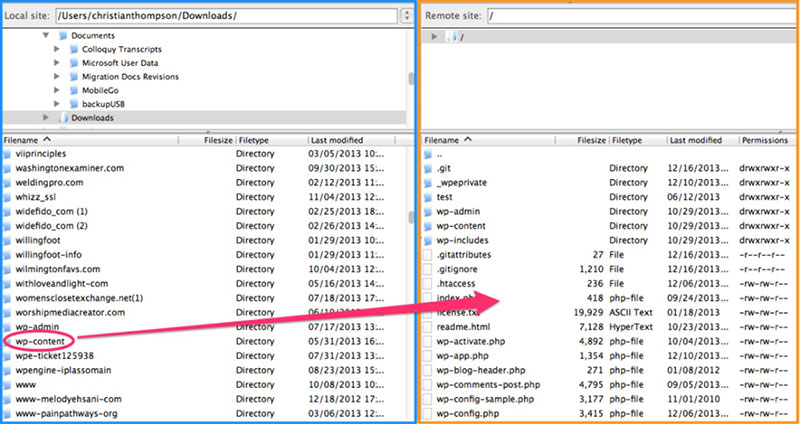
Make sure to download folders with the names wp-admin and wp-content. They house files like index.php and wp-config.php that are important for the functioning of the site.
When the download has finished go to http://localhost/yourfoldername/. This is the address of the localhost server.
Check if the files transferred correctly. It could be that there is a database error like this one:
Export The Site’s Database
The core of a WordPress site is the associated database. This database is not included in the files that were downloaded in the previous step.
So, it is necessary to download it separately.
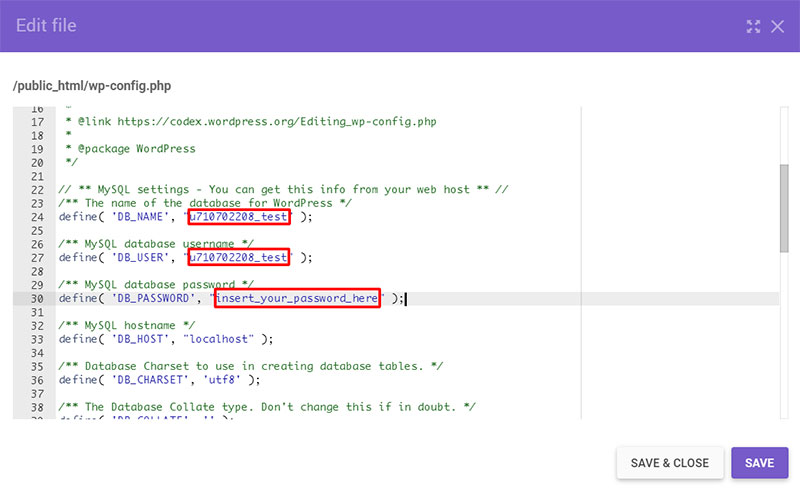
First, figure out which is the right database. That is information contained in the files that were already downloaded.
- Go to the copy’s root directory.
- Open the wp-config.php file in a normal text editor.
- Look for this line:
- Note the name of the database.
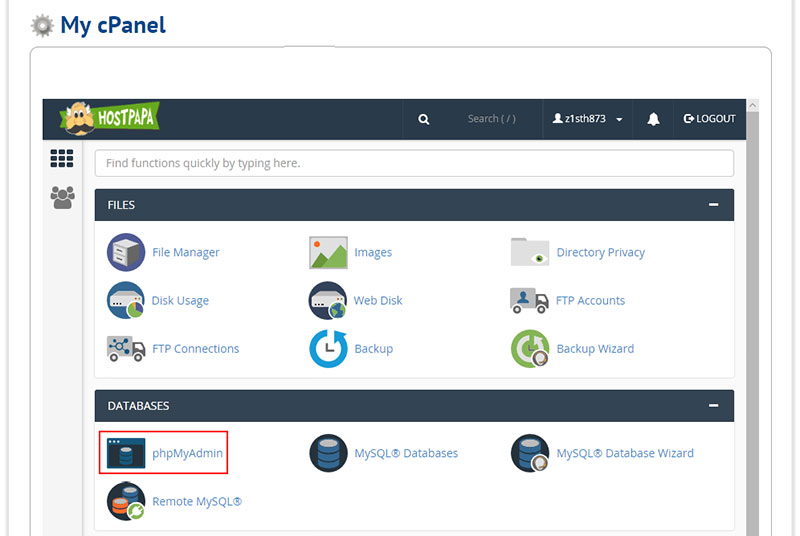
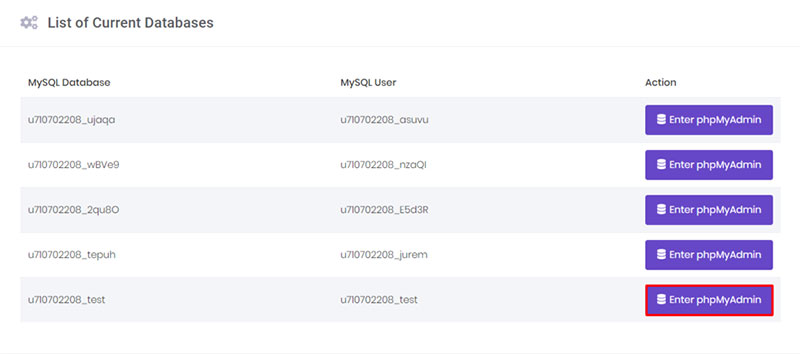
- Login to the hosting account.
- Go to cPanel.
- Click on phpMyAdmin.
- Log in to the phpMyAdmin area.
- Select the right database.
- Click
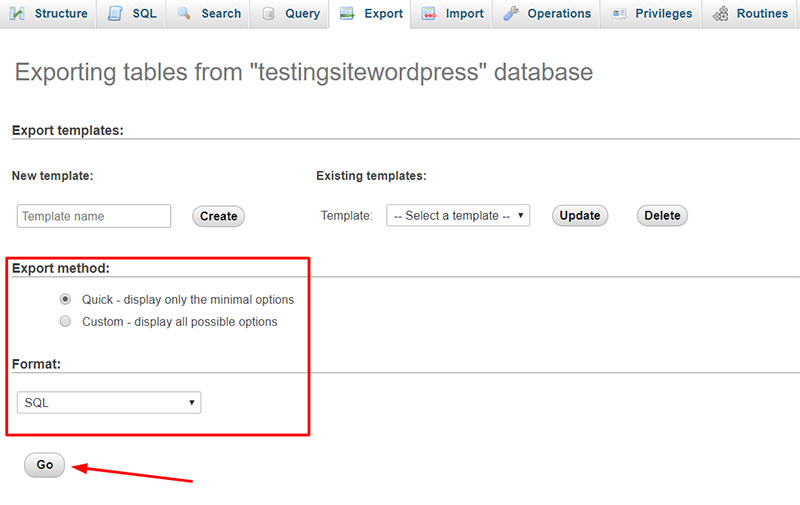
- Under Export Method, select Custom Display all Possible Options.
- Select all the tables to export.
- Under Output Compression, select zipped or gzipped.
- Choose SQL as the format.
- At the bottom, click Go. The download will now start.
Importing All Data and Files
After downloading the database, it is now time to import it.
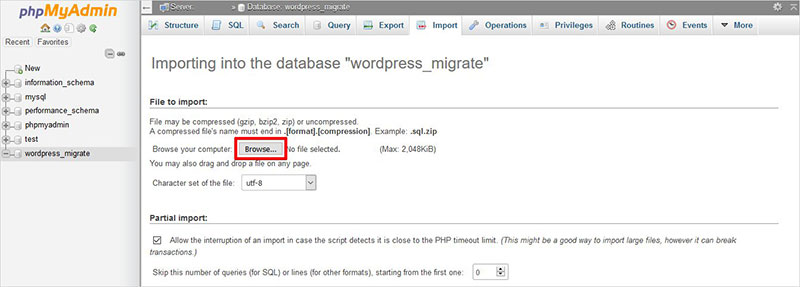
- Open phpMyAdmin on the local server by going to http://localhost/phpmyadmin/
- Select the previously created database.
- Click on the Import tab at the top.
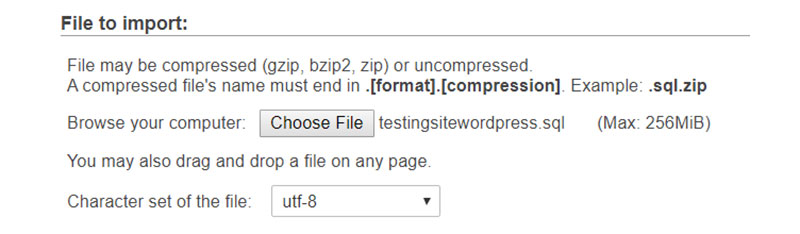
- Click Choose File at the top.
- Select the downloaded database file from the previous step.
- Click Upload. phpMyAdmin will now unpack and install the database file.
Now the database is correctly set up. Of course, all the URLs still refer to the original website.
To update all the URLs run an SQL query in phpMyAdmin. Select the database and then click SQL.
Go to the SQL screen in phpMyAdmin and copy and paste the code. Replace example.com with the URL of the live site and http://localhost/mylocalsite with the URL of the local server.
Update the wp-config.php File
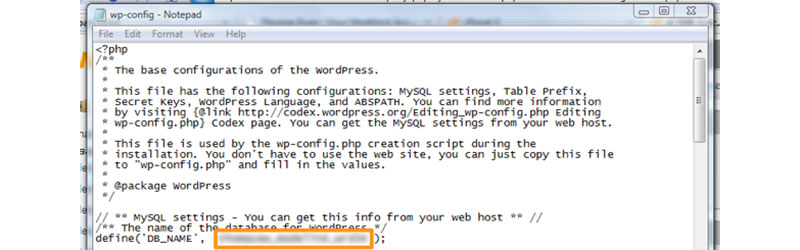
The next step to create a local copy of a live WordPress site is updating the local copy of the wp-config.php file. This configuration file contains all settings for the site, including the route to the database.
- Go to the folder that contains the local wp-config.php file.
- Open the config file in Notepad or a similar text editor.
- Replace the database name with the previously created one. This is the name of the database saved on the local computer.
- Replace the database username with the local MySQL username. Usually, it is ‘root’.
- If there is a password, enter it too. Otherwise, leave this empty.
- Save the changes.
/** The name of the database

for WordPress */

define('DB_NAME',

'database_name_here');

/** MySQL database username */

define('DB_USER',

'username_here')

/** MySQL database password */

define('DB_PASSWORD',

'password_here');
Set Up the Database for Local Usage
After importing the database, go to the Databases tab. The imported database now appears there in the list.
Click the Check Privileges link that is next to the name of the database and follow these steps:
- Select Add User in the next screen. The screen that follows looks like this:
- Locate the User Name and password in the local wp-config.php file.
These have a DB_USER and DB_PASSWORD prefix, respectively. It is not necessary to edit the localhost or any of the other variables.
- Click Add User.
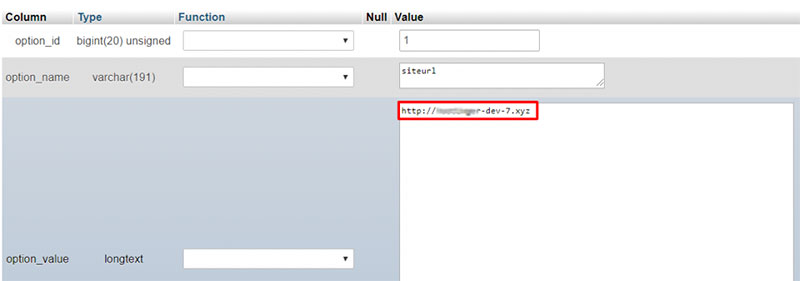
In the WordPress database, there are two fields to edit.
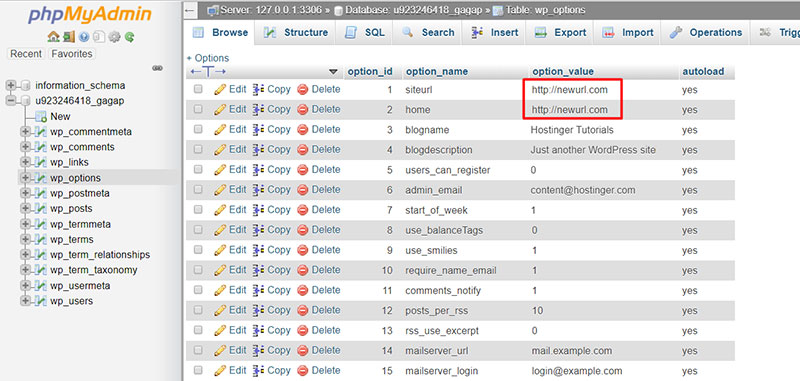
- Go back to the Databases tab.
- Select the name of the local database.
- Open the wp_options table.
- Locate the siteurl and home
- Click
- Replace the URL under option_value with http://localhost/yourfoldername/.
This is an alternative method to achieve the same:
- Open the database file in the Editor.
- Find siteurl and home. Make sure to choose the field with the option suffix.
- Look for these values in phpMyAdmin and change them to http://localhost/yourfoldername/
Now navigate to http://localhost/yourfoldername/ using a web browser. If all went well, the local WordPress site appears complete.
Please note that internal links must be changed to default. To do this go to WordPress and select the Permalinks screen under Settings.
After changing them to the local site links, it is always possible to change them back.
FAQ about creating a local copy of a live WordPress site
How do I create a local copy of a live WordPress site?
Oh, it’s super simple! You just need to follow a few steps. First, make a backup of your live site (files and database). Then, install a local server like XAMPP, MAMP, or WampServer.
Import your database and copy your site files to the local server. Update the wp-config.php file with your local database credentials, and voilà! You’ve got a local copy of your live WordPress site.
What do I need to download to create a local copy?
To make a local copy, you’ll want to grab both your site files and the database. For the site files, use an FTP client like FileZilla to download them.
For the database, you can use phpMyAdmin or another database management tool to export it. And, of course, you’ll need a local server setup like XAMPP, WampServer, or MAMP.
How do I move the local copy back to the live server when I’m done?
No worries, friend! When you’re ready to push your local changes back to the live server, just follow these steps: backup your live site (always a good practice), upload your modified site files via FTP, and import the updated database using a tool like phpMyAdmin.
Finally, update the wp-config.php file with your live server database credentials. Boom! You’re all set.
What if I have a large WordPress site?
If your site is quite large, don’t sweat it. You can still create a local copy! Just be aware that downloading and uploading site files and databases might take a bit longer.
You might also consider using a plugin like Duplicator or All-in-One WP Migration to simplify the process. These plugins can help you easily create a backup of your site and migrate it to your local server.
Can I work on my local copy while the live site is still running?
Absolutely! That’s the beauty of working with a local copy. You can make all the changes you want, test new features or designs, and troubleshoot issues without affecting your live site.
Once you’re satisfied with the changes, you can push them to the live site with confidence.
Do I need to worry about security on my local copy?
Well, security is always important, even on a local copy. However, since your local copy isn’t accessible to the public, it’s less likely to be targeted by hackers.
Still, it’s a good idea to keep your local server software and WordPress installation up-to-date and follow best security practices.
Can I have multiple local copies of my live site?
Oh, for sure! You can create as many local copies as you need for various purposes, like testing different themes, plugins, or customizations.
Just make sure to keep track of the changes you make in each local copy, so you know what’s happening when you decide to push any changes back to the live site.
How do I update the URLs in the local copy?
Great question! After importing the database to your local server, you’ll need to update the URLs to match your local environment.
You can either use a plugin like Velvet Blues Update URLs or run a search and replace query directly in the database using a tool like phpMyAdmin or WP-CLI. Just make sure to replace the live site URL with your local site URL.
Will working on a local copy affect my site’s SEO?
Nope! Working on a local copy won’t have any impact on your site’s SEO. Since your local copy is not accessible to search engines or the public, it won’t be crawled or indexed.
Your live site’s SEO won’t be affected by any changes you make to your local copy until you actually push those changes to the live site. So, you can safely test and experiment with new content, designs, or plugins on your local copy without worrying about SEO consequences.
Can I use version control like Git with a local copy of my WordPress site?
You bet! Using version control like Git is actually an excellent idea when working with a local copy of your WordPress site. It allows you to keep track of changes, collaborate with other developers, and easily revert to previous versions if needed.
Just initialize a Git repository in your local WordPress directory, and you’re good to go. When you’re ready to push changes to the live site, you can use Git to deploy those changes smoothly and efficiently.
If you enjoyed reading this article on how to create a local copy of a live WordPress site, you should check out this one on how to edit categories in WordPress.
If you’re a software developer working with Git, learn about the benefits of using WordPress with GitHub.
We also wrote about a few related subjects like how to delete WordPress themes, how to make a phone number clickable in WordPress, WordPress database plugins, how to watermark images, how to check the WordPress version, creating a comparison table with WordPress plugins, how to upload an HTML file in WordPress, where are WordPress pages stored and how to justify text in WordPress.