Navigating the labyrinth of WooCommerce shipping classes can be like unraveling a cryptic code. Yet, unlocking this puzzle is essential for any e-commerce maverick’s toolbox.
Picture this: a meticulously tailored shopping experience where delivery nuances are finely stitched into the fabric of your online storefront. With the precision of a seasoned web artisan, I’ve delved into the mosaic of shipping intricacies, crafting streamlined pathways for products to glide from your digital shelves to customers’ doorsteps.
In this compendium, expect to emerge versed in configuring shipping rates, gracefully juggling shipping zones, and mastering the alchemy of shipping cost calculation.
We’ll dissect how custom shipping methods are less a chore and more a strategic lever, allowing one to deftly maneuver through the ever-evolving tapestry of e-commerce demands.
With each scroll, the veil will lift, revealing how to wield WooCommerce’s shipping options for optimal functionality—be it for weight-based shipping, securing that coveted free shipping threshold, or offering a buffet of delivery choices to cater to your clientele’s varied palates.
Let’s embark on this expedition, charting the course for streamlined logistics that resonate with the rhythm of your online venture.
Table of Contents
What Are WooCommerce Shipping Classes?
WooCommerce shipping class is a method in which you group similar products, thus bulkier products go together, and lighter ones have their class, etc.
The key benefit of shipping classes is that the owner can group products depending on how they’ll be shipped out. So, if you sell furniture, you’ll have to create a different class for chairs and a different one for couches.
In addition to shipping classes, you could also implement Flat Rate Shipping, where you create flat rates for different products.
So you could have a unique flat rate for larger items and a different one for smaller items.
Shipping classes aren’t always mandatory, so you do not need to apply them to every product. It is advisable to use shipping classes on any products with extra shipping fees.
The Difference Between Shipping Rates And Shipping Classes
A WooCommerce shipping class is a method to categorize similar products, for example, the bulky shipping class, which contains only large items.
A shipping rate is an extra cost that the customer must pay, depending on the shipping class. So, any bulky items might have an extra $50 charge. This extra fee is called a shipping rate.
Why WooCommerce Shipping Classes Are Important?
eCommerce businesses rely on shipping, paired with a solid ecommerce SEO strategy, will make the business more competitive.
WooCommerce’s flexibility enables you to use nearly any shipping strategy.
Shipping costs can be difficult to calculate. You need to think about the distance that the product will travel, as well as the weight and size.
If your products are the same weight, then shipping rates are easy, but this is rare so, you’ll need to categorize your products in their respective class with their distinct cost.
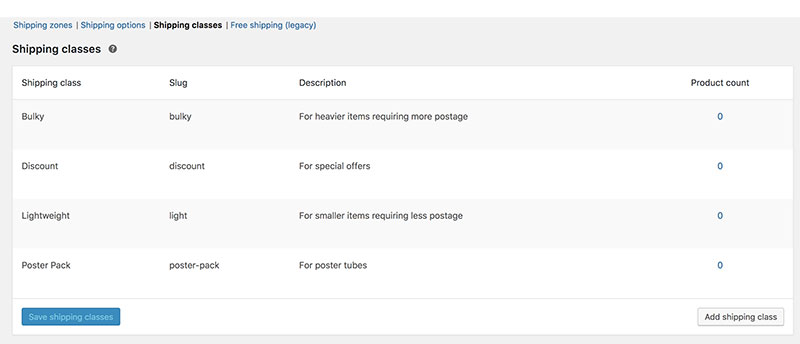
Some key examples of WooCommerce shipping classes include:
- Bulky Items
If you are selling tools or furniture, these heavier and larger products such as couches or heavy machinery, typically require a specialized freight courier and belong in a dedicated Bulky Items shipping class to ensure accurate freight calculations.
- Lightweight Items
If your products are lightweight, possibly fit into an envelope, they will not attract a high shipping fee.
- Fragile Items
Fragile items require extra care, by using a larger box and bubble wrap.
- Specifically Packaged Items
If you sell posters or artwork, these need to be placed in tubes and might cost extra to ship out.
👉 Learn how you can solve common WooCommerce product table challenges and manage and present your product data with ease with wpDataTables.
Adding WooCommerce Shipping Classes In Your Shop
To set up a simple WooCommerce shipping plan, follow these steps:
- Set up Shipping Zones
- Add Shipping Methods and Rates
- Assign a Shipping Class (Optional)
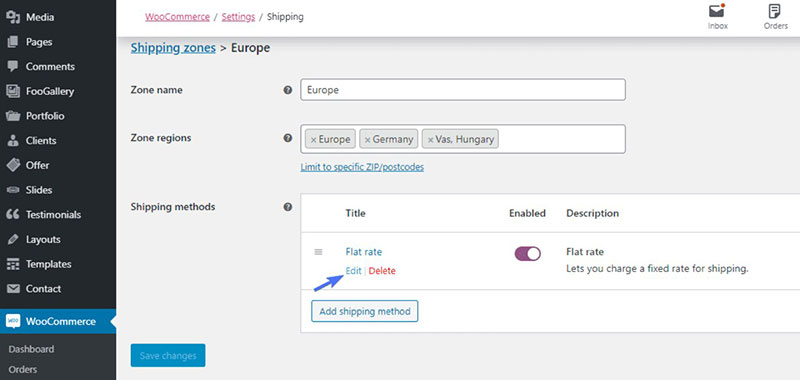
Shipping Zones
These are geographic areas where you can ship your items to. Their size can range from a continent to a specific zip code. These areas enable you to select unique places all over the world where you can sell your products. You’ll also be able to choose specific methods and rates.
You’ll also have a default option named “Locations”, which covers all other zones not covered by the previous choices.
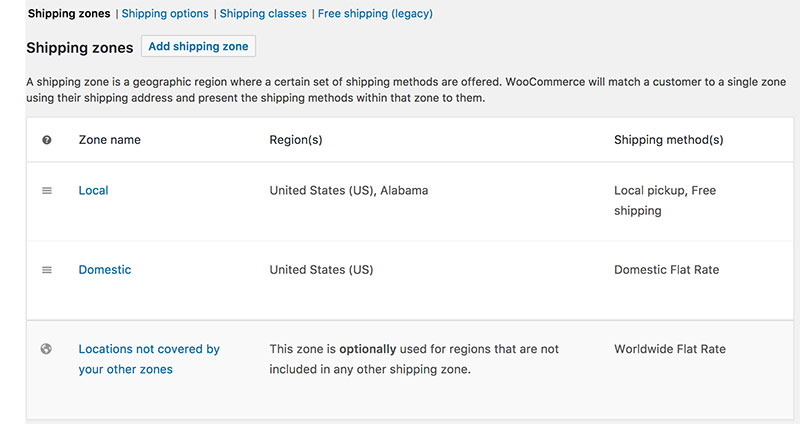
The ‘locations’ option allows the customer to have their item shipped to any location that doesn’t belong to any of the shipping zones.
You must have at least one option in this default zone. Otherwise, your customers will get a message saying that no shipping methods are offered for their area, so they won’t be able to checkout.
Shipping Methods
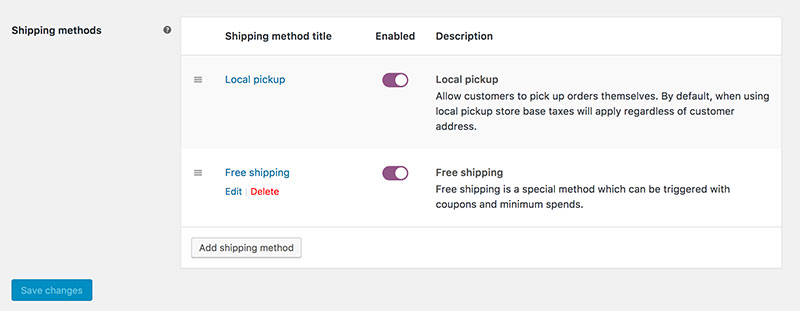
WooCommerce provides access to some in-house shipping methods, including Flat Rate Shipping, Local Pickup, and Free Shipping. You’ll also have the option to add some of your own shipping methods if required.
If you choose the flat rate option, your customers will be charged a fixed fee on every shipping class. Thus, bulkier items have a higher fee, and lightweight ones a lower one.
The Local Pickup option is straightforward. Your customers will be able to collect their products from a local pickup point.
You can offer the Free Shipping method for your entire catalog. However, customers must meet some requirements before they qualify for free shipping. These can be either a coupon code or a minimum total cart value.
Assigning Shipping Classes

You won’t need to set up shipping classes if all your products have the same shipping cost. If you use any other premium extensions, the shipping classes are redundant.
However, if your product shipping costs vary, you should implement one shipping class for each product type. This way, you can alter the shipping costs when the customer reaches the checkout process. It’s important to know that you cannot add more than one shipping class for each product.
How to Add Shipping Classes
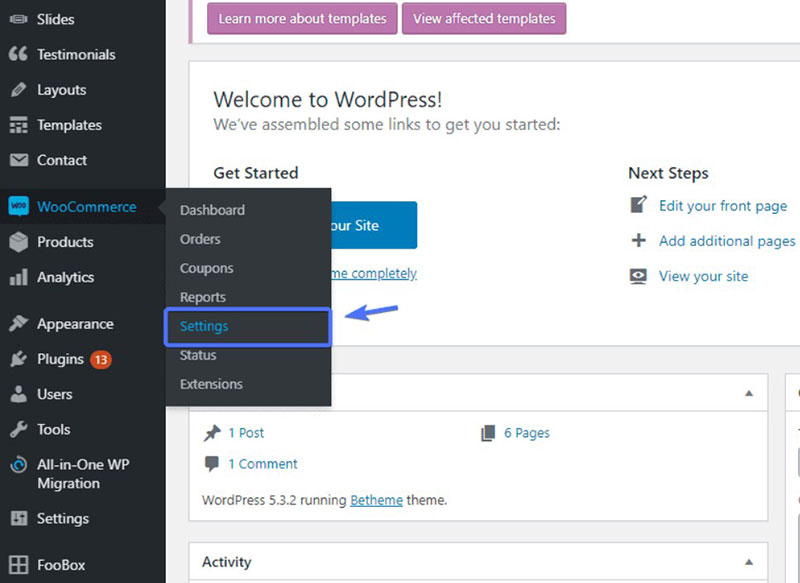
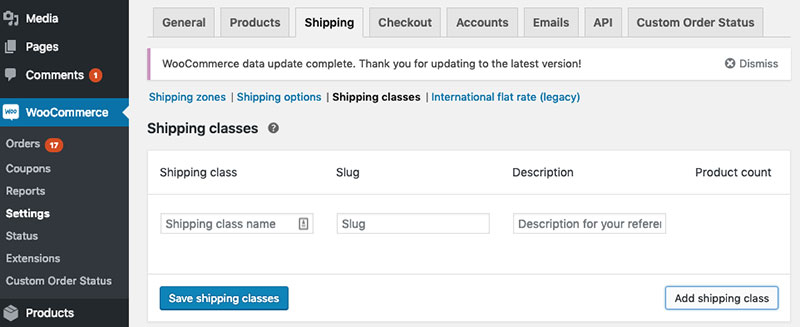
On your Admin Dashboard, look for the “Settings” option, and click that.
Then go to Shipping -> Shipping Class, where you’ll find three different fields.
Shipping Class – Here, you can choose the name of the shipping class. You can put anything you want here. If you’re setting up weight classes, add some measurements. So, for example, you could add a “1Kg” class or a “100g” class. You could also choose product names, such as “Couches” or “Chairs”.
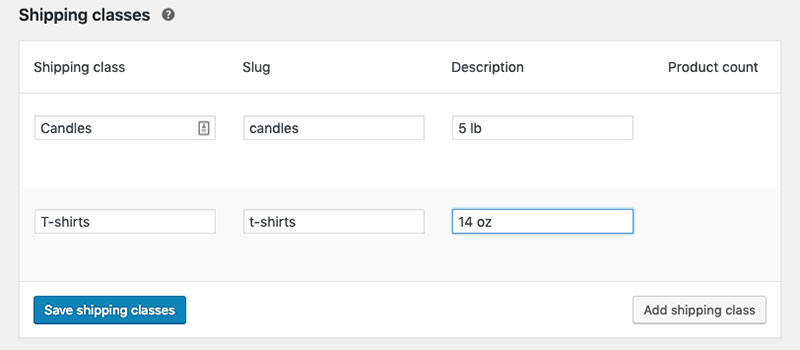
Slug – This is a distinct identifier of a shipping class. You do not need to fill this one out, as it will generate if you leave it blank.
Description – You should input specific details about the shipping class in this field. It could be something simple like, “This class includes any products above 10Kg” if the shipping class is “10Kg”.
Then you’ll find the “Product Count”. Once you’ve added some products to the shipping class, the total number of products will appear here.
Adding Multiple Classes:

The process is simple for adding more shipping classes. Just repeat the process above, starting with “Add Shipping Class”.
Shipping Cost
You set the rates for shipping items to specific shipping zones. You could use Flat Rate Shipping so that when you ship an item to a certain area, the shipping fees remain the same.
To customize the Flat Shipping Rate, add the Shipping Class cost and calculate the different shipping fees for different types of products. This way, the shipping fees will be calculated on the products in the customer’s cart.
This benefits the customers, as they pay no more than what is required, and you won’t have to pay extra money to ship out larger items.
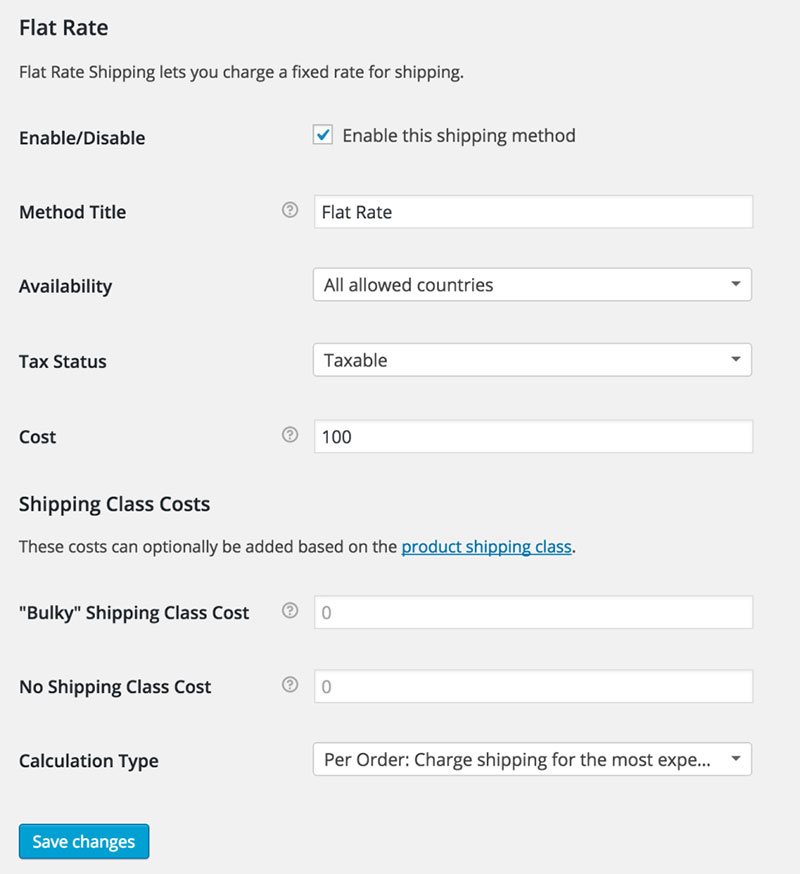
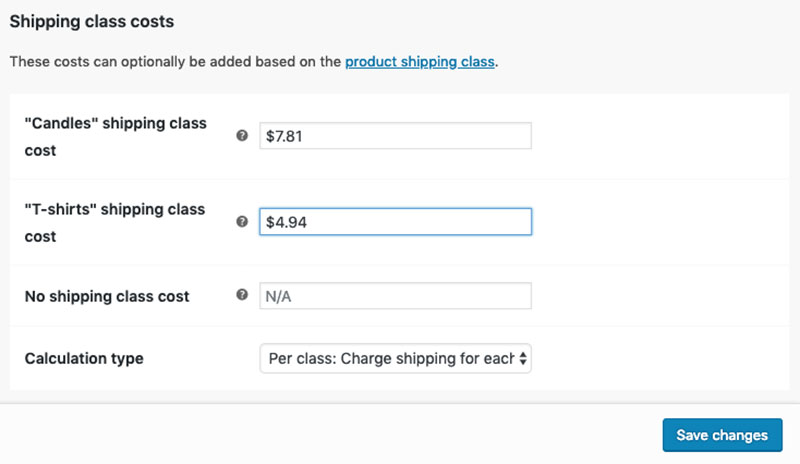
Configuring Shipping Class Cost for the Flat Rate Shipping Method
Find the Flat Rate Shipping method on the settings, by clicking on “Edit” for your shipping zone, then click on “Edit” again on the flat rate shipping method.
You should have reached the settings page, and the required option will be found under the Shipping Class Cost section.
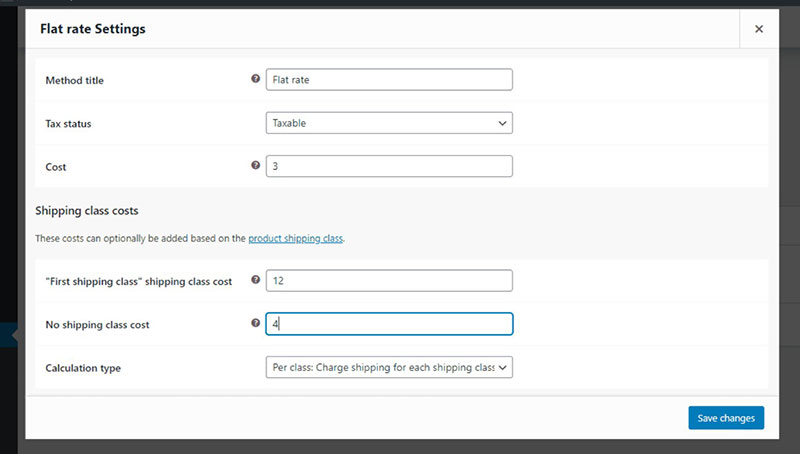
You’ll need to ensure that your calculation type is set to “Per Class: Charge shipping for each class individually”.
Now, simply calculate the cost for each individual shipping class, based on the product quantity and cost.
FAQ about WooCommerce shipping classes
What Exactly Are WooCommerce Shipping Classes?
Shipping classes in WooCommerce stand as categories, convening similar products under a shipping rule umbrella. They streamline how shipping rates apply, often by weight, size, or type, optimizing shipping rules and costs for both store owners and customers. Integrating these shipping classes with various ecommerce plugins enhances the overall functionality and customization of the online store.
How Do I Create a Shipping Class in WooCommerce?
Venture into your WooCommerce settings, and under the ‘Shipping’ tab, you’ll encounter ‘Shipping classes’. Here, you can conjure a new class, label it, and scribe a description—with each step crafted to match your shipping policy and delivery offerings.
Can I Assign Multiple Shipping Classes to a Single Product?
A product dances with a single shipping class at a time. However, to tailor the jig, define varying classes for a bouquet of products within a woocommerce order management system, streamlining the shipping rates calculation for diverse trolley contents.
How Are Shipping Costs Calculated Using Shipping Classes?
Shipping classes are merely the compass—shipping rates configuration in ‘Shipping Zones’ are the captains steering the ship. They factor in product dimensions, weight, and class to unfold the final cost, akin to a maestro conducting an orchestra.
Is It Possible to Offer Free Shipping for Certain Shipping Classes?
Indeed, the free shipping threshold sweeps in like a knight in shining armor for select shipping classes. It can be set as an option within the ‘Shipping Zones’—a reward for customers who fill their carts with eligible wares.
How Can I Override Shipping Classes for Specific Products?
Product-specific shipping rules knock on the door for such situations. When editing a product, you can choreograph custom rates, having them pirouette over the global settings, ensuring each product’s shipping cost is a solo performance.
Do Shipping Classes Affect International Shipping Rates?
Absolutely. Shipping classes are the roots, with international shipping rates being the branches. They influence how costs are calculated, helping you weave a web of global connections with customers far and wide.
Can Shipping Classes Be Imported or Exported?
With a flick of the digital wand, WooCommerce’s shipping extensions can import or export shipping classes. Like migrating birds, they move between environments, ensuring your e-commerce shipping solutions remain seamless.
How Do Shipping Classes Work With Real-Time Carrier Rates?
Shipping classes feed into the loom where real-time carrier rates are woven, aligning shipping methods WooCommerce crafts with the tapestry of dynamic pricing provided by carriers like UPS and FedEx.
Can Customers Choose Their Preferred Shipping Class at Checkout?
The stage at checkout isn’t for customer choice of shipping class but rather for selecting from the shipping methods prepared backstage. Each customer’s selection then plays out in the grand ballet of order fulfillment.
Conclusion
In the digital tapestry where WooCommerce shipping classes intertwine with the fabric of e-commerce, their importance remains unchallenged. These classes are the architects of shipping strategies, defining rates, calibrating shipping zones, and ensuring shipping options embolden the customer experience.
Through this journey, we’ve unwrapped the layers of shipping methods, grappled with the alchemy of cost calculation, and navigated the waters of international shipping.
Let’s pocket these insights—tools that will remake the world of online retail, stitch by precise stitch. The power rests in designing an ecosystem where products, no matter their shape or form, find their path to customers under the guidance of custom shipping methods and WooCommerce extensions.
As the curtain falls, it’s clear: mastery over WooCommerce’s shipping capabilities is not merely a stroke of luck but the result of meticulous design, ensuring every package’s journey is as smooth as the slide of a mouse to its final click of purchase.
The endgame? A flourishing online storefront, resonantly tuned to the rhythm of its audience’s needs.
If you enjoyed reading this article on WooCommerce shipping classes, you should check out this one about WooCommerce to QuickBooks.
We also wrote about a few related subjects like WooCommerce shipping plugins, WooCommerce payment gateways, best WooCommerce plugins, WooCommerce vs PrestaShop, the best free WooCommerce plugins, and PayPal vs Stripe in WooCommerce.