Imagine the pulse of your online store: each product, a heartbeat. The vitality? WooCommerce variable products — the linchpin of e-commerce vitality, offering shoppers the diversity and customization that casts the mundane into the extraordinary.
Navigating the labyrinth of digital retail necessitates a master key; this is where variable products shine, allowing for a synthesis of product variations, attributes, and intricate pricing strategies. As web design evolves, so does the necessity for adaptive inventory tracking and a seamless user experience (UX). The fabric of a successful WooCommerce storefront weaves through the adept management of these complex products.
This article is the light in the morass of online shop management. It unfolds the intricacies of WooCommerce attributes, stock management, and the subtle art of product customization. By the closure, proficiency in managing product variations will be yours, elevating your digital shop into a beacon of personalized shopping.
Delve into sections illuminating setup, plugins, and UI design, each a brushstroke in your e-commerce masterpiece.
Table of Contents
What is a WooCommerce Variable Product?
A variable product is a featured product type in WooCommerce that allows merchants to provide a set of variations on particular items. It lets them display and preview multiple color variants, sizes, and other attributes of an item, as well as the corresponding prices in one product listing. This allows customers to create a variation closest to their personal preference, which makes for an immersive and more convenient shopping experience.
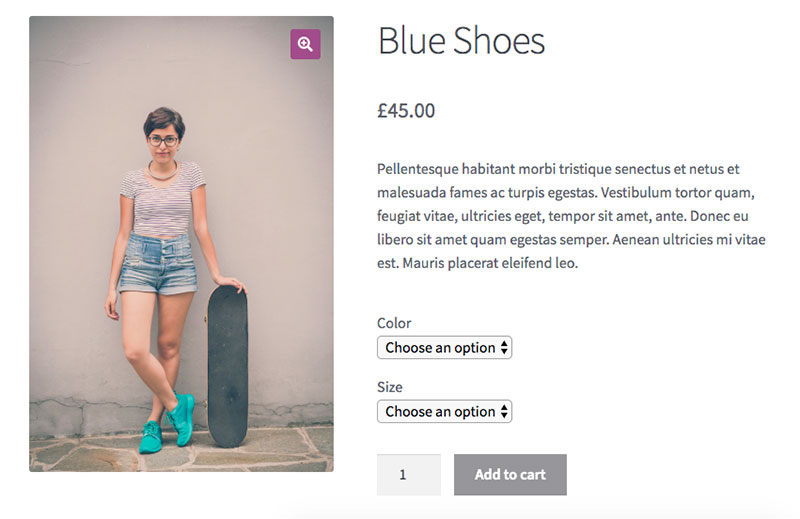
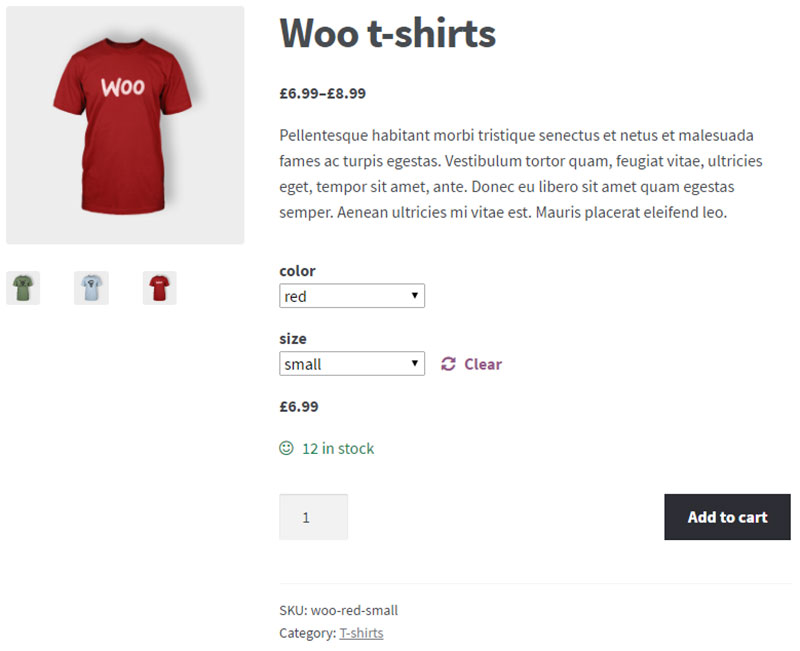
For example, a customer can choose among the available shirt colors and sizes before adding the item or the “variation” to the shopping cart and proceeding to checkout. A variable product can be any product or merchandise. Retailers can sell the same shirt in different colors, or the same bag in different designs or materials on one product page. It shows the available options for every product.
Best Practices for Displaying Your Product Variations
If you want to generate sales and attract customers, you have to optimize product variations in your online store. Here are some of the best practices for displaying variable products that you can follow to sell more products online.
The first tip is to make sure that labels for attributes are clear, specific, and simplified. For example, use “navy” instead of “blue” to describe an item color, and “33 inches” instead of “tall” for size measurements. The next tip is to allow customers to have a clear view of each variable product by providing an accurate, detailed, and high-quality image, and make sure they are easy to preview. This offers customers a clear picture of the product because they might be thinking of a very different shade of pink from the actual color of the product.
Enabling customers to add several items to their shopping cart simultaneously will entice them to buy multiple variants in one purchase. Lastly, explain any differences in prices of your variations. After all, customers want to know what they are paying for and get their money’s worth. Explain why the other variation is cheaper by a dollar. Was it because of the materials used, or was it because of its less intricate design? Having such transparency will ultimately help your store earn customer’s trust.
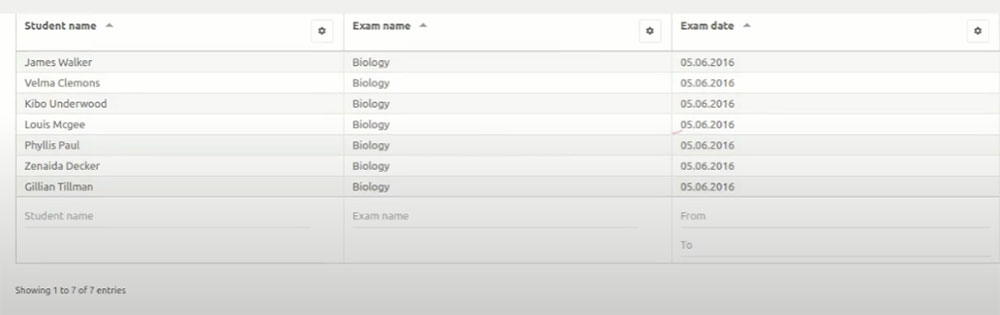
👉 Learn how you can solve common WooCommerce product table challenges and manage and present your product data with ease with wpDataTables.
How to Set Up a WooCommerce Variable Product
There are three main steps on adding a variable product, setting the product type, adding the product attribute, then adding the variations.
Set the Product Type
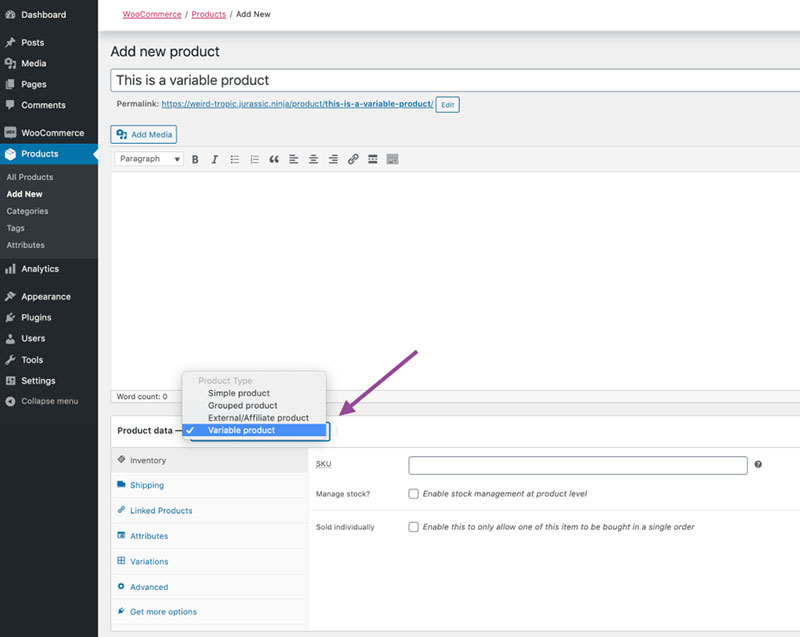
You may begin with creating a new product on your WooCommerce store or edit an existing item. Now go to your main menu panel on the left side. Under ‘WooCommerce’, select ‘Products’. You may click the ‘Add Product’ button or ‘Edit’ on an existing product, either way, it will display the ‘Product Data’ drop-down menu, then select the ‘Variable product’ option.
Add the Product Attributes
Now, you can add the product attributes that will be used for variations. Attributes are properties of a variable product that are completely configurable such as color, size, stock-keeping unit (SKU), and others. It allows you to generate more product variations. You may use custom or global product attributes for your variable product.
Custom Product Attributes
As the term implies, custom product attributes are attributes unique to a specific product. These attributes are created to solely identify a particular product, hence should not be used in other items.
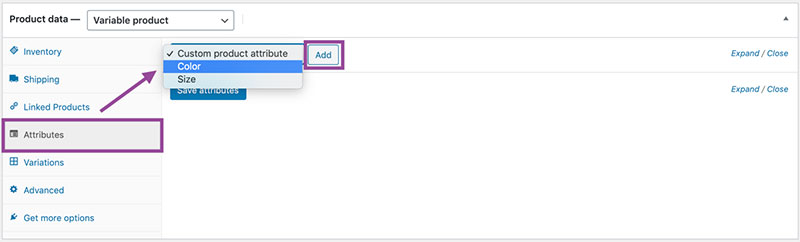
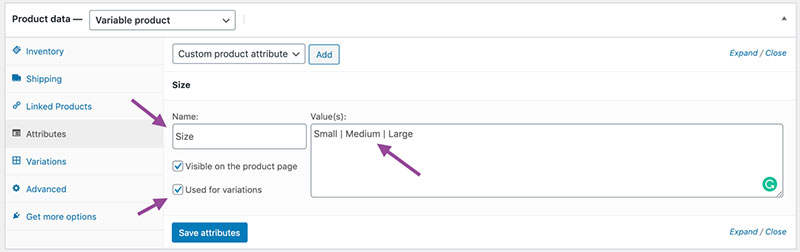
To add custom product attributes, from the ‘Attributes’ section, select the ‘Custom product attribute’ option then click ‘Add’. You may now name the attribute like ‘Size’ or ‘Color’ for example. Then, set the values for that attribute. Separate the values with a vertical pipe character (|). For example, ‘Small’ | ‘Medium’ | ‘Large’. After setting the values, make sure that the ‘Used for variations’ and the ‘Visible on the product page’ checkboxes are enabled or checked. Lastly, save all changes by clicking the ‘Save attributes’ button.
Global product attributes
Unlike custom product attributes, global attributes are generic attributes that apply to several products in your online store. One of the common examples of this attribute is color. Items with identical colors can be classified and filtered out under one color attribute.
To add global attributes, you must create them first. You may also do this before setting the product type. To do so, go to the ‘Products’ section on the WooCommerce admin or main menu panel, then select ‘Attributes’. Under the ‘Add new attribute’, insert the name of the product attribute in the ‘Name’ field like ‘Color’ or ‘Size’ for example, then save it by clicking the ‘Add attribute’ button. The table on the right side will now display the new attribute.
You can also add the attribute terms, which are the specific values of the attributes such as blue, red, small, medium, and so on. To add the attribute terms, under the ‘Terms’ column on the table, click the ‘Configure terms’ link of your new attribute, then add as many terms as you need.
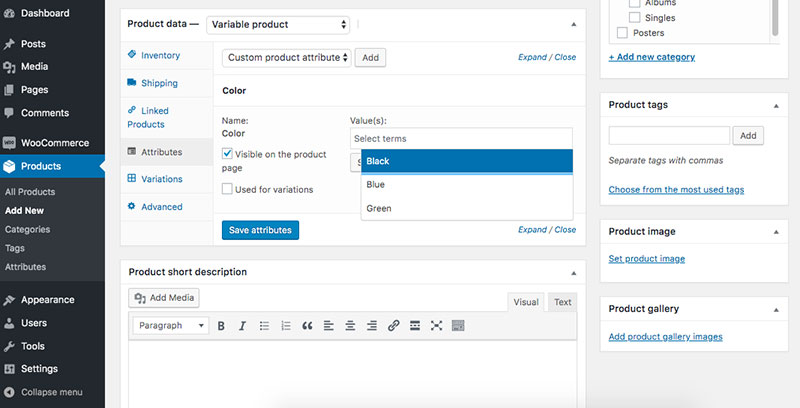
After creating global attributes, you may now proceed to the product that you wish to edit. Under the ‘Attributes’ section, you may select an option from the drop-down menu and click ‘Add’. Choose ‘Select all’ under the ‘Value(s)’ field to include all attributes listed. Make sure that the ‘Used for variations’ and the ‘Visible on the product page’ checkboxes are enabled or checked, then finally click the ‘Save attributes’ button.
Adding WooCommerce Variations to Your Product
There are many ways to add variations to your product. You may create single or multiple variations, or create them in bulk, but first, you must make sure that your product variations have a price and are ‘In stock’, to avoid displaying unavailable items to your customers. Next, you need to define the variations for your variable product.
Creating a single variation
You can create a single broad variation that covers all combinations of the product attributes. This method is a good option if you do not need to track the item stock per variation, modify the price and the image according to the selected variation, or if the products have generic SKU codes. To do so, you must edit your variable product.
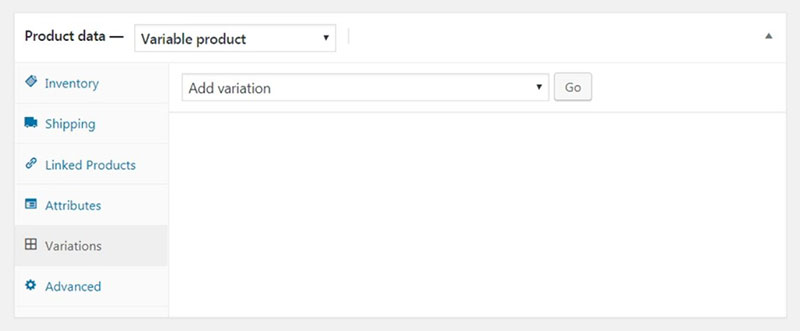
Under the ‘Product Data’ section, click the ‘Variations’ tab. Select the ‘Add variation’ option from the drop-down menu and click the ‘Go’ button. After creating the variation, on the drop-down menu under ‘Variations’, you may leave the option as is on ‘Any…’, then expand the variation details by clicking the row. Now make sure that the variations have their ‘Regular Price’ and are set to ‘In Stock’. Lastly, click the ‘Save changes’ button.
This variation will now be displayed as the product option on the product page.
Manually create multiple variations
If a variation requires different settings, for example, the stock settings, then you may choose to create multiple variations. The steps are the same with creating a single variation however, rather than leaving the option as ‘Any…’, you have to select the attributes for every variation.
Creating variations in bulk
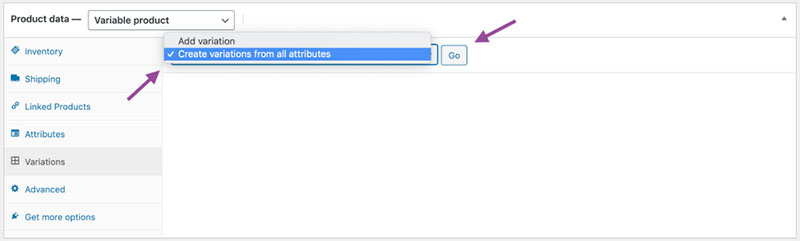
You may decide to use a bulk process to create variations for all combinations of product attributes. Go to the variable product you wish to edit. Click the ‘Variations’ tab under the ‘Product Data’ section, then select the ‘Add variation’ option. Click ‘Create variations from all attributes’ and proceed with ‘Go’.
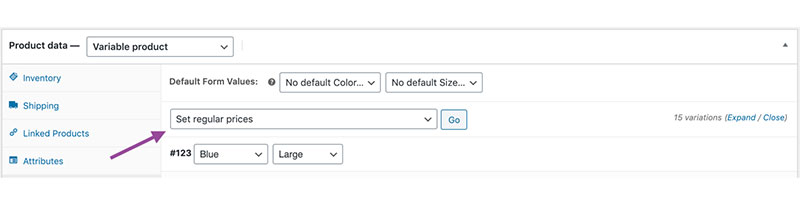
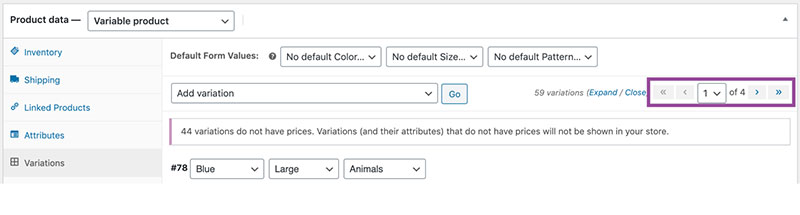
This will generate a maximum of 50 variations at once. You may run the process again until it stops creating variations. If you find it tedious to set the prices for every variation, WooCommerce offers a practical solution. Click the ‘Add variation’ option from the drop-down menu, then select ‘Set regular prices’. Insert the price, and click ‘OK’.
Set Default Variation
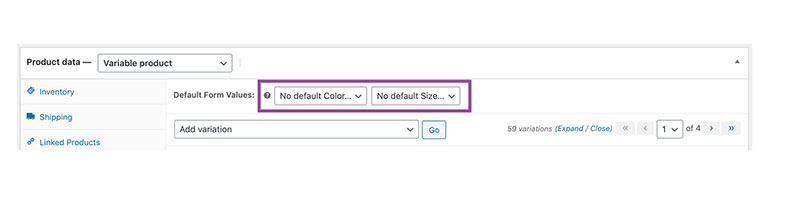
You can also set a default variation for the customers. To do so, under the ‘Default Form Values’, set a default variation for every attribute, then save any changes.
Adding Variation Data

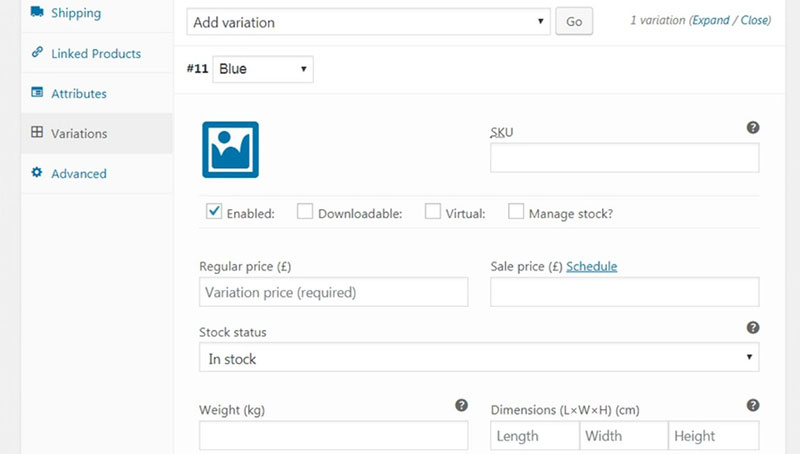
When adding variations, WooCommerce offers the WooCommerce Show Single Variations plugin where retailers can display and configure variations individually. It provides more control and flexibility when searching and browsing through the product catalog. It features different checkboxes and fields which require retailers to provide variation data. The ‘Enabled’ checkbox enables or disables a particular variation; the ‘Show in Catalog’ checkbox allows merchants to decide which variation they wish to appear on the shop page. It also has the ‘Downloadable’ checkbox for downloadable variation and the ‘Virtual’ checkbox for non-physical products which automatically removes the shipping settings.
If the ‘Downloadable’ checkbox is selected, it displays three options. The ‘Downloadable Files’ which lets you upload the file or files for customers to download. The ‘Download Limit’, which lets you set how many times the file can be downloaded, you may also leave it blank to set the limit to unlimited. The ‘Download Expiry’ sets the number of days before a download expires after purchase.
The ‘Regular Price’ field requires retailers to enter the regular price for the variation, and the discounted price when the variation is on sale on the ‘Sale Price’ field. It also has drop-down menus such as ‘Tax Status’ which has three options by default, ‘Taxable’, ‘Shipping only’, and ‘None’; and ‘Tax Class’. These let you identify the tax class for every variation, ideal for variations with different tax bands.
Check the Result On Front-End
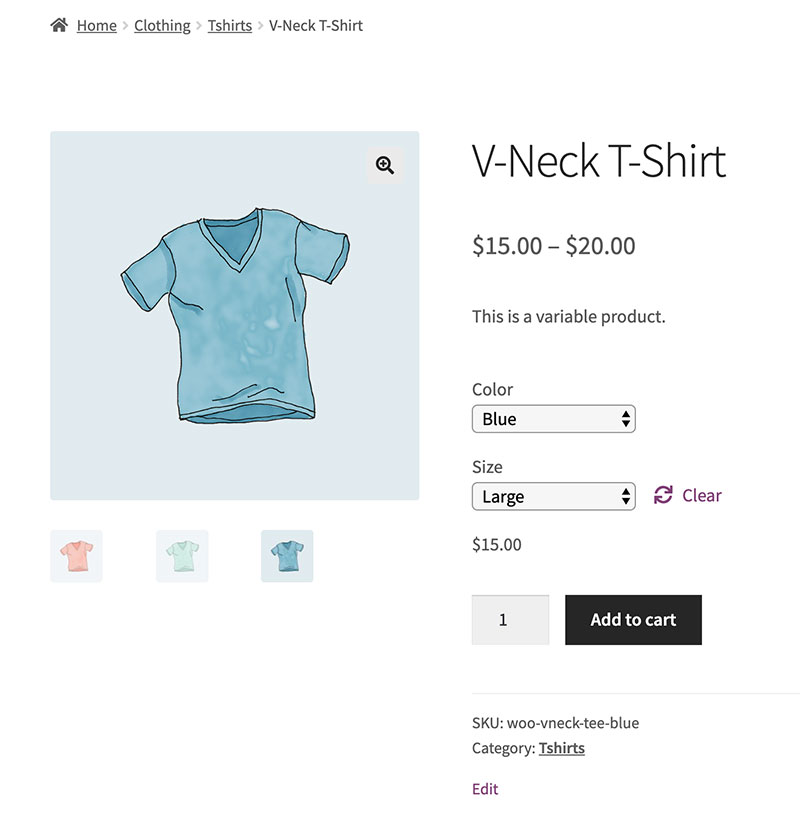
After all these steps, your WooCommerce variable products are finally ready. You may review and check the results on the front-end, and modify any errors or information.
FAQs on WooCommerce variable products
How do I create a WooCommerce variable product?
To craft a WooCommerce variable product, it’s a dance within the dashboard. Start with ‘Products’ and then ‘Add New’. Select ‘Variable product’ from the ‘Product Data’ dropdown. You’ll then create and configure attributes, setting the stage for variations—like a choreographer planning a routine’s every move.
Can I set different prices for product variations?
Absolutely, tailoring prices for each variation is like giving them distinct personalities. In the ‘Variations’ section of your product, you’ll have the power to pinpoint precise prices for each variant, playing the role of a financial strategist ensuring every product variation hits the right market note.
What’s the limit on the number of variations I can add?
While there’s technically no built-in ceiling, your web server’s whim sets your boundary. Keep watch; too many variations can conjure a sluggish experience. Wisdom suggests a balance—aim for less than 50. More calls for savvy measures, perhaps splitting products to soothe the server’s spirit and keep the user experience snappy.
How do I manage stock for variable products?
It’s like juggling; you manage each product variation’s stock within the ‘Variations’ section. Assign unique SKUs and activate ‘Manage stock?’—now you’re the ringmaster of quantities, alerts, and backorders. In this digital circus, meticulous stock management keeps the performance flawless.
Is it possible to add an image to each product variation?
Indeed, illustrating each variation with an image paints a vivid picture for shoppers. Within the ‘Variations’ section, an invitation to upload awaits beside each variant. A unique image for each acts as a visual anthem, elevating the shopper’s journey and bringing the abstract concept of choice into crystal clarity.
How can customers select product variations?
Selection is a symphony conducted on the product page. Your customer plays maestro with drop-down menus or variation swatches, orchestrating their choice. Behind the scenes, ensure attributes are labeled ‘Visible on the product page’—this lays out the melody’s notes for the customer’s composition.
Can I offer discounts on certain variations?
Strategize your offers like a chess grandmaster. In the ‘Variations’ pane, tweak each variable pricing at will. Present a discount across the board or on select variants. Each move recalibrates the value proposition, potentially cornering to checkmate—enticing customers while aligning with your business’s tactical gambits.
How do I handle shipping for variable products?
Conquer shipping like a seasoned captain setting sail. Define weights and dimensions within variations, charting a course for your shipping methods. The scales of commerce shall favor the precise. Remember, the world is vast, and shipping options are as diverse as the ports from which you embark.
Is there a way to bulk edit variations?
Patience, the bulk edit is your ally. Skirting through single edits, the ‘Bulk actions’ dropdown becomes your shortcut. Apply changes to all variations like a skilled editor pruning a manuscript. It’s about efficiency, transforming what could be a laborious task into a swift stroke of a pen.
Can I import or export variable products?
Yes, navigation through import/export is a merchant’s voyage. WooCommerce fortifies you with CSV files as your compass. Within the ‘Products’ page, chart the waters with ‘Import’ or ‘Export’; your variable products, and all their complexities, ready to disembark or welcome aboard new data.
Conclusion
In the tapestry of online commerce, the WooCommerce variable product feature stands as a testament to flexibility and digital customer engagement.
Seamlessly weaving through inventory tracking and stock management, it presents a myriad of options—from sizes to colors—each variation its own distinct silhouette against the backdrop of your digital storefront.
- Embrace the system’s prowess in handling product variations.
- Leverage the WooCommerce attributes for a personalized shopping experience that sings to the tune of your customer’s desires.
- Revel in the architecture that allows for complex products, payment gateways, and shipping methods to coalesce, painting a mosaic that shoppers navigate with ease.
Farewell, from the first attribute to the last SKU, the journey within WooCommerce’s realm captures more than transactions—it captures imaginations and preferences, fortifying the bond between merchant and customer. From the foundations laid, your store emerges not just as a marketplace, but a haven of choice and opportunity.
If you enjoyed reading this article on WooCommerce variable products, you should check out this one about how to set WooCommerce related products.
We also wrote about a few related subjects like WooCommerce grouped products, how to set up WooCommerce test mode, WooCommerce redirect after checkout, WooCommerce appointments plugins, WooCommerce product variations, how to export export WooCommerce orders, how to change the WooCommerce number of products per page, WooCommerce hide category from shop page and the best WooCommerce extra product options.