Imagine this: you’ve built an impeccable online storefront—your digital window to the world teeming with eager customers. Yet, something pivotal looms before the grand opening—ensuring your checkout process works flawlessly, a silent gatekeeper to your business’s success. That’s where setting up WooCommerce test mode becomes the linchpin.
Delving into the intricacies of WooCommerce sandbox setup, you’re not merely toggling options in a backend; you’re crafting the buyer’s journey, one that must be seamless. I understand the gravity of this, for a single glitch could fracture trust and tarnish first impressions.
This article isn’t just a guide. It’s your ally in preempting such mishaps. By journey’s end, testing WooCommerce checkout will seem less daunting and more like a strategic phase in building your online empire.
We’ll dissect payment gateway testing, negotiating WooCommerce developer settings, and embodying the caution of a WooCommerce debug mode aficionado. Prepare to escort your e-commerce venture to unassailable heights with the deft touch of a test mode connoisseur.
Table of Contents
5 Steps To Set Up a WooCommerce Payment Test
1. Put your shop in Test Mode
To run a LIVE store test it is best to use the free WooCommerce Stripe extension.
Install and set up the Stripe extension, and enable the WooCommerce Test Mode. It is now possible to test the checkout process. Use a Stripe test credit card to simulate purchase without a real payment.
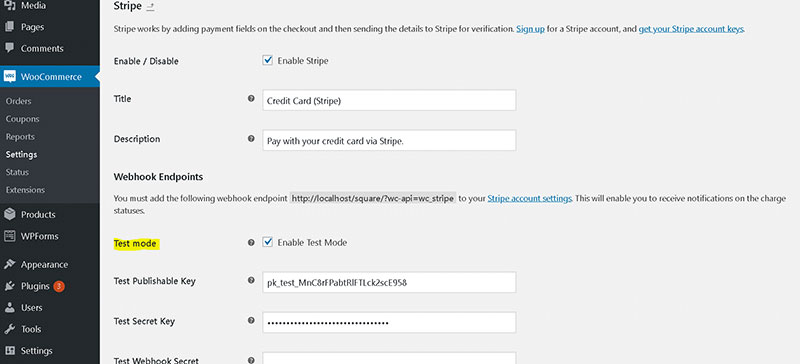
To activate the Stripe payment, ensure that the test mode is correctly configured. To access the Stripe configuration go to WooCommerce – Settings –Payments – Stripe.
Select the “Activate Test Mode” option and save the changes. The payments section will automatically go into test mode.
Next, copy and paste the new Test Publishable Key and Test Secret Key into your WooCommerce Stripe settings. Click “Save Changes”.
Please note: Other methods of payment such as PayPal will be addressed in another article. PayPal and additional methods of payment will not be affected by changes made here.
👉 Learn how you can solve common WooCommerce product table challenges and manage and present your product data with ease with wpDataTables.
2. How to find your Publishable Test and Secret Keys
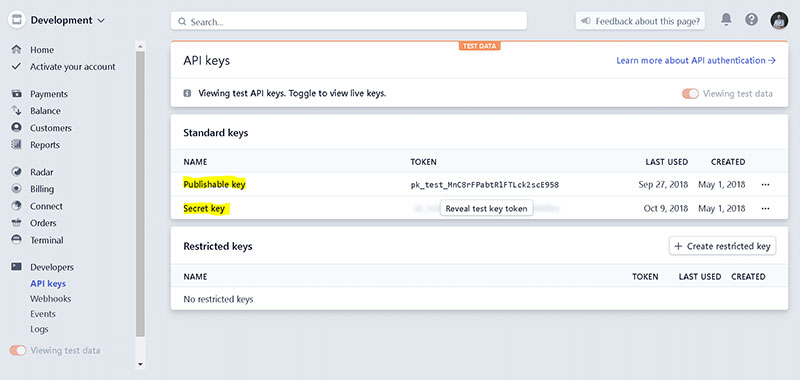
Start by logging in to your Stripe business account.
In the menu click Developers> API keys. Locate the access button in the upper corner that enables test mode or live mode.
Your account will have two sets of API keys – Live and Test. To access both, use the toggle switch in the left menu. Select “View Test Data”. Test keys will have ‘a _test_ text’ in the name.
Copy & paste the number of your Stripe account keys into the corresponding WooCommerce field. Don’t forget to leave the test mode enabled and click save.
3. Simulate a Payment using a Test Credit Card in WooCommerce Test Mode
Now you can make a test purchase using the buyer test account. All viewable screens, such as deposits, transactions, and disputes, will appear in test mode only.
Conducting proper WooCommerce testing at this stage helps ensure every checkout scenario functions as expected before your store goes live.
To use a test card to simulate a Stripe payment:
- Go to your shop’s public URL e.g. sitename.com/shop/ or a specific product page.
- Add a product to the shopping cart.
- Preview your cart (if using AJAX or products).
- Click → “Proceed to Checkout”.
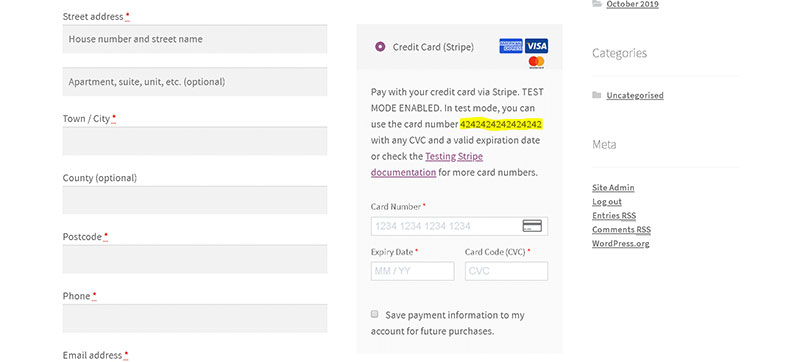
Enter the billing details. Fill in all required fields such as the shipping address. For testing purposes, any valid details will work.
Enter the following card details in the Credit Card Number field: 4242424242424242.
Card expiration date (MM / YY): Ensure the date is valid.
4. How to test credit cards for other payments processors
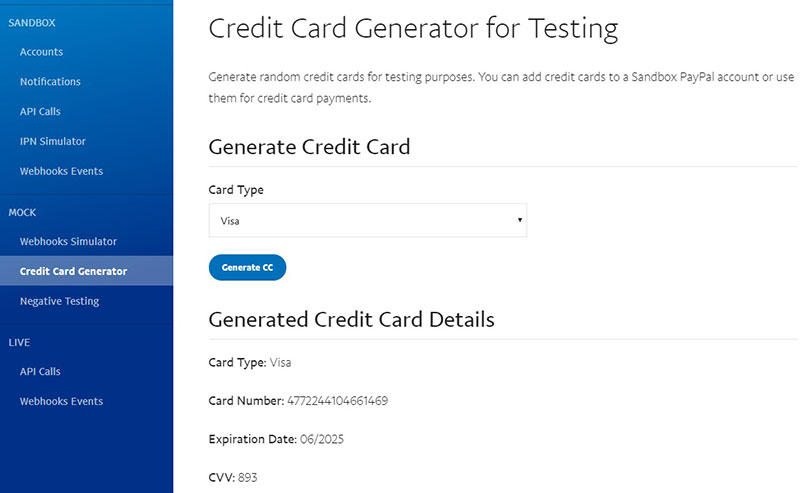
Since the test card is only valid for use with Stripe, it is still necessary to test other payment gateways, like PayPal. This is possible by using dummy credit card numbers or a Credit Card Number Generator.
Below are credit card numbers and sandbox/test mode options to use for testing purposes. These have been provided by some of the most popular WooCommerce payment processors.
- PayPal FAQ for test Card Numbers
- Get Credit Card Numbers
- Credit Card Number Generator & Validator
- net Test Card Numbers
- FirstData / Payeezy Test Credit Card Numbers
- Square Sandbox Card Brands
- Klarna Test Credit Card (note: only one test card is provided)
| Number | Card Brand |
| 4142 4142 4142 4142 | Visa |
| 4000 0544 5444 5444 | Visa (debit) |
| 5555 3333 3333 3333 | Mastercard |
| 5105 5105 5105 5105 | Mastercard (prepaid) |
| 3456 7890 1234 005 | American Express |
| 6000 1111 2222 3333 | Discover |
5. Expiration Dates & CVC
In test mode enter a present or future date in the expiration field (example: 01/04). For the CVC, try any valid 3-digit number (example: 444).
Be aware that, unlike the majority of credit cards, American Express requires a 4-digit CVC.
To test exact error codes provide information that is invalid or incorrect. The following are examples that will result in error codes:
- Using an invalid month (like 15)
- Using a year in the past (like 1980)
- Using a two-digit number (like 98)
How to test payments with the PayPal Sandbox
Before activating your website for use by buyers, it is helpful to test the integration. A simple simulated payment verifies the configuration without any money changing hands.
Go to the PayPal developer page
Sandbox accounts require login credentials. To obtain these, log in to the PayPal developer page using your PayPal username and password. In the Developer Dashboard → “Sandbox” – “Accounts”.
Create PayPal Sandbox test accounts
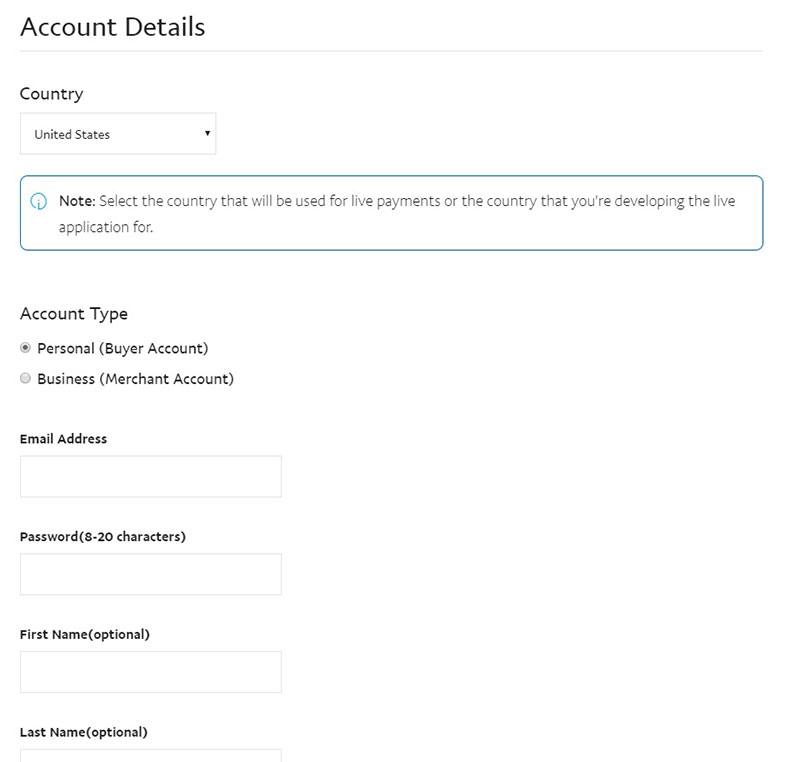
Create two test accounts:
- a test seller (the merchant account)
- a test buyer (the customer)
Click → Create Account
Create a bogus email for test purposes. Something like [email protected] will act as a reminder that it is a merchant account. Add a name for the merchant account as this will be displayed on the payment page later.
Hey, did you know data can be beautiful too?
wpDataTables can make it that way. There’s a good reason why it’s the #1 WordPress plugin for creating responsive tables and charts.
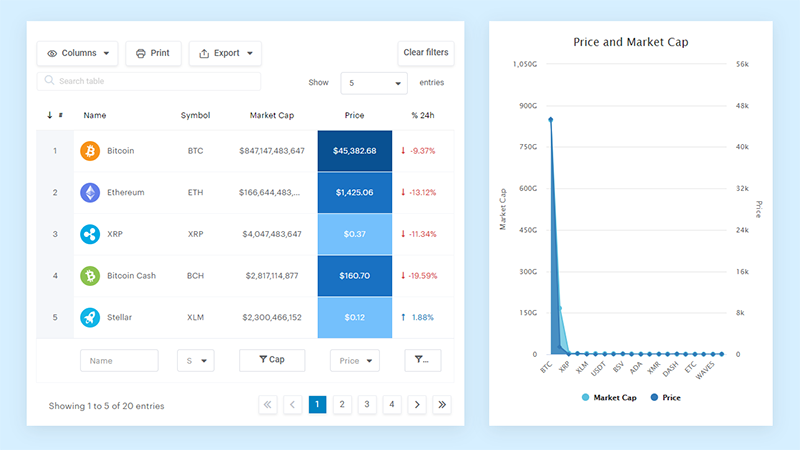
And it’s really easy to do something like this:
- You provide the table data
- Configure and customize it
- Publish it in a post or page
And it’s not just pretty, but also practical. You can make large tables with up to millions of rows, or you can use advanced filters and search, or you can go wild and make it editable.
“Yeah, but I just like Excel too much and there’s nothing like that on websites”. Yeah, there is. You can use conditional formatting like in Excel or Google Sheets.
Did I tell you you can create charts too with your data? And that’s only a small part. There are lots of other features for you.
How to set up the WooCommerce PayPal settings
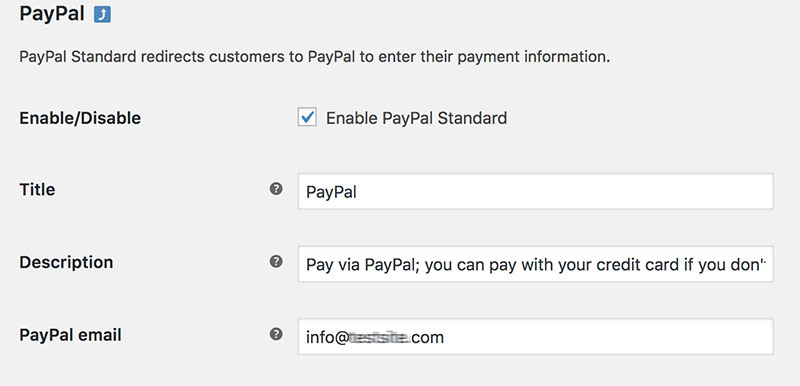
Return to your WooCommerce shop to test a purchase. In the WordPress dashboard click on WooCommerce → Settings → Payment gateways → PayPal. Set it up as follows:
- Check the ‘Enable PayPal standard’ option and confirm
- Enter the bogus Merchant email address in the PayPal & Receiver email box
- Check the ‘Enable PayPal Sandbox’ option
PayPal’s test mode is now active and it will only handle test payments. If a real purchase is made while test mode is active, the purchase will be denied.
Note: If other payment processors are active, such as bank transfer or Authorize.net, they will process real payments.
How to test a purchase
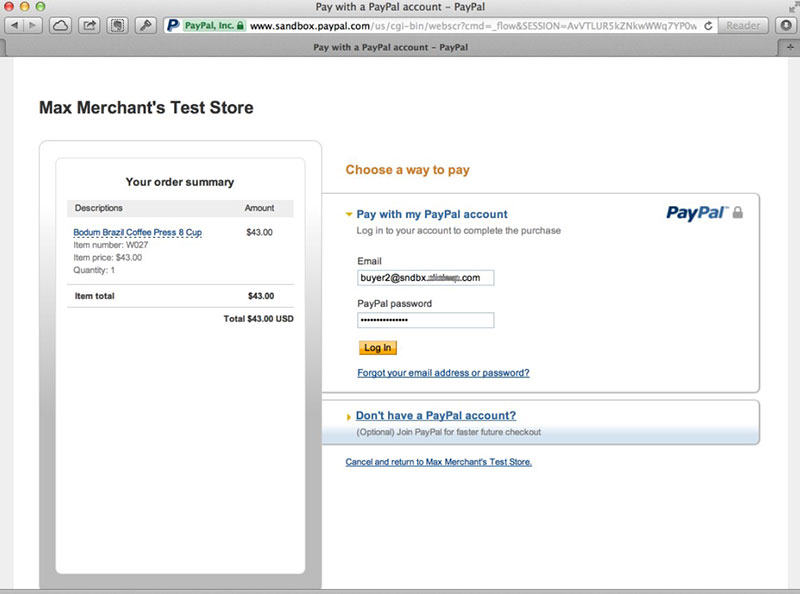
For this step, remember to use the test account created for the buyer. From another browser visit your shop, click on a product, and hit the “Place Order” button. You will automatically be directed to the PayPal Sandbox to process the payment.
Important: To confirm test status, the words “test store” will appear in the shop name, and the URL will be sandbox.paypal.com. PayPal may add a Test Site label in the upper or lower part of the page.
Log in with the created buyer test account and confirm the payment. Click → Return to the merchant link to finish the order.
Other WooCommerce Test Modes
Testing refunds
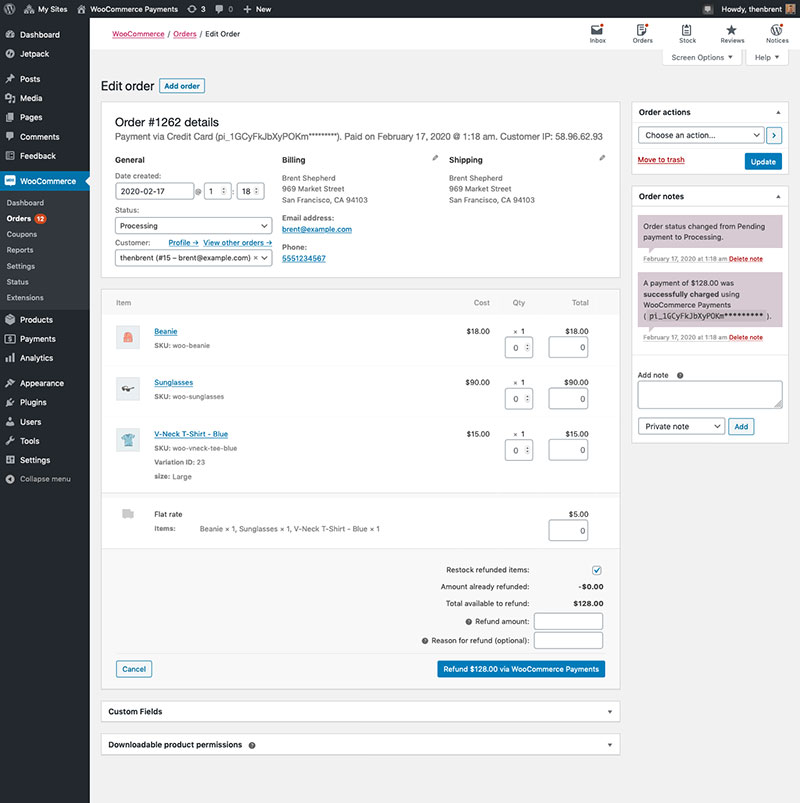
If you want to do a refund test:
- Pay for an order
- Now in WP Admin, go to WooCommerce > Orders.
- Click on the Order ID of the order created earlier.
- Hit the Refund link.
- Add the refund amount and, if desired, the reason for the refund.
- Then hit the refund button via WooCommerce Payments.
- Next, go to Payments > Transactions and confirm the refund transaction is in there.
Testing Manual Captures
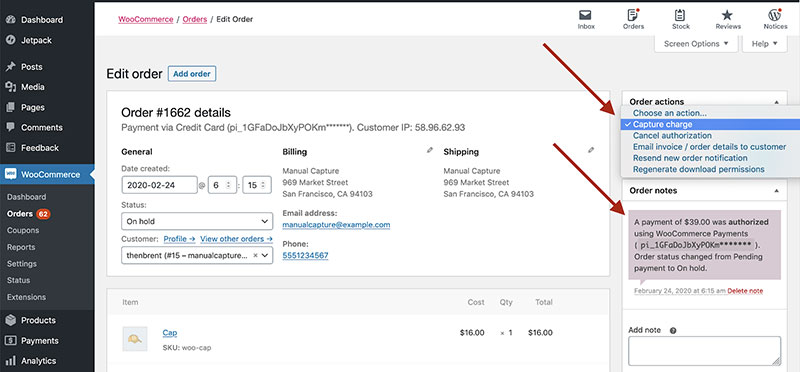
You can test a card payment authorization using manual capture:
- Go to Payments > Settings.
- Enable manual capture.
- Buy an item for testing purposes.
- Then go to WooCommerce > Orders.
- Click on the order ID of the order created earlier.
- Confirm the order has a text saying: “A payment of $xx.xx was authorized using WooCommerce Payments”.
- Choose an action → Capture charge → Update.There should be a note on the order saying: “A payment of $39.00 was successfully captured using WooCommerce Payments”.
- Finally, go to Payments > Transactions and check if there is a transaction with the “charge” type listed.
FAQs about WooCommerce test mode
How do I initiate test mode in WooCommerce?
Unveil the WooCommerce settings, shadowed beneath the ‘Payments’ section. A clandestine toggle, akin to whispering a spell, activates ‘Test Mode’. Transitioning your storefront to a parallel realm where transactions mimic reality, yet currency remains a figment—a sandbox for your scrutiny.
Is a sandbox account necessary for WooCommerce test mode?
Indeed, imagine a sandbox account as your digital doppelganger, masquerading as a real buyer. WooCommerce, in cahoots with payment gateways like PayPal or Stripe, demands such phantoms to rehearse the e-commerce ballet—sans the financial crescendo.
How can I tell if WooCommerce is running in test mode?
Visual cues are subtle yet distinct. Orders conjured in this alternate reality come tagged as ‘test’—scarlet letters to differentiate from genuine commerce. Scan for these breadcrumbs, which safeguard against the faux pas of blending fantasy with the tangible tapestry of live transactions.
What’s the difference between WooCommerce sandbox and live modes?
It’s akin to dress rehearsal versus opening night. In the sandbox, transactions are illusions, specters that vanish without a trace, leaving your coffers untouched. Live mode, by contrast, breathes life into transactions, filling your treasury with each customer’s passing.
Can I process refunds in WooCommerce test mode?
Process? Yes. Impact? No. Refunds in the realm of WooCommerce test mode are pantomimes, choreographed movements that echo the real thing. Yet, like shadows when the sun sets, they leave no print on your balance.
Does setting up WooCommerce test mode affect my site’s performance?
Fear not, for the performance of your digital fortress remains unassailed. The WooCommerce test mode operates in a veiled dimension, invisible to your patrons, ensuring your storefront’s ballet continues uninterrupted and as swift as ever.
How do I configure payment gateways in WooCommerce test mode?
Consult each payment gateway’s grimoire—you’ll unearth test API keys, akin to talismans, potent in the sandboxed realm alone. Embed these keys within WooCommerce, and presto, you materialize a bridge allowing mock transactions to traverse.
What should I test in WooCommerce test mode?
Test the waters by simulating every conceivable purchase pirouette. From the initial dance of adding products to the cart to the final twirl at checkout. Ensure your SSL certificate stands vigilant, and the checkout page responds with grace and precision.
How long should I run my WooCommerce store in test mode?
Run the diagnostic masquerade until each participant—the products, the cart, the checkout—performs flawlessly under your scrutinizing gaze. Only when confidence swells, and uncertainties fade like morning mist, should you step forth into the reality of live mode.
Can customers accidentally access the WooCommerce test mode?
Crafted with care, WooCommerce shields unwitting customers from stumbling into this backstage; their path remains ensnared in the bright lights of live commerce, where their actions wield the weight of bona fide currency.
Conclusion
In the grand tapestry of e-commerce, arming oneself with the knowledge of setting up WooCommerce test mode marks but the beginning. It’s a ballet of digits and decisions, all converging to present a pristine checkout experience.
- Poised on the brink of launch,
- Your digital realm’s foundations firmly established,
- Gaze turns to the checkout gatekeeper—test mode.
This final act isn’t merely a checklist; it’s the culmination of careful orchestration—dancing through WooCommerce sandbox setups and payment gateway rehearsals. Transactions now whisper through in silence, leaving not a dent in reality’s fabric, yet speaking volumes to those who listen.
With these solemn rites observed, stage curtains draw back—WooCommerce’s debug mode bows out. The storefront, no longer a phantom of potential, awakens to the hustle of trade and the music of genuine currency. It’s here, the journey transitions; the true test begins.
If you enjoyed reading this article on how to set up WooCommerce test mode, you should check out this one about how to set WooCommerce related products.
We also wrote about a few related subjects like WooCommerce grouped products, WooCommerce variable product, WooCommerce redirect after checkout, WooCommerce appointments plugins, WooCommerce product variations, how to export WooCommerce orders, how to change the WooCommerce number of products per page, WooCommerce hide category from shop page and the best WooCommerce extra product options.