If you are starting a new website, it is possible you will use WordPress. If you are new to building and editing websites, you will need some time to learn how to use it. In this article, we will teach you how to add a drop-down menu in WordPress.
Adding navigation menus in WordPress is easy as it already has a built-in management system. This is essential for every website because it allows us to explore the website easily. Every navigation bar has dropdown menus containing a list of all the pages on the website. Hover your mouse over a certain page title and click on whatever page you want to go to. If the menu is well designed and the pages are well organized, you will easily explore through groups of similar pages. This may influence your bounce rate and actually decrease it.
The links to the main pages of your website are all in the navigation menu. It is placed at the top of your screen as a horizontal line together with the website logo. You can create and customize this menu with the use of WordPress. You may choose a theme and a template that will suit the style of your website. You can make changes as you like to get the website suitable for your needs and style.
There is even an option to customize the WordPress navigation menu to a compact version. It will save up some space and still be easy to read the link text and navigate through the website. There are many simple ways to lessen the bounce rate and attract and keep visitors on the page.
You need to know how to use the WordPress dashboard first. The dashboard might seem confusing at first, but follow the instructions and you will learn to use it in no time. Once you do, you will be able to create and design amazing websites. Let’s start with instructions on how to add a drop-down menu in WordPress.
Go to the dashboard and click on the Appearance > Menus to create a menu. Once you do, simply drag and drop the menu items right below the main navigation menu. Don’t forget to click the Save Menu so you don’t lose your work. But, this is not all. In this article on how to add a drop-down menu in WordPress, we won’t explain just that. We will also present you with some other useful tips you might like and want to add to your website. The more you learn, the better website editor you become.
Table of Contents
Create menu items

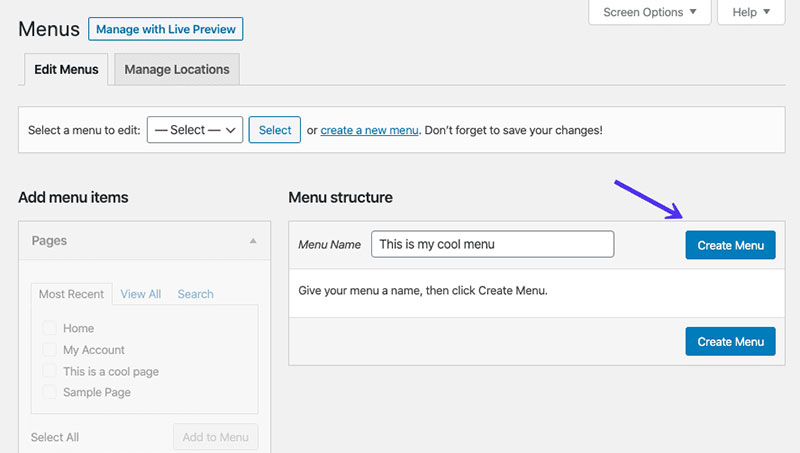
To create a dropdown menu, you have to start at the Appearance Menus. Depending on your current theme, you will get certain options to choose from. Select the Edit Menus tab and choose to add a new menu. Think of the menu name and enter it in a field located below the Menu structure section. Click on the Create Menu. You have to create at least one new menu. After you do that, a new tab should pop up on your screen. It will be named as Manage locations and you should find it right next to Edit Menus.
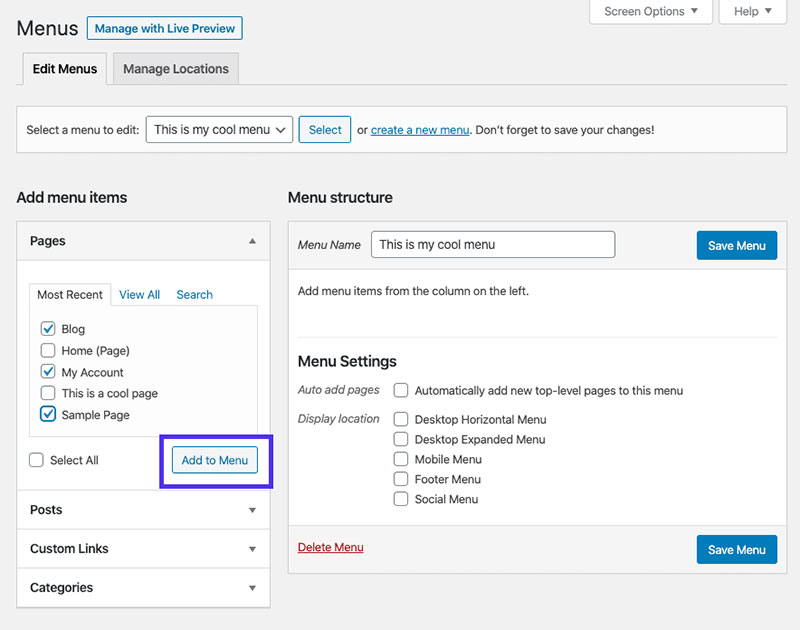
You should add menu items section lists such as Pages, posts, custom links, and formats to your menu. Check out all the available options in this category. After you choose the ones you want, mark the checkbox for the selected item. Click on the Custom Links section and input the URL in case you want to add a link to your menu.
Adding sub-items to a menu
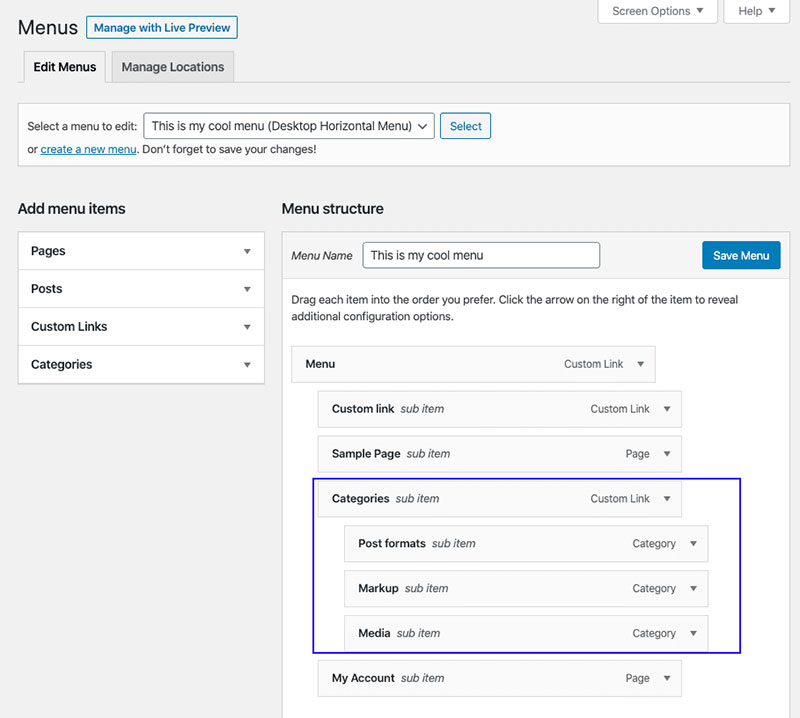
To create a new menu, you will also need some additional menu items. The items that appear inside the dropdown menu are called the sub-items. You can add these to any of the items already in your dropdown menu. Of course, this depends on how you want to organize your many and menu items.
You can add different categories under the blog link. To do this, pick the items you want from the left column. Click “add to menu” and they should pop up in the right column. You should know these will appear as regular items and what you need is a sub-item of the main menu. To do this, move the item more to the right and you will get a sub-item.
Add links to the menu
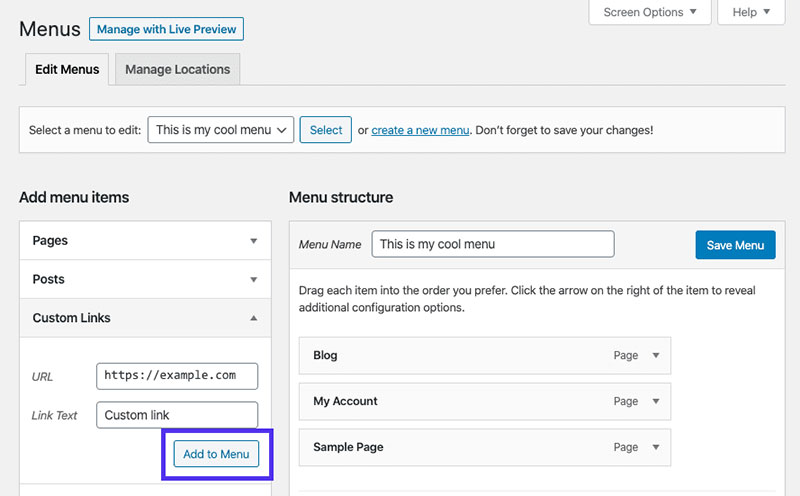
You will want to add some links to your content. To do this, mark the pages and the posts using the sidebar you would want to be on your website menu. After you make the selection, click the Add to Menu. If you want to, you can also add some custom links in the dropdown menu. This is not something you must add, but just in case you wish to be more creative.
Set your menu structure
The organization is essential for a good quality website. At this point, the new menu is not organized yet. As you click and choose what to add it will all get piled up in the dropdown menu. New items appear as you click and add new ones. Not even the dropdown menu function is activated. So, let’s see how to take care of this.
To organize menu items in a certain order in WordPress, all you have to do is drag-and-drop. Simply select an item, click and hold it. Place the item wherever you want on the menu. This can also be applied to the sub-items.
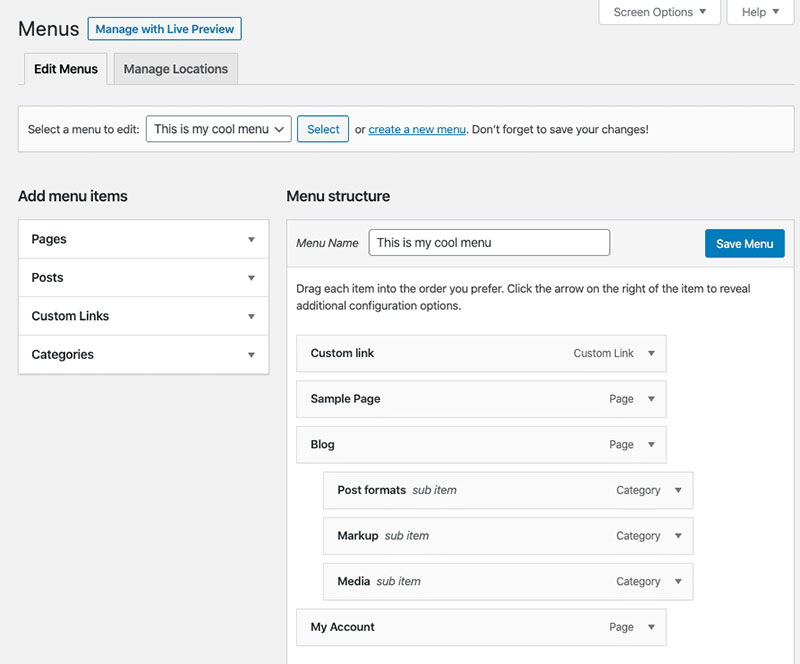
For example, make a list of certain blog posts and position them under the broader Blog menu item. Navigation menus are there to help site visitors explore the pages and move from one link to another easier.
Be sure not to add too many items to one menu. If there is too much, it may seem confusing. Therefore, it is better to sort and add items into a couple of categories.
Some people create so-called mega menus. They also appear as dropdown menu and show a lot more links, sub-menus, and more. If you’re interested, find tutorials and articles about mega menus only.
Organize WordPress menu
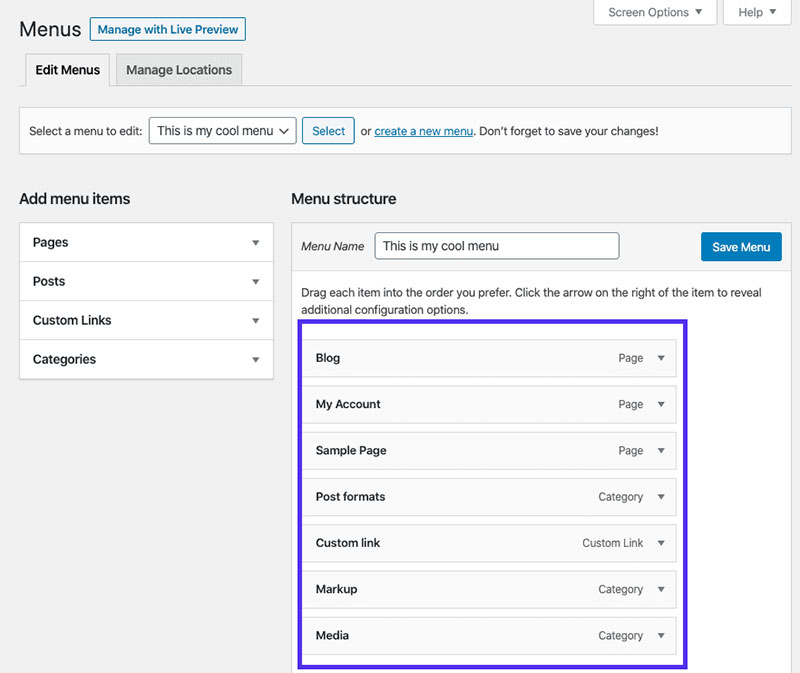
All the items you chose and selected should now be placed under the Menu structure in the editor. They will appear listed in individual tiles. As we already mentioned, these items show up in the menu in the same order as you click and add them. But, you can customize this and change their order. This is a useful option when creating a dropdown menu because it allows you to create a simple menu. The simpler the menu, the easier the navigation. Just don’t forget to save your changes after re-ordering the items.
One way to create a WordPress dropdown menu is drag-and-drop. This is the simplest one. Select items, add, re-organize in sub menus and categories and put them in a desirable order.
If you have more website pages that are really important and should belong to a menu, you need to figure out a proper page hierarchy.
Choose menu location
After you create dropdown menu, the next step is to choose where you’d like to place it on your website homepage. If you are satisfied with your menu, then it is time to select its location on the home page.
The first part of the screen a website visitor sees is the header. This is a good place to display a menu because no one wants to scroll and search for the menu.
We recommend you try out a couple of WordPress themes. Each theme has different display locations. It will be best if you choose for example Top Menu, Primary Menu, Primary, etc.
Publish drop-down menu

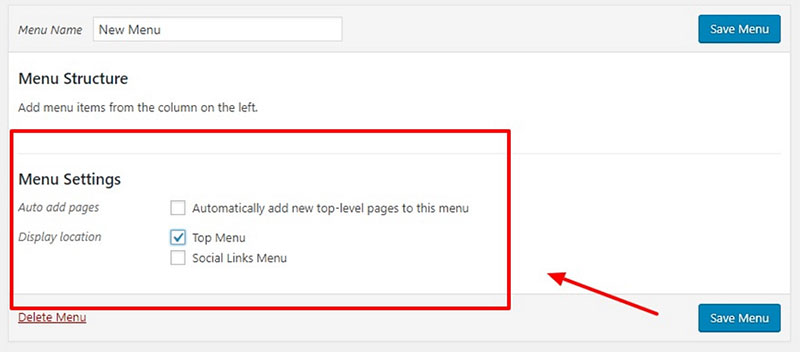
Sometimes, you’ll be making changes to an already existing menu. Adding pages or categories, for example. These changes will directly appear on the website. But, if you are about to add new menu, then you will need to select a theme and a location to display this new menu.
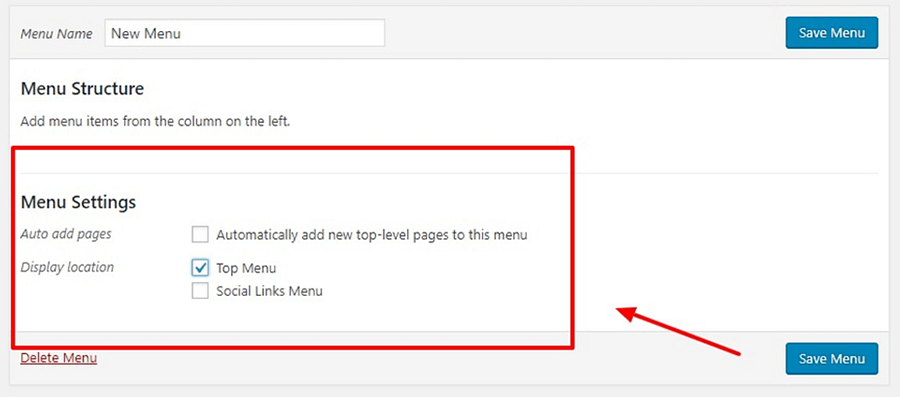
Every WordPress theme has different options to display the menu. You will, of course, choose among the WordPress themes and menu locations you like best. To do this, select option in the right column – Menu Settings. Find a “Display location” setting and choose the “Save menu” button.
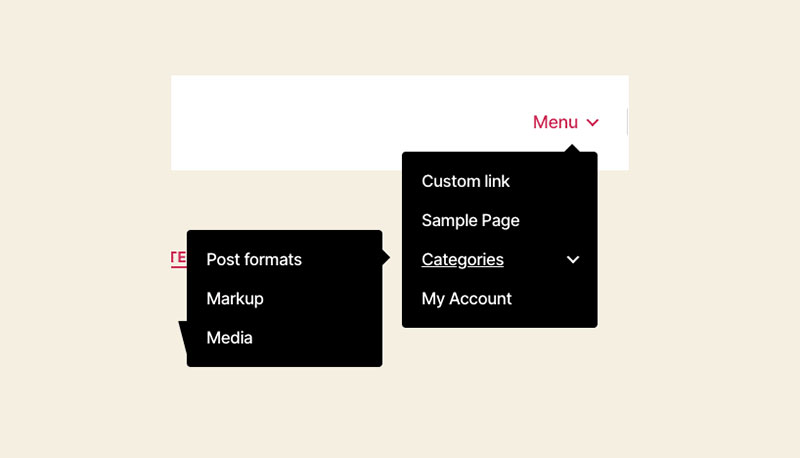
Preview menu

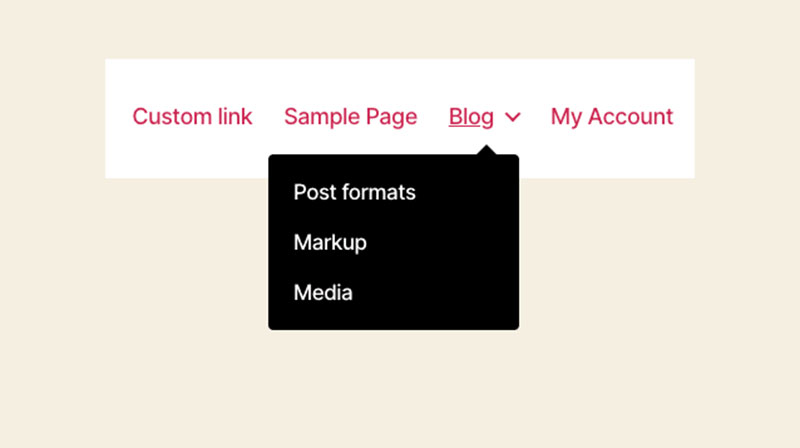
Before anything goes public and online, it is best to have a live preview of your WordPress site and new menu. To do this, check it out in the WordPress Customizer. You will get a live preview and also you can make changes in real-time.
Add, change order, delete, switch items, make whatever changes you think are needed while having a live preview. Have in mind that many people surf through the internet via mobile phones. Make sure your WordPress website will look and function on the phone as well as on a desktop computer.
FAQ on adding a drop down menu in WordPress
How Do I Start with Adding a Drop-Down Menu in WordPress?
Alright, so you’re diving into the world of WordPress, and you want to jazz up your site with a drop-down menu, yeah? First things first, head over to your WordPress dashboard, and find ‘Appearance’ and then ‘Menus’. This is where the magic happens. You’re gonna create a new menu or pick an existing one.
To get that drop-down action, you need to add items to your menu and simply drag them a bit to the right underneath the main item, and bam, you’ve got yourself a drop-down. Make sure your theme supports drop-down menus though; not all of them play nice with this feature.
Got Any Tips on Styling This Drop-Down Menu?
Oh, absolutely! Now, to give that menu some pizzazz, you’re gonna need to play around with some CSS. Head over to ‘Appearance’ and then ‘Customize’.
From there, dive into the ‘Additional CSS’ section. This is where you can add your own styles. You want to target the menu items and the sub-menu items. Throw in some ‘:hover’ actions to make things pop when someone hovers over them. If CSS feels like gibberish, there are plenty of tutorials out there to guide you through.
Are There Plugins to Help Me Out?
You betcha! WordPress has a treasure trove of plugins. For drop-down menus, you might want to check out plugins like ‘Max Mega Menu’ or ‘UberMenu’.
These plugins are like magic wands; they can transform your standard menu into a mega menu with all the bells and whistles. Just install the plugin, configure the settings, and your menu will be on steroids. It’s user-friendly, and you don’t need to be a coder to get the hang of it.
How Can I Ensure My Drop-Down Menu Is Mobile-Friendly?
Oh, mobile responsiveness is key! You gotta make sure your menu looks good and works well on all devices.
First off, ensure your WordPress theme is mobile-responsive; that’s half the battle won. Then, when you’re setting up your menu, keep it simple. Don’t cram too many items in there. If you’re using a plugin, check its settings for mobile options. And hey, don’t forget to test it out on different devices to make sure everything’s running smoothly.
My Drop-Down Menu Isn’t Working. What Do I Do?
Yikes, that’s frustrating! First things first, clear your cache; sometimes old code gets stuck and messes things up. If that doesn’t fix it, check for plugin conflicts.
Deactivate your plugins one by one, and see if that solves the issue. If you’ve got some custom code in there, make sure there’s no typo or error. And if you’re really stuck, don’t hesitate to reach out to the theme or plugin support; they’re usually pretty helpful.
How Do I Add Custom Links to My Drop-Down Menu?
Oh, custom links are cool; they open up a whole new world of possibilities. In the ‘Menus’ section of your dashboard, you’ll see an option for ‘Custom Links’.
Click that, and you can add any URL you want, along with the link text. Add it to your menu, adjust the position, and you’re all set. You can link to external sites, PDFs, whatever floats your boat. Just remember to open external links in a new tab; keep your site open in the background.
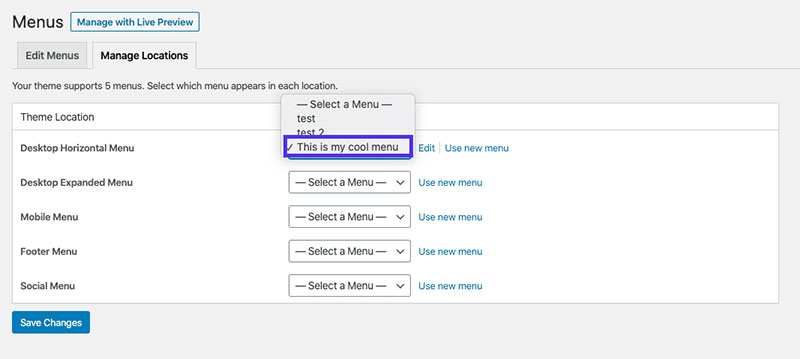
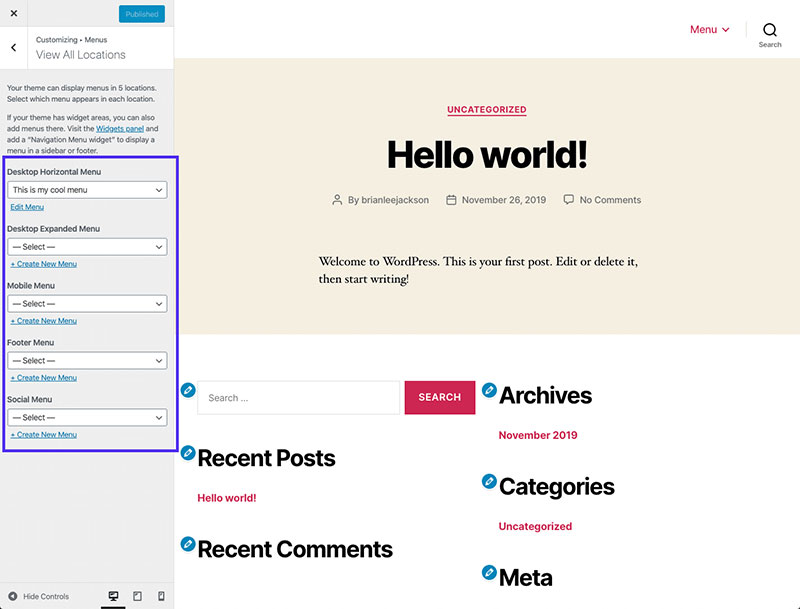
Can I Assign My Drop-Down Menu to Different Locations?
Absolutely, you’ve got options! When you’re in the ‘Menus’ section, look for ‘Menu Settings’ at the bottom. You’ll see ‘Display location’.
Here, you can pick where you want your menu to appear. Different themes offer different locations; some have primary menus, footer menus, social menus, you name it. Pick the location you want, save it, and check out how it looks on your site. Play around with it till it feels just right.
What’s the Deal with Mega Menus?
Ah, mega menus are like the Ferraris of drop-down menus. They let you show off a lot of content in a slick, organized way.
If you’ve got a lot of categories, products, or links to flaunt, a mega menu might be just what you need. You can use a plugin or get down and dirty with some custom coding if you’re feeling adventurous. Mega menus are all about enhancing user experience and making navigation a breeze.
How Do I Make My Drop-Down Menu More Accessible?
Accessibility is key, my friend. You want everyone to be able to navigate your site easily. Make sure your theme follows accessibility standards.
Use clear, descriptive labels for your menu items. If you’re using a plugin, check if it has accessibility features. And hey, test your site with keyboard navigation to make sure it’s user-friendly for folks using screen readers. Making your site accessible isn’t just good karma; it’s good for business.
Any Advanced Techniques I Should Know About?
Oh, for sure! If you’re feeling confident and want to take things to the next level, you might want to experiment with conditional menus.
This means showing different menu items to different users based on certain conditions. Maybe you want to show a special menu to logged-in users, or change the menu based on the time of day. This requires some PHP magic and a bit of coding know-how, but it can really tailor the user experience on your site.
Ending thoughts on how to add a drop down menu in WordPress
In this article about how to add a drop down menu in WordPress, we presented you with some basic steps. The dropdown menu should be well-organized. You shouldn’t clutter it with too many items. It is better if you in several categories. This will make navigation through the website easier. The first page of a website is the most important one. It has to be well-organized, clean and neat. A well-designed home page and menus will keep the visitors interested and on the website.
If you enjoyed reading this article on how to add a drop down menu in WordPress, you should check out this one on how to create statistical tables in WordPress.
We also wrote about a few related subjects like how to watermark images, how to check the WordPress version, creating a comparison table with WordPress plugins, how to scan the WordPress database for malware, how to upload an HTML file in WordPress, where are WordPress pages stored and how to make a phone number clickable in WordPress