


Table of Contents
What does this add-on do and when is it useful?
Master-Detail Tables is an add-on for wpDataTables that allows you and your site visitors to see all desired details for each row with a simple click. Many users today have tables with a large number of columns and data. However, when such tables are placed on a website, they often disrupt the visual appearance of the page. Until now, the only solution was to hide certain columns or completely modify the table to fit the page. But what if you need all those columns and data, and you can’t hide anything because you want your users to have all the information? Don’t worry, there is now a solution for that.
The Master-Detail Tables add-on allows you to hide less important data from the table on the frontend, while still giving users the option to view all the information, either in a non-tabular view or now also in a special tabular display by simply clicking on the desired row. This way, you don’t have to delete any columns; you can simply hide them visually and display all the information when needed. This scenario illustrates a common use of the Master-detail functionality in practice. However, please note that within the details, you can also display data from columns that are visible on the frontend, i.e., columns that have not been previously hidden. This add-on provides you with the flexibility to creatively adapt it to your needs and the needs of your users.
Further in the text, it will be explained how you can easily access the desired details by simply clicking on a specific row or button, and how to use the Master-Detail add-on yourself.
How to install the addon?
Installing the Master-Detail Tables addon is a quite straightforward process if you have some experience with WordPress plugins. There are 2 possible ways of uploading it to the WordPress site:
Go to your WordPress admin panel, open the “Plugins” page, then click “Add new”, choose “upload” and then browse to the ZIP file that you’ve downloaded from our store.
Go to our store, login with the credentials you received via e-mail when you purchased the plugin, download the plugin and extract the ZIP file that you’ve downloaded. Once you’ve done that open your WordPress installation through FTP, browse to wp-content/plugins, and upload the extracted folder there.
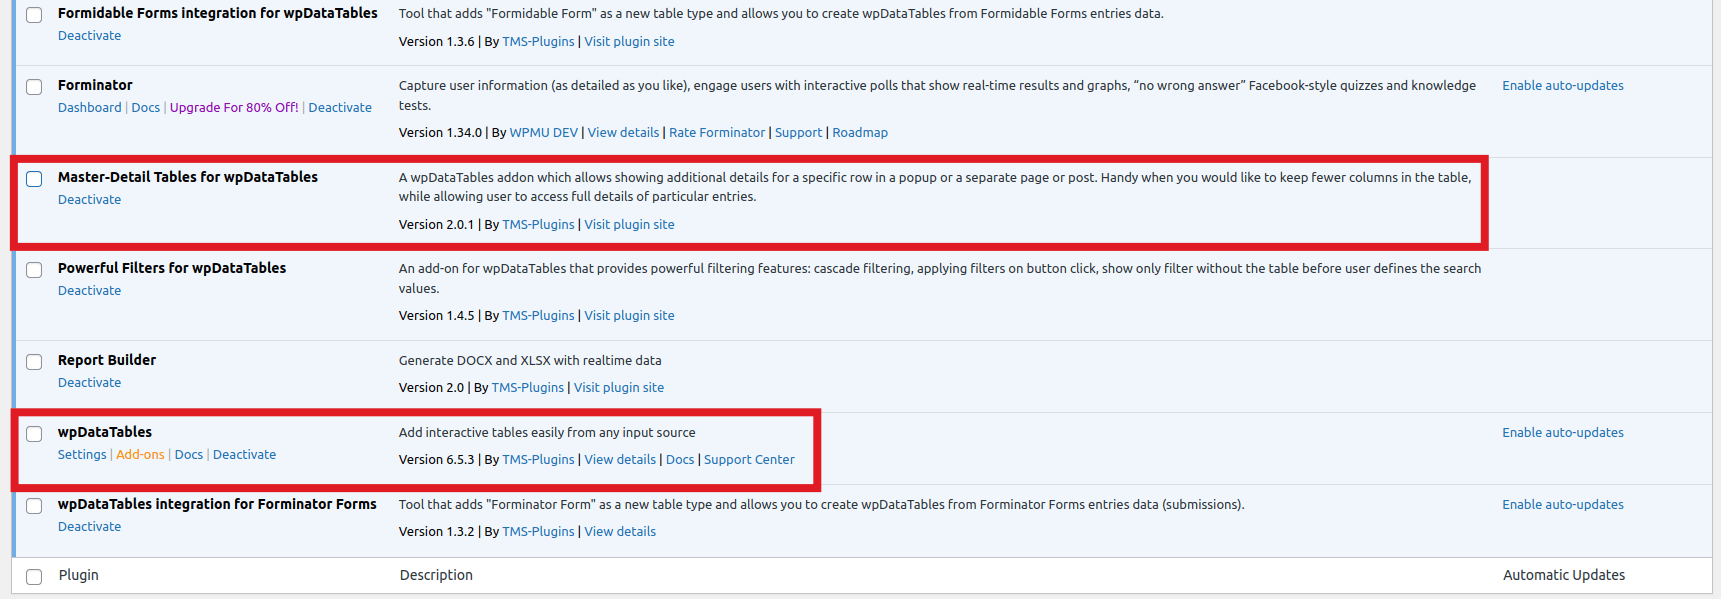
Once you’ve uploaded the plugin using one of these 2 scenarios, you should see the Master-Detail Tables add-on in your plugins list. Just click “activate”, and you’re good to go!
How to enable the addon?
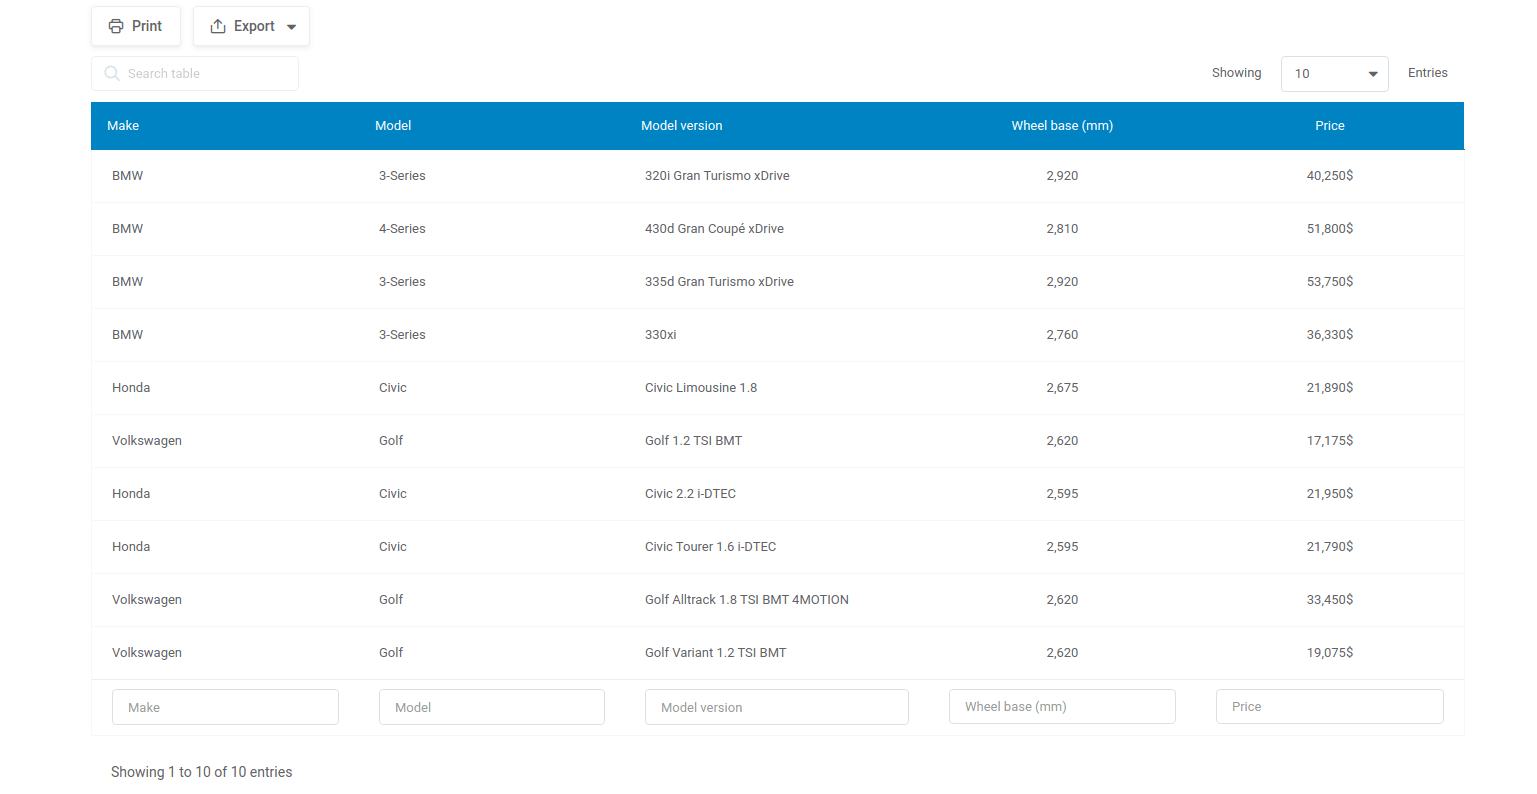
What you need to do first is to create wpdatatables from Table wizard. To begin with, we will create a non-editable table from this excel file. If you encounter any issues in this step while creating the table, simply follow the instructions from Creating Tables in WordPress from Excel.
When you have created a table with all the necessary columns, you can immediately select some columns that disrupt the visual appearance of the table and hide them. Don’t worry about losing the data contained in the hidden columns, because this is where the Master-Detail add-on comes into play, allowing you to provide users with that information by simply clicking on the row for which you want to see more details. You can also display data from visible columns within a separate detail view in either tabular or non-tabular display. You choose the data you want to display as additional details about a row, whether they are in visible or hidden columns. See how to select the data you want to display as details.
Please note that there is a small difference in functionality between editable and non-editable tables. This difference pertains only to a slightly different way of accessing details from the table. Here, you can learn about the basic differences in functionality between editable and non-editable tables.
Next, activate the Master-Detail Tables add-on within the Installed Plugins section. After activating the Master-Detail Tables add-on you will notice a new table settings tab called Master-Detail Settings on the table configuration page. When you click on it you will see the option “Master-Detail”.
In order to try out how the Master-Detail add-on works, please enable the “Master-Detail” option and you will see several new options.

How to use Master-Detail options?
1. Open details on – Choose the action that will enable displaying the details of a specific row – If the “Row click” is selected, users will be able to access details for a row by clicking on it. If the “Button click” is selected, a new column will be added to the table, where each row will get a button opening the details for it.

2. Show details in – Choose how your details will be opened – If the “Popup” option is selected, the details for the selected row will appear in a popup dialog on the same page. If you choose one of the “Post” or “Page” options, users will be redirected to the selected post or page (depending on what you chose in this step), which will be displayed in the current or a separate tab based on the settings you choose in the next option (4). This way, the post or page will open as a filled template with the actual data from the table. Please note that you must first create the post or page template and fill it with placeholders to use it. Later, it will be explained how to create a template.
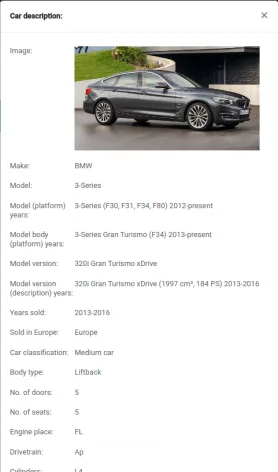
3. A. Popup Title – Choose a title for the popup with row details. If you leave the field blank, the default title will be “Row details” (In our example we will call it Car description:)

3.B. Template page – This option is displayed if, in the previous step (Step 2 “Show details in”), you chose to display the details on a page or post. In this step, select the appropriate template you have previously created in WordPress. This can be a post or a page, depending on the format in which you want the row details to open. Creating a template works by creating a page or post that you fill with variable and non-variable parts. The visual design, details, sections, and complexity of the page are up to your imagination. There are many ways you can create this template. The variable parts are inserted into the template as placeholders, which will later be replaced by the actual data of the row when a specific row in the table is clicked. To ensure the placeholder is replaced with the correct values, insert it into the template in the following format: %originheader%. The placeholder is defined by placing the original column name between the %% signs. This ensures that the placeholder is replaced with the specific data from the exact column corresponding to the row for which you need additional details. Read more detailed instructions on creating templates later in the text.
4. Link target attribute – This option is unchecked by default. In that case, the row details will be displayed on a post/page that will open in a separate tab. If you check this option, the page or post with the row details will open in the same tab you are currently on.
5. Send details over – The POST method is chosen by default. It sends details associated with the Table ID and the Column ID from the selected/clicked row.
Limitation: With the POST method, the column placeholder values on your “Template Page/Post” will only render when the user is redirected by clicking/selecting the row from the table.
Directly visiting the URL of the “more details Page” or “Post” will only show empty column placeholders.
If you change this to the “GET” method, the details data associated with the table ID and the chosen column ID from the selected row will be conveyed through GET parameters, making the information accessible via the unique URL. In other words, this allows you to have a unique URL for each record/row in the table. This URL can be visited directly, and it will render the column placeholder values without having to click the row or button from the Table.
Please note: If you choose the “GET” method, make sure to set your chosen “Parent/Child Table column Name”.
If you leave that option blank, you will see an error if you click a row from the Table and the Template Page won’t load/redirect.
6. Send table data – This option appears only if, in the previous step (5) “Send details over,” we selected to send data via a GET parameter. “Send table data” gives you the flexibility to choose the table data you want to send. Within this option, there are three possible choices:
Depending on which of the three options within this feature you choose, you will be able to send detailed information in a non-tabular or tabular view. The first and second options allow you to send detailed information from the rows of the parent/existing table or the row details specifically from the child table. The third option within this feature allows you to send the entire dataset from the child table in a separate tabular view on the post or page.
We will now explain each of these three options in detail, along with examples.
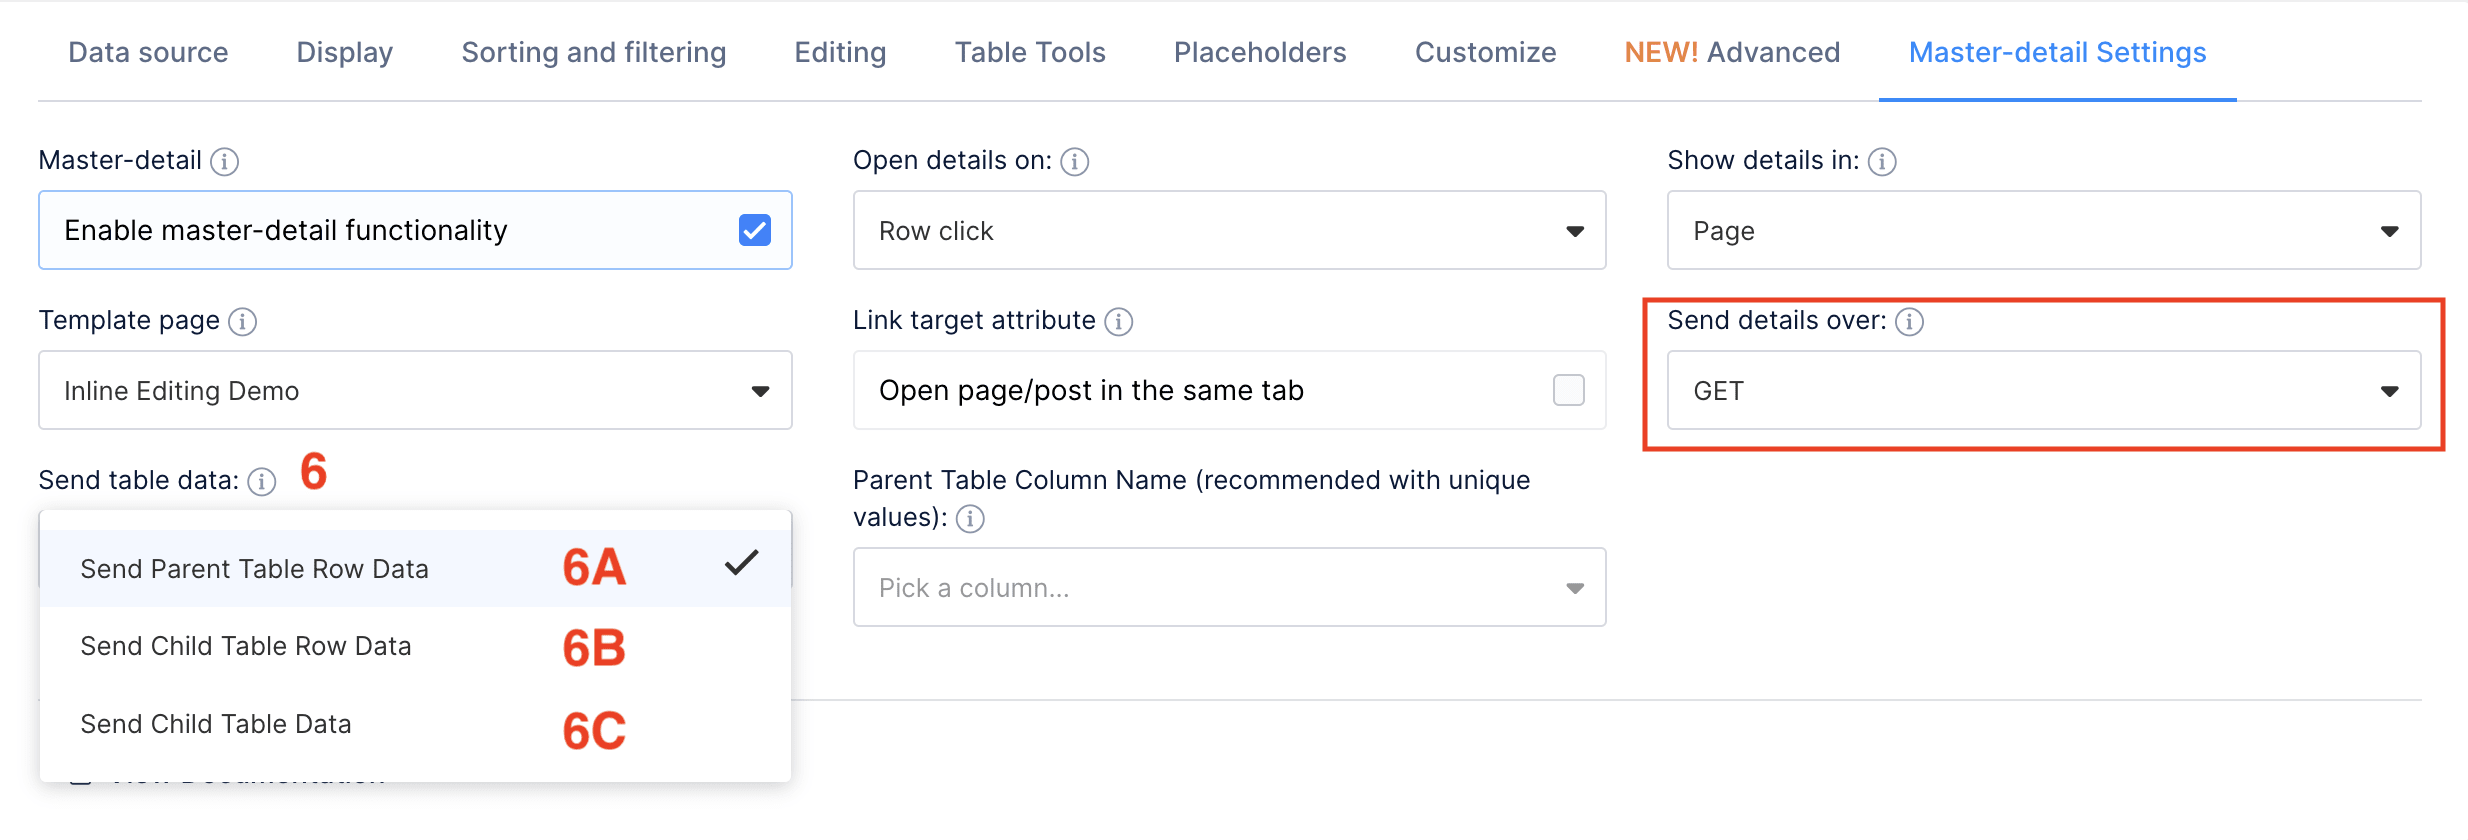
6.A. Send Parent Table Row Data – This option allows you to generate desired details in a non-tabular view for the selected row of this parent table by simply clicking on the desired row or button. The option becomes visible only after selecting to send via the GET parameter in step five. The essence of this option is that only the parent table ID and the details of a specific row, in the format you previously defined in the template (Instructions on how to create a custom template), are sent via GET parameters. Sending data via GET parameters allows you to access the details of any row at any time and from anywhere, without needing to have the entire table in front of you. This way, you can directly access the details of a specific row through a URL, instead of searching for and clicking on the specific row within the table. This option is extremely useful for efficient data access and simplifies working with large tables. Pay attention to the next option “Parent Table Column Name,” where you need to select a column with unique values (e.g., WDT_ID in Manual tables) based on which placeholders in the template will display details of the exact table, column, and row.
It’s best to demonstrate the use of this option with an example. First, you need to create wpDataTables from the Table wizard. Let’s start by creating a manual table by importing this Excel file. As you can see, this table has a large number of different columns. In this specific example, we followed the steps below:
After following the steps mentioned above, you will get the following table. Click on the “More Details” button in the column of the row for which you want to see more information. In the table below, you can see how the details page opens and what details it contains. Since we previously selected the option to send details via GET parameters, you can copy the URL of the details page and access it anytime and from anywhere.
6.B. Send Child Table Row Data – This option allows you to connect two tables so that by clicking on a row in the parent table, you can easily access more detailed information from the child table. This eliminates the need to create tables with many different columns and entries to gather all necessary information about any item. This option works by allowing you to send row details specifically from the child table. For this option to function correctly, you need two tables, a parent and a child, which are interconnected by a common UNIQUE ID column. Within the master detail functionality, in the “Child Tables” option, select the child table whose data you want to link with the chosen parent table. Establish the link by selecting unique columns with corresponding unique values in the “Parent Table Column Name” and “Child Table Column Name” options. Create a template beforehand that will contain placeholders from the child table, which will be displayed and replaced with actual data from the child table when you click on the row in the parent table to which this information pertains. This way, you get the ability to see detailed information from the parent table row, in a non-tabular view, which is stored in the child table linked to the parent table by a unique ID column.
Note: This will only be handled as a “One-to-One” relation. If you have multiple rows with the same ID in the “Parent Table Column Name” of the selected child table; in that case, only the first row matching the chosen ID will be rendered, and any other ‘duplicate ID rows’ will be ignored. That is why we recommended using unique values for the relation columns earlier (both parent and child columns).
It’s best to demonstrate the use of this option with an example. What you need to do first is to create wpDataTables using the Table Wizard. Let’s start by creating manual tables by importing Excel files. You’ll need one parent table and one child table, which we will link using a common unique ID column. Let’s go through the steps together:
In this way, we have created two tables where one is subordinate to the other and provides more detailed descriptions of its rows. By clicking on the parent table below, observe how and which details open on the details page. You will notice that the page offers a detailed description of universities based on data stored in the child table. Since we previously selected the option to send details via GET parameters, you can copy the URL of the details page and access it anytime and from anywhere.
| wdt_ID | wdt_created_by | wdt_created_at | wdt_last_edited_by | wdt_last_edited_at | FacultyID | FacultyName | Location | EstablishedYear | StudentCount | ProgramsOffered |
|---|---|---|---|---|---|---|---|---|---|---|
| 1 | Sara | 18/07/2024 02:48 PM | Sara | 18/07/2024 02:48 PM | 1 | Faculty of Engineering | New York, NY | 1,854 | 5,000 | 10 |
| 2 | Sara | 18/07/2024 02:48 PM | Sara | 18/07/2024 02:48 PM | 2 | Faculty of Medicine | Los Angeles, CA | 1,900 | 4,000 | 8 |
| 3 | Sara | 18/07/2024 02:48 PM | Sara | 18/07/2024 02:48 PM | 3 | Faculty of Business | Chicago, IL | 1,920 | 3,000 | 12 |
| 4 | Sara | 18/07/2024 02:48 PM | Sara | 18/07/2024 02:48 PM | 4 | Faculty of Arts | Boston, MA | 1,870 | 2,000 | 15 |
| 5 | Sara | 18/07/2024 02:48 PM | Sara | 18/07/2024 02:48 PM | 5 | Faculty of Sciences | San Francisco, CA | 1,930 | 3,500 | 20 |
| 6 | Sara | 18/07/2024 02:48 PM | Sara | 18/07/2024 02:48 PM | 6 | Faculty of Law | Washington, D.C. | 1,800 | 1,000 | 5 |
| 7 | Sara | 18/07/2024 02:48 PM | Sara | 18/07/2024 02:48 PM | 7 | Faculty of Education | Austin, TX | 1,950 | 2,500 | 7 |
| 8 | Sara | 18/07/2024 02:48 PM | Sara | 18/07/2024 02:48 PM | 8 | Faculty of Computer Science | Seattle, WA | 1,980 | 4,000 | 10 |
| 9 | Sara | 18/07/2024 02:48 PM | Sara | 18/07/2024 02:48 PM | 9 | Faculty of Architecture | Miami, FL | 1,850 | 1,500 | 6 |
| 10 | Sara | 18/07/2024 02:48 PM | Sara | 18/07/2024 02:48 PM | 10 | Faculty of Social Sciences | Philadelphia, PA | 1,890 | 3,000 | 10 |
| FacultyID | FacultyName | Location | EstablishedYear | StudentCount | ProgramsOffered |
6.C. Send Child Table Data – This option allows you to connect two tables so that by clicking on a row in the parent table, you can easily access more detailed information from the child table. (Well known Parent/Child table relationship). This eliminates the need to create tables with many different columns and entries to gather all necessary information about any item. This option allows you to display the entire dataset from a child table in a separate table view on a post or page. In this way, you can establish a “One-to-Many” relationship. This means that you can link one row in the parent table to multiple rows in the child table. This type of relationship enables each row in the parent table to have multiple corresponding rows in the child table, which is useful when you want to display all related data.
Here’s how it works: by selecting a row in the parent table that you want more information about, you retrieve data about all rows in the child table that are linked to it.
When using this option, you should select the child table under the “Child Tables” option and connect it to the parent table using unique columns that have matching values through the options Parent Table Column Name and Child Table Column Name. This setup ensures that if the id column (Parent Table Column Name) in the parent table has multiple matching ids in the child table id column (Child Table Column Name) that relate to it, opening the template details by clicking on a row in the parent table will display a table with all the rows from the child table that are linked by the unique column to this row.
It’s necessary to first create and insert a template that contains the placeholder
%wpdatatables_md_child_table%
which allows you to display all rows from the child table linked to the selected row in the parent table in a tabular view.
It’s best to demonstrate the use of this option with an example. What you need to do first is to create wpDataTables using the Table Wizard. Let’s start by creating manual tables by importing Excel files. You’ll need one parent table and one child table, which we will link using a common unique ID column. Let’s go through the steps together:
%wpdatatables_md_child_table%
(Instructions on how to create a custom template.)
In this way, we linked the parent table of products with all the information about those products to the child table of orders related to the products from the parent table. Click on any row from the parent table below to see a tabular display of all orders related to that specific product. Since we previously selected the option to send details via GET parameters, you can copy the URL of the details page and access it anytime and from anywhere.
| wdt_ID | wdt_created_by | wdt_created_at | wdt_last_edited_by | wdt_last_edited_at | ProductID | ProductName | Category | Price | Stock | Supplier | SupplierContact | Description | Weight | Dimensions | Warranty | Rating | ManufactureDate | ExpiryDate | Discount | SKU | Color | Material | OriginCountry | Brand | PackageType |
|---|---|---|---|---|---|---|---|---|---|---|---|---|---|---|---|---|---|---|---|---|---|---|---|---|---|
| 1 | Sara | 18/07/2024 11:10 AM | Sara | 18/07/2024 11:10 AM | 1 | Laptop | Electronics | 1,200 | 50 | TechSupplier | 123-456-7890 | High performance laptop | 2.5 kg | 30x20x2 cm | 18/07/2026 | 4.50 | 15/01/2023 | 15/01/2026 | 10% | LTP1200 | Black | Metal | USA | TechBrand | Box |
| 2 | Sara | 18/07/2024 11:10 AM | Sara | 18/07/2024 11:10 AM | 2 | Smartphone | Electronics | 800 | 100 | PhoneWorld | 987-654-3210 | Latest model smartphone | 0.5 kg | 15x7x0.8 cm | 18/07/2025 | 4.80 | 01/03/2023 | 01/03/2025 | 5% | SM800 | Silver | Metal | China | PhoneCo | Box |
| 3 | Sara | 18/07/2024 11:10 AM | Sara | 18/07/2024 11:10 AM | 3 | Office Chair | Furniture | 150 | 200 | OfficeGear | 456-789-0123 | Ergonomic office chair | 10 kg | 60x60x120 cm | 18/07/2029 | 4.20 | 20/11/2022 | 20/11/2028 | 15% | OC150 | Black | Fabric | Germany | Comfort | Box |
| 4 | Sara | 18/07/2024 11:10 AM | Sara | 18/07/2024 11:10 AM | 4 | Coffee Maker | Kitchen | 100 | 75 | KitchenPro | 321-654-9870 | Automatic coffee maker | 3 kg | 25x25x35 cm | 18/07/2027 | 4.00 | 10/05/2023 | 10/05/2026 | 20% | CM100 | White | Plastic | Italy | BrewMaster | Box |
| 5 | Sara | 18/07/2024 11:10 AM | Sara | 18/07/2024 11:10 AM | 5 | Headphones | Electronics | 200 | 150 | SoundTech | 789-012-3456 | Noise-cancelling headphones | 0.3 kg | 20x15x5 cm | 18/07/2025 | 4.70 | 25/02/2023 | 25/02/2024 | 10% | HP200 | Black | Plastic | Japan | AudioMax | Box |
| 6 | Sara | 18/07/2024 11:10 AM | Sara | 18/07/2024 11:10 AM | 6 | Gaming Console | Electronics | 500 | 60 | GameZone | 654-321-0987 | Next-gen gaming console | 4 kg | 40x30x10 cm | 18/07/2026 | 4.90 | 01/06/2023 | 01/06/2026 | 5% | GC500 | Black | Plastic | USA | GameTech | Box |
| 7 | Sara | 18/07/2024 11:10 AM | Sara | 18/07/2024 11:10 AM | 7 | Microwave Oven | Kitchen | 250 | 80 | HomeAppliances | 098-765-4321 | Convection microwave oven | 15 kg | 50x50x30 cm | 18/07/2027 | 4.40 | 15/04/2023 | 15/04/2026 | 10% | MO250 | Silver | Metal | South Korea | HomeCook | Box |
| 8 | Sara | 18/07/2024 11:10 AM | Sara | 18/07/2024 11:10 AM | 8 | Vacuum Cleaner | Home | 180 | 90 | CleanUp | 123-789-4560 | High-power vacuum cleaner | 8 kg | 35x35x50 cm | 18/07/2026 | 4.30 | 20/01/2023 | 20/01/2025 | 10% | VC180 | Red | Plastic | UK | CleanMaster | Box |
| 9 | Sara | 18/07/2024 11:10 AM | Sara | 18/07/2024 11:10 AM | 9 | Smartwatch | Electronics | 250 | 120 | GadgetWorld | 432-987-6543 | Multi-function smartwatch | 0.1 kg | 5x5x1 cm | 18/07/2025 | 4.60 | 10/03/2023 | 10/03/2024 | 5% | SW250 | Black | Metal | China | TechWear | Box |
| 10 | Sara | 18/07/2024 11:10 AM | Sara | 18/07/2024 11:10 AM | 10 | Air Conditioner | Home | 600 | 30 | CoolAir | 321-123-6547 | Energy-efficient AC unit | 20 kg | 70x50x25 cm | 18/07/2029 | 4.20 | 01/12/2022 | 01/12/2027 | 15% | AC600 | White | Plastic | Japan | AirCool | Box |
Opening details by clicking on a selected row is the first option under “Open details on.” To enable this functionality, simply select “Row click” under this option. This allows you to quickly and easily access the details of any row in the table.
It is important to note that if the table is non-editable, the details card will open immediately upon clicking the row. However, if the table is editable, there is an additional step between clicking the row and opening the details card – you need to click the master detail button located next to the other buttons for editing, deleting, and duplicating the row.

Try this option on the table below:
If you click on any row in the table, you will get more details about the car description in a popup dialog for that row. You can check how this works in the table below.
Different functionality of “Row click” option for editable and non-editable wpdatatables
If you create editable tables (manually created tables, table created by import the table data from Google Spreadsheet, Excel or CSV and MySQL based wpDataTable ) and choose “Row click” on Open details on settings in Master-detail settings this option will behave differently for tables:

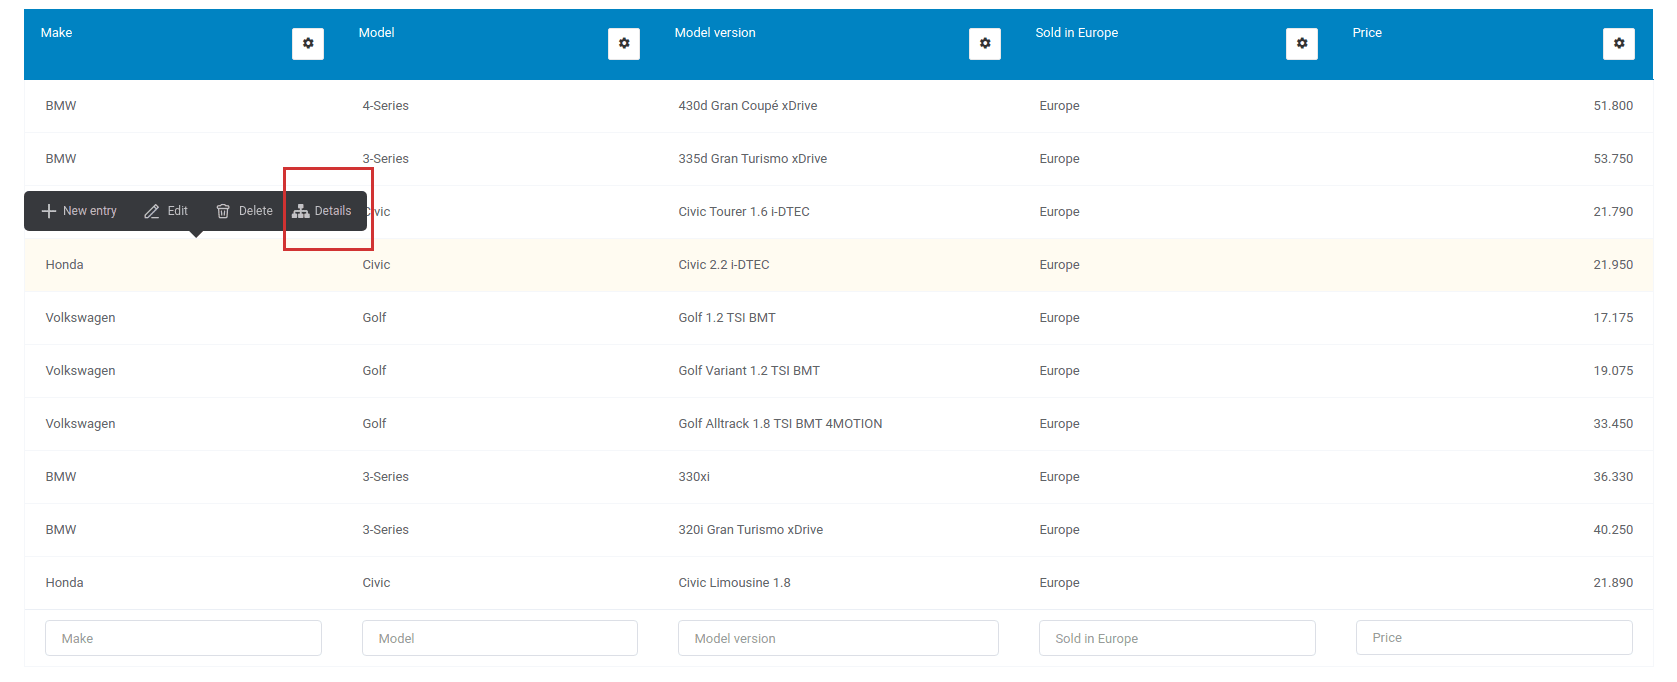
If you turn on option Popover editing in wpdatatables, Details button will be shown there as well.
As for the “Button click” option, “More details” link will be displayed in the same way for both editable or non-editable tables – a new column will be added with “More details” link as an option in each row.
For the second scenario you can choose: from settings Open details on the option “Button click”, from settings Show details in the option “Popup” and Popup Title settings you already defined. When you finish this, click Apply so these settings can be applied to the table.
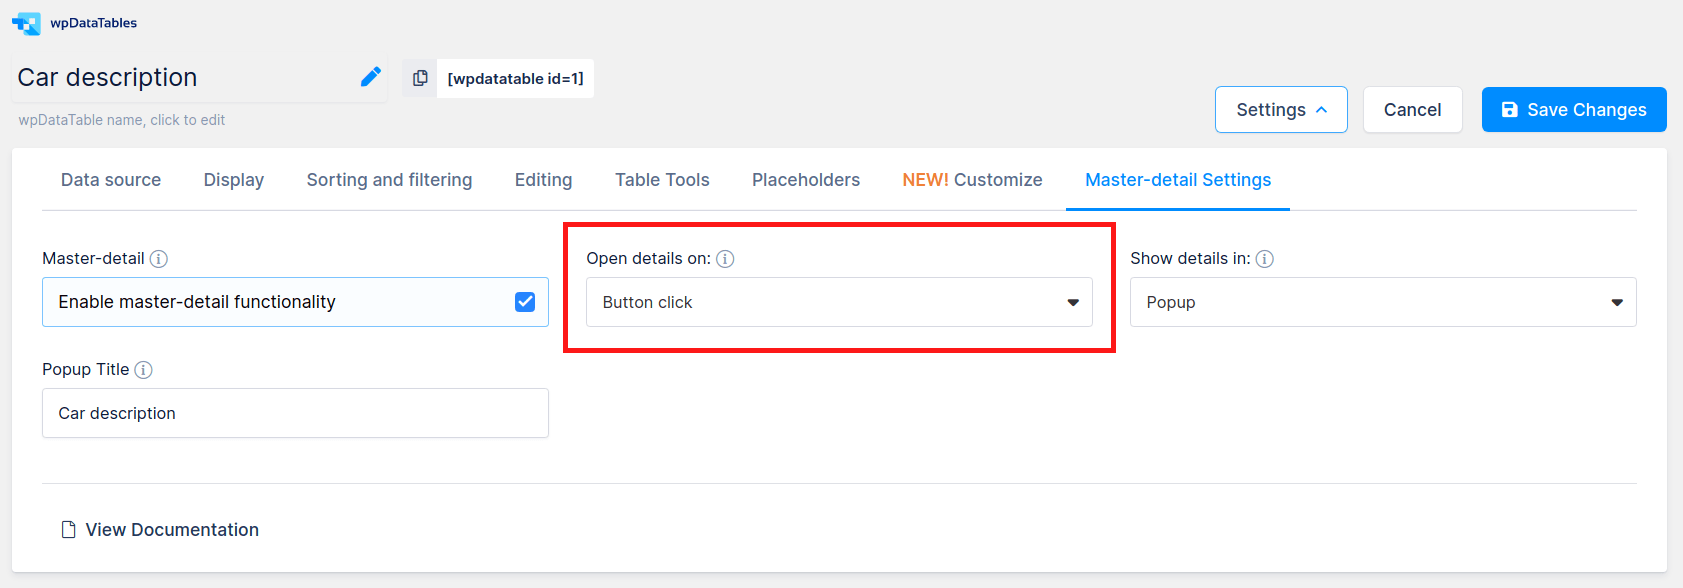
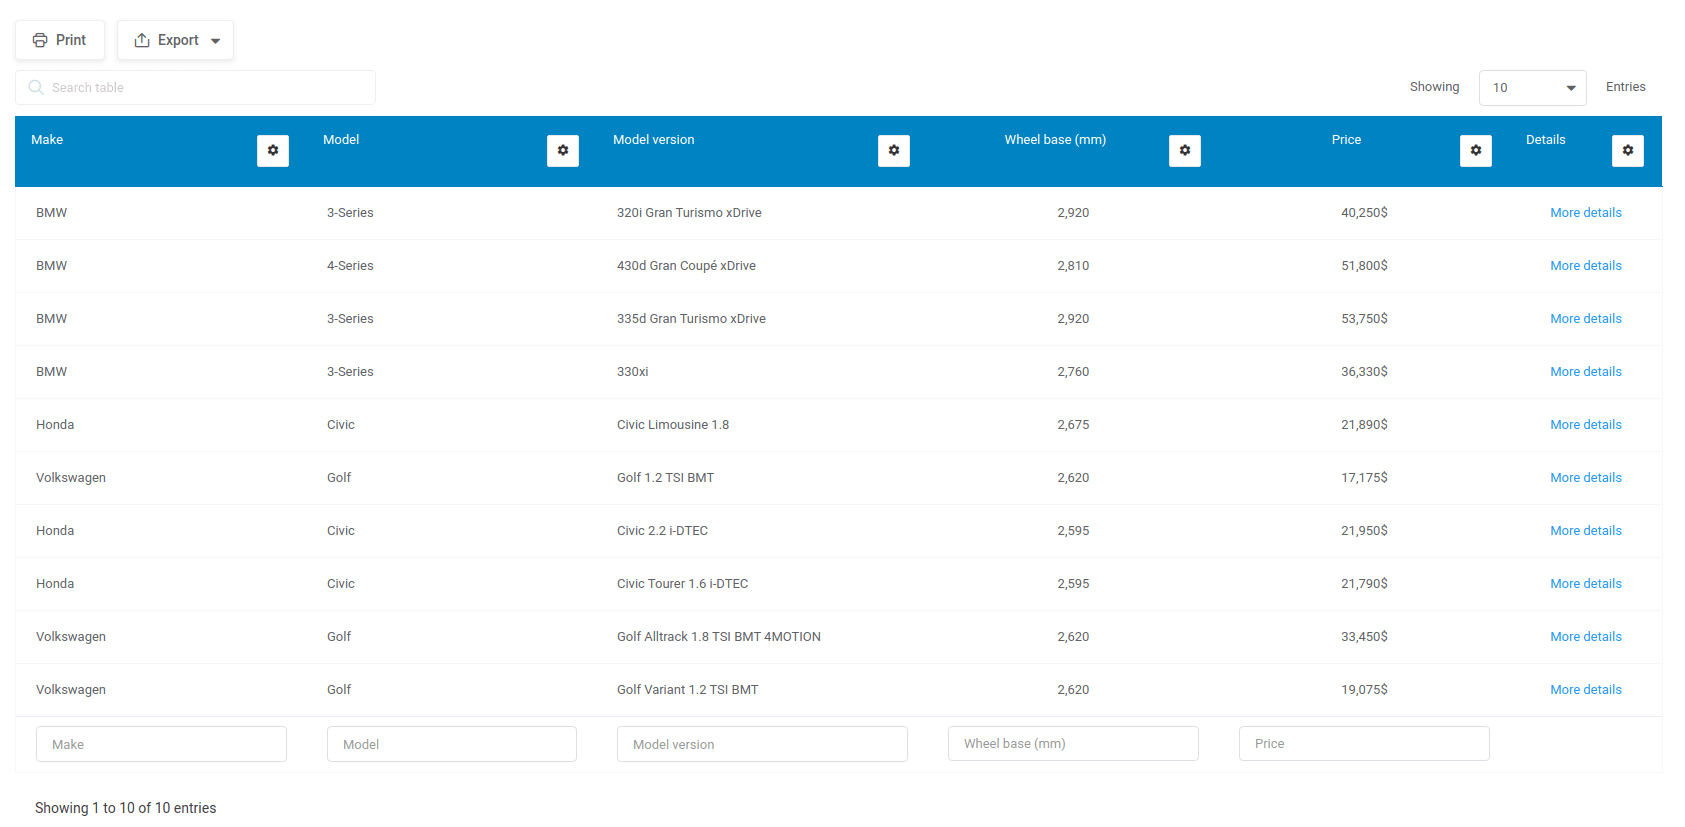
You will see a new Master-detail column created called Details which is filled with predefined value “More details” link. If you click on any of these links a Popup modal with details about car description details (like in the first scenario) will be shown.
You can check out how this works in the table below.
You are able to configure this new Master-detail column. When you click on Column settings button column settings for this column will be shown. On DISPLAY tab you are able to set options like in other column types from wpdatatables: change Display header, Column position, Cell prefix and suffix, Add column class and color, Hide column on mobile or tablet devices (if Responsiveness option is turn on ) and Show this column on front-end.
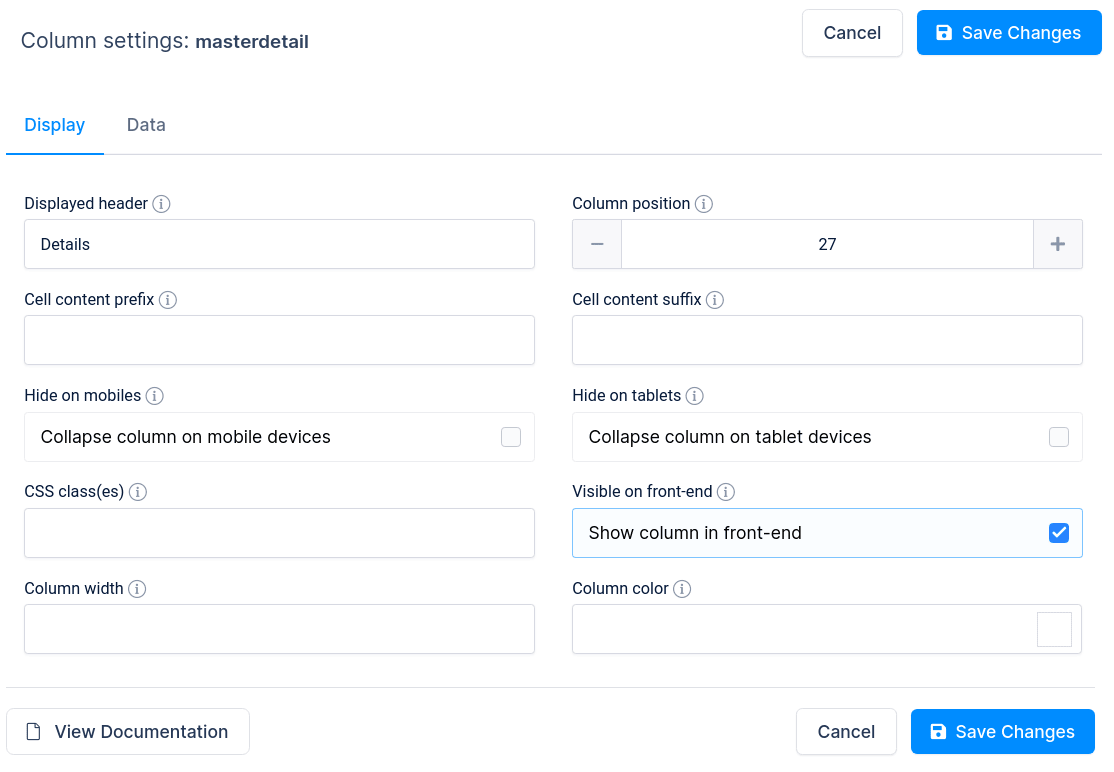
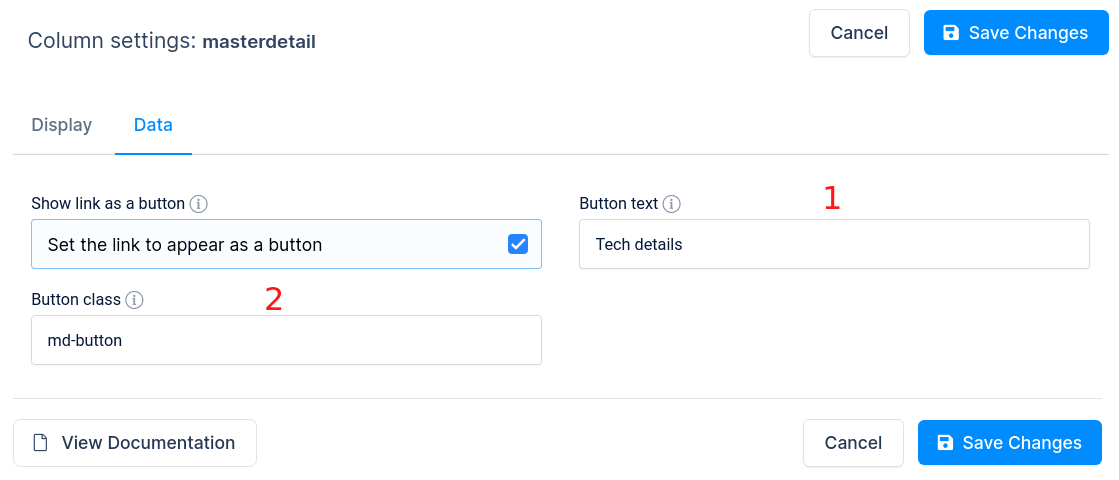
On the DATA tab you will find an option “Show link as a button”– this option allows you to display the link as a button. When you turn it on two new options will be shown:
1) Button text – You can set the button display text. (We change it to Tech details)
2) Button class – You can set the button CSS class. (We add and create md-button class)
When you check that, you need to click apply and the setting will be saved. You can create the custom CSS class md-button in CUSTOM JS AND CSS settings, in the field Custom wpdatatables CSS, inserting this:
.md-button{background-color: #0083c2 !important;line-height: 1.75;border:1px solid transparent;color:#fff !important;padding: .75rem 2rem;font-size:18px;border-radius: 28px;box-shadow: 0 2px 6px 0 rgba(122,122,122,.5);text-transform: none;position: relative;transition: all .3s ease;}.md-button:hover{cursor:pointer;color:#fff !important;background: #008cff !important;}
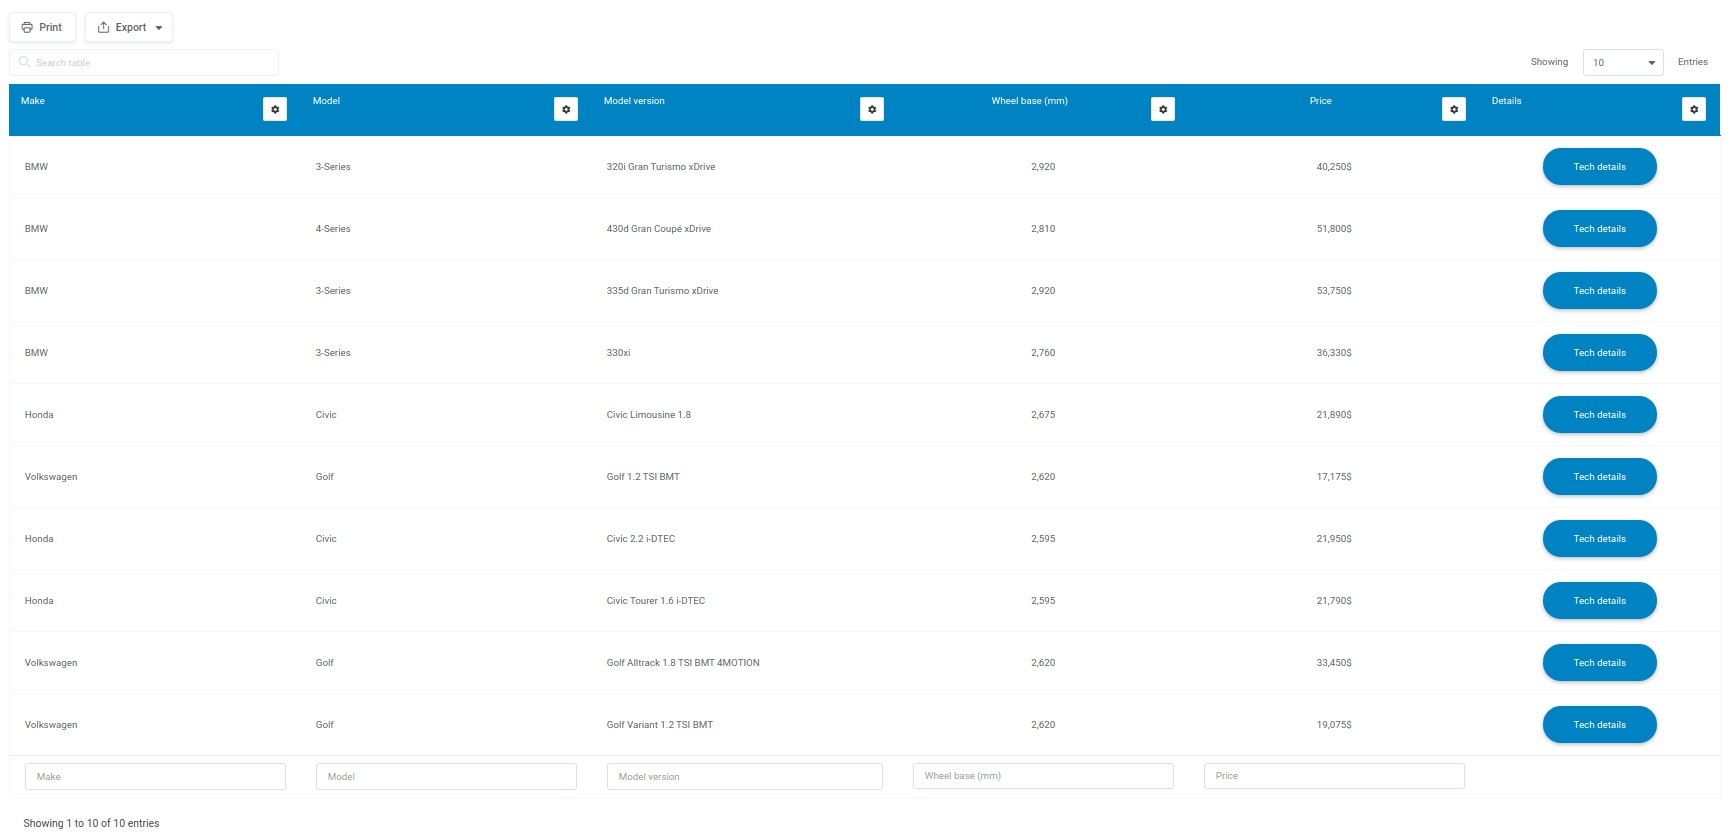
When you click save you will get buttons in table like this:
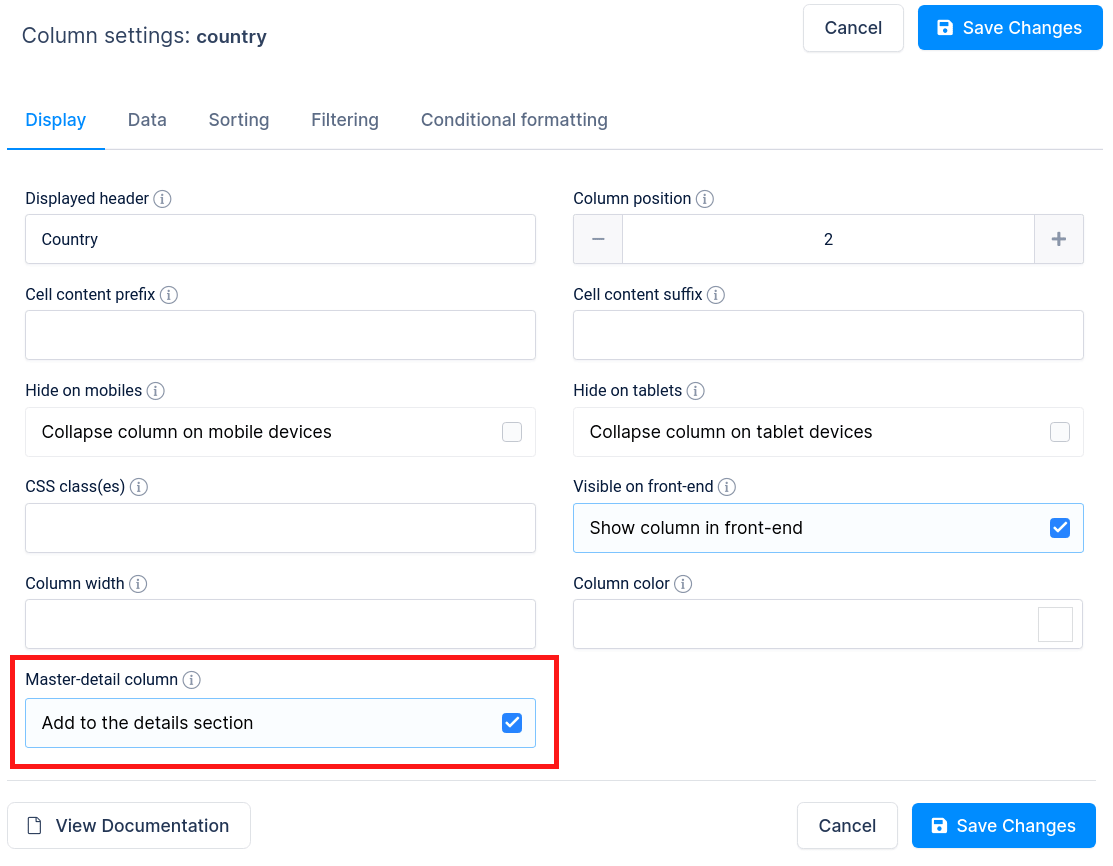
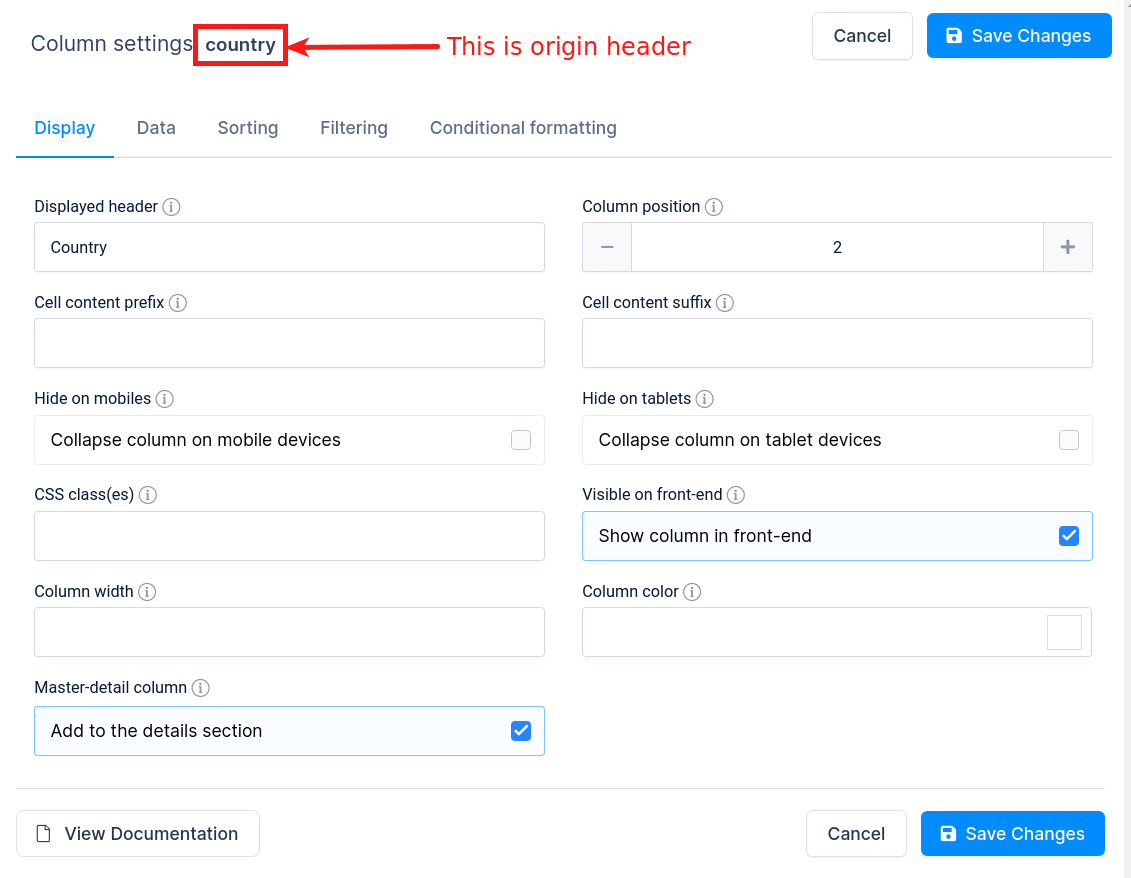
There is an option for each column (except Master-detail column-Details) for you to choose whether that column will be shown in the Master-detail section or not. Once you open Column Settings, in the Display section you will see “Master-detail column” setting and “Add to the details section” option (turned on by default).
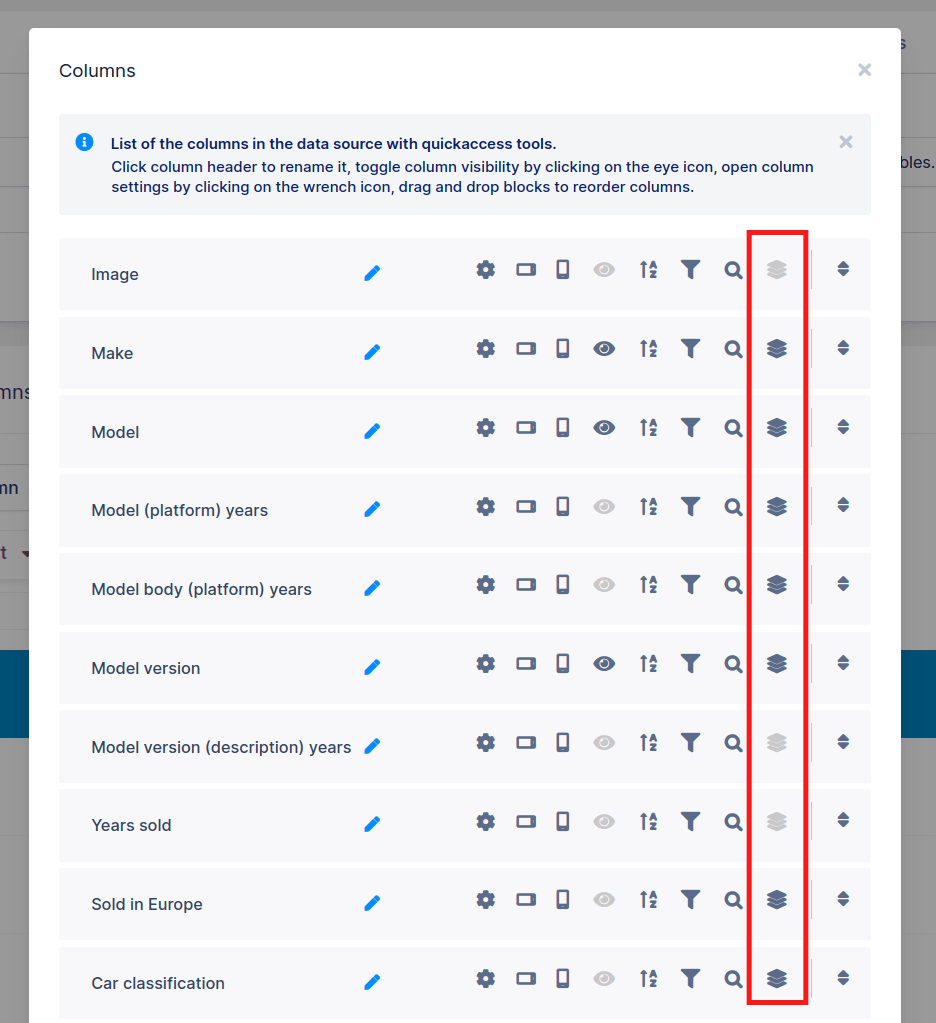
You will find the same option if you click on “Column list” button above the table.
When you click on it, you will see a list of all columns where you can choose which column will be included in Master detail table or not.
So, if you hide some columns from the front-end page, you can still choose whether those columns will be shown in Master-detail section.
If you choose in the “Show details in” setting the “Post” or “Page” option, a new setting will appear “Template page” or “Template post” (depending on what you have chosen: page or post) where you will choose your already prepared custom page or post.
The Link target attribute section allows you to open the Master-Detail page/post in the same tab. The default behavior of the add-on is to open Master-Detail page/post in another tab.

When you create wpdatatables and choose which column you will use in the Master detail section then you need to prepare your custom post or page to show details from your table. We will only explain how to do it on a custom page because it is the same procedure for a custom post.
You will create a new page or you can do it on an already existing one. What you need to do is to create placeholders by using origin headers from columns that you use for Master-detail which you can find in column settings of each column. You can see it in wpDataTables configuration page when you open column settings panel by clicking on “Column settings” button ![]() or by clicking on “Column list” button complete-column-list from where you can open column configuration for each column.
or by clicking on “Column list” button complete-column-list from where you can open column configuration for each column.
You need to copy that origin header and then insert it on your page between percentage characters like this (in our case origin header is Image ):
%Image%
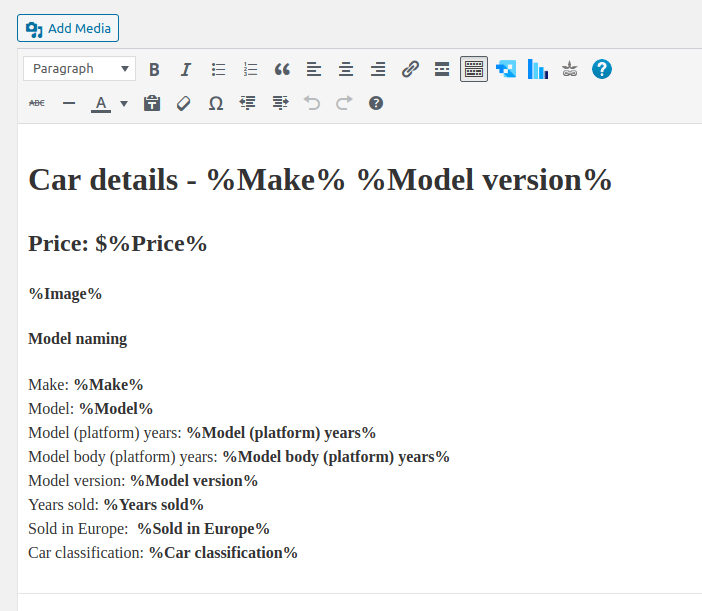
This way you will create placeholders for values from this column on your page. You need to create those placeholders on your custom page for each column that you include in the Master detail section (Turn on the option “Add to the details section” on the Master-detail column setting). Please note that if you create a placeholder for a column where you turn off this option it will not be shown on the template page after “Row or Button click”. Please note that if you create a placeholder for a column where you have disabled this option, it will not be displayed on the template page after “Row or Button click.” Also, be aware that templates behave differently depending on which option we selected in the settings for sending details.
If the details are sent via POST, when you directly visit this custom page, the placeholders will be replaced with empty strings, so data will only be populated when you access this page from our table by clicking on Row or Button, depending on your configuration.
If the details are sent via GET parameters, you can copy the URL of the details page and access it anytime and from anywhere. This way, you won’t have to sift through an entire table of items to find a specific row whose details you want to see; you can always access the details page of a specific item through a unique URL.
Here is the example in our case for the Car details page (without any page builder)
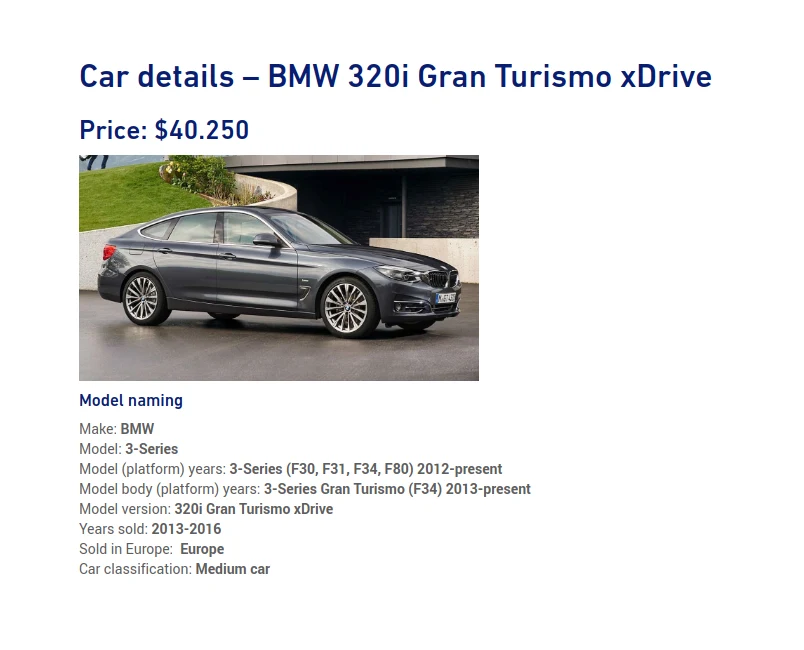
When you save this page you need to go in to Master-detail settings and choose option “Page” on Show details in settings and then Template page settings will be displayed where you will choose your custom page, in our case it is the Car details. After that click apply to save the settings. When you click on the “Row” or “Button link” (depending on what you set in the settings “Open details on”) you will be redirected to that page.(example for our case)
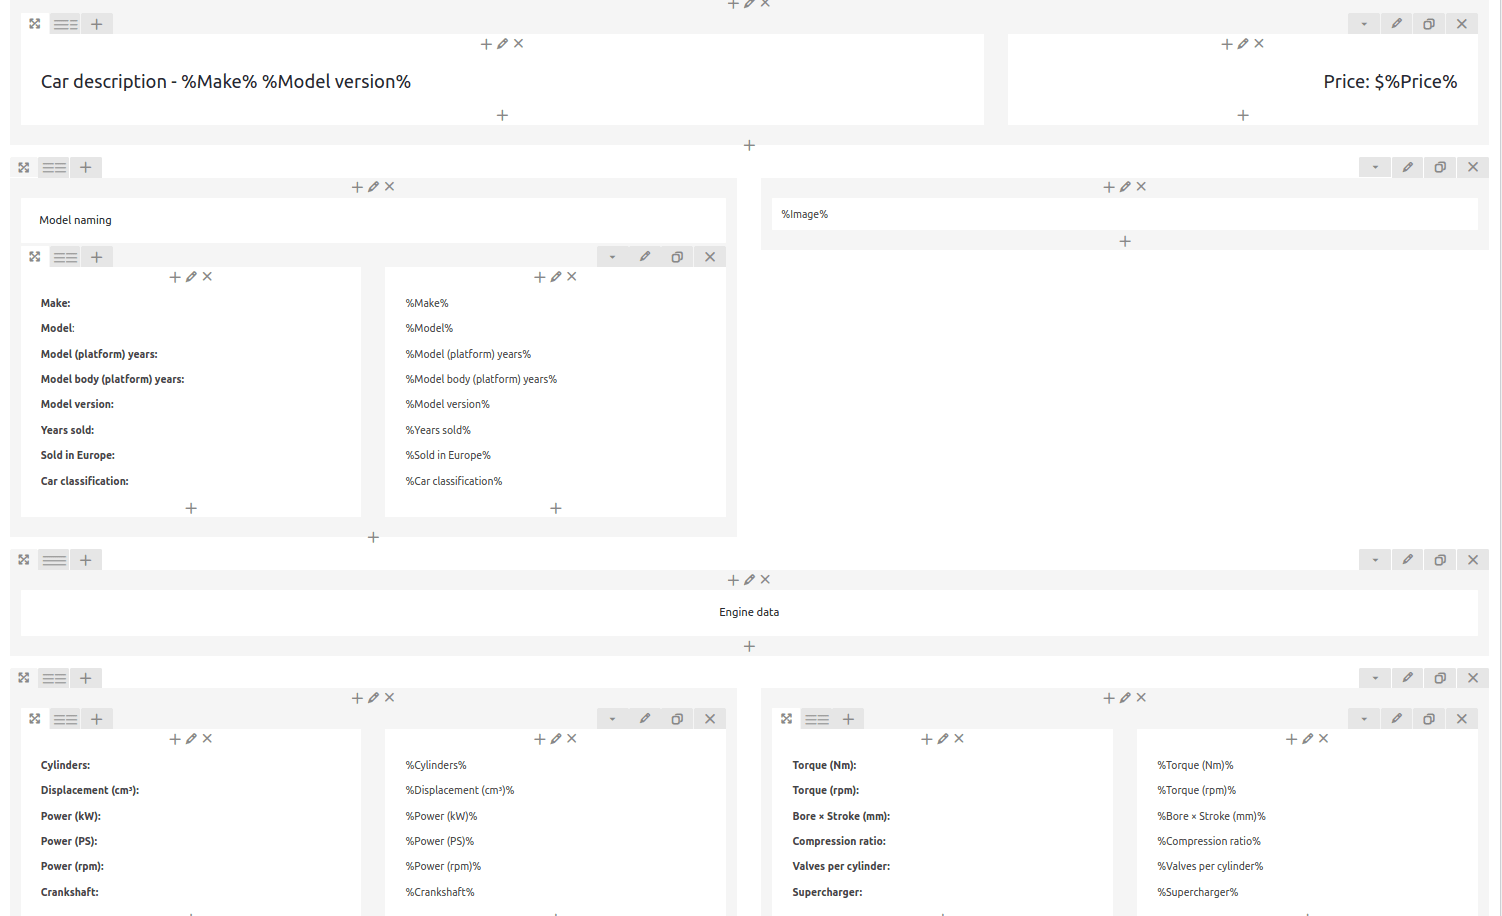
This was an example without any customization, but you can do it depending on your needs. In our example, we customize the layout with WPBakery Page Builder like this:
If we previously selected the last option, “Send Child Table Data”, in the “Send Table Data” settings, and we want to display the details of the row from the parent table, we insert the following placeholder in the template:
%wpdatatables_md_child_table%
which allows you to display all rows from the child table linked to the selected row in the parent table in a tabular view.
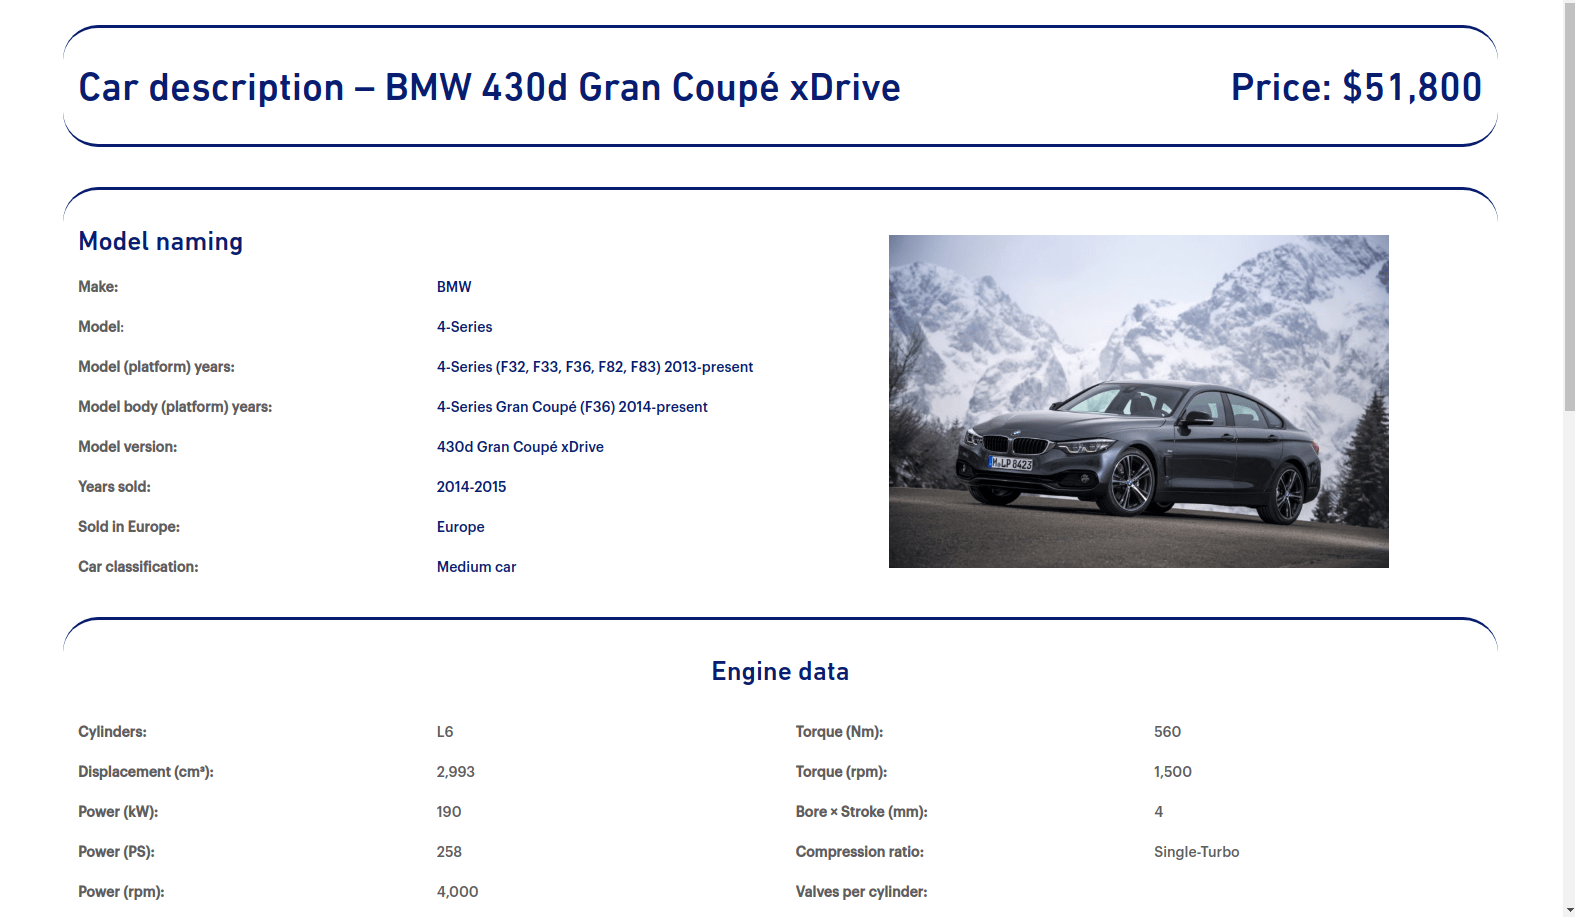
When you click on the “Row” or “Button link” (depending on what you set in settings “Open details on”) you will be redirected on that page. (example for our case with page builder)
You can test this on the table below by clicking on button Tech details.
To get your hands on wpDataTables Lite, please enter your email address below. We’ll send you a direct download link and keep you updated on existing features along with helpful tips and tricks!
