


Table of Contents
As you know, wpDataTables was able to create a table linked to an existing JSON file for a while now. This method allowed you to create a table from a one-level array of same-structured objects where each object will be parsed as a row and each field inside the object as a cell. From version 5.0, you are able to create tables from a nested JSON file or URL with or without JSON Authentication.
An example of a simple JSON URL with nested data, that we will use it in this tutorial, can be found here.
In this tutorial, we will learn how to create tables with Nested JSON structure with or without authentication. Let’s watch a first live demo created from Nested JSON structure, and then go through the steps needed to create it.
If you are using some API that is returning prepared JSON then you will skip this part of preparing. You first need to prepare the JSON data source. Make sure to follow these simple rules:
1. The data set should not be empty; it should contain at least a few rows.
2. The format of the JSON file has to be followed. You can’t start with an angle bracket ” [ ” as it will return an error.
3. The plugin allows you to choose what the “roots” for creating the table will be, but please note that you can only select one level within your JSON file to create a table.
4. The JSON should be available via an URL that wpDataTables can access.
In this example, we will use a sample JSON data set available through the free “The Star Wars API” that you can find on this link. You can copy and paste it to your new wpDataTable to follow the steps of this tutorial.
Now, we need to create a wpDataTable based on the JSON data source that we prepared.
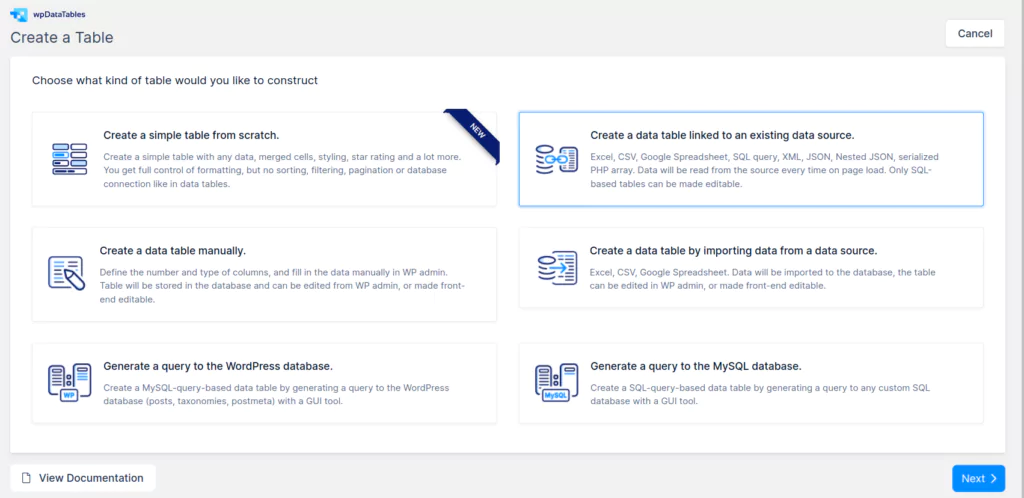
1. Go to wpDataTables -> Create a Table and choose the option Create a data table linked to an existing data source.
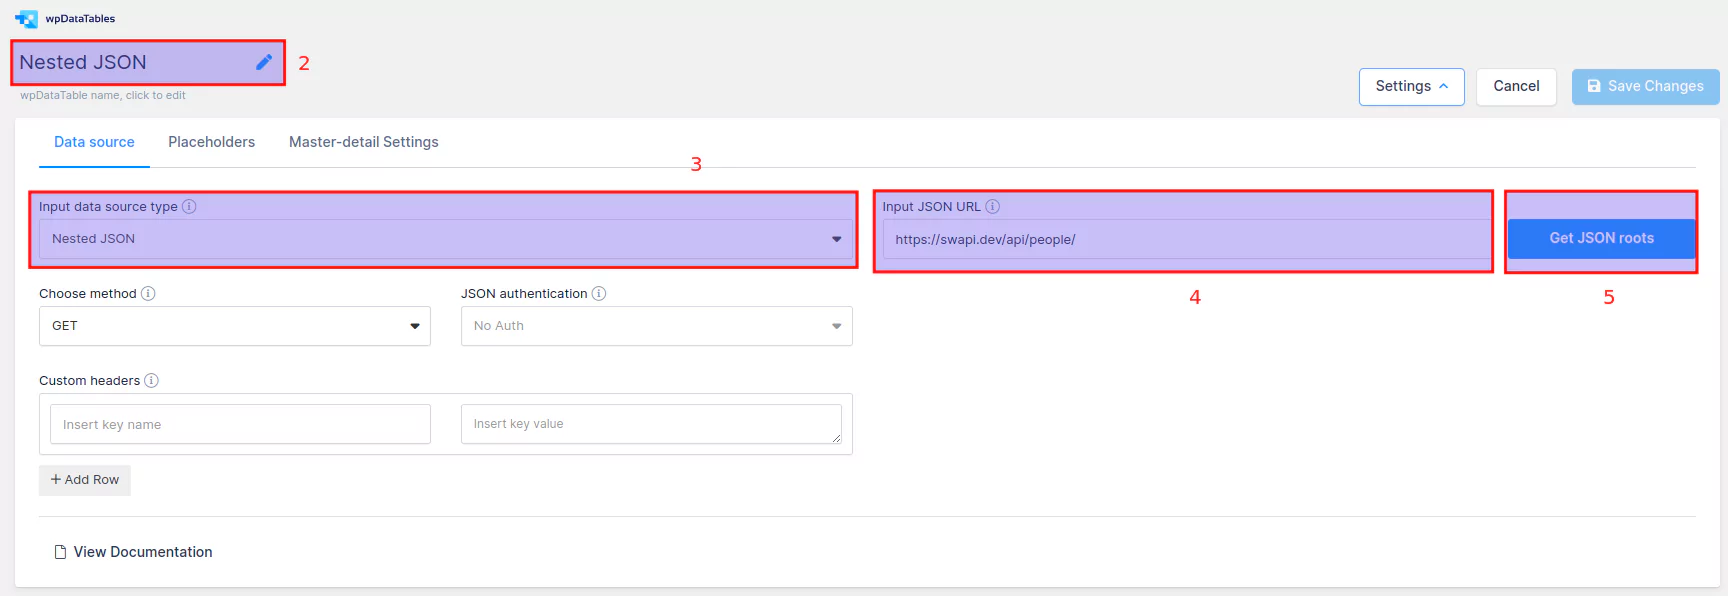
2. Provide a name for the new wpDataTable in the wpDataTable name input to help you identify it.
3. Choose the Nested JSON option in the Input data source type select box.
4. Paste the URL of your JSON data set to the Input JSON URL input field.
5. Press the Get JSON roots button. wpDataTables will read the data and a new drop-down will appear below the “Input JSON URL” field.
Please note: Under “Choose Method”, you can select GET (which is selected by default), or POST.
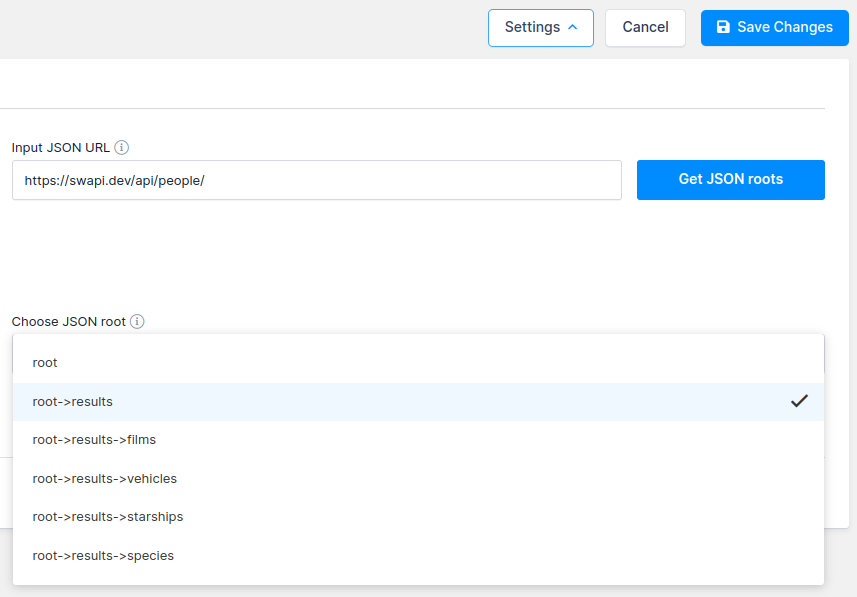
This will provide you with all the levels you have in your nested JSON file, so you will be able to choose one of these levels for table generation.
Using the file provided above, you will be able to choose “results”, “films”, “vehicles”, “starships”, and “species”. For this tutorial, we selected “results”.
As this is not a JSON file that requires authentication, once you select the level, you can click on the “Save Changes” button in the top right, and the table will be shown below.
If you want to change the JSON root, you will need to click on “Get JSON roots” again in order to see all available levels.
If one of chosen root path objects contains keys that have an array or objects as values and you need to include them in a table as cell values, then you can choose these two hooks:
For the first hook that accepts 3 params
you only need to provide a boolean value true, like in the example below:
/** * Parse one level deep in nested JSON structure
* @param $deepParse
* @param $jsonURL
* @param $tableID
* @return bool|mixed
*/
function parseNestedJSON($deepParse, $jsonURL, $tableID){
//use only for tables that have specific json url
    if($jsonURL == 'https://swapi.dev/api/people'){
      return true;
    }
    return $deepParse;
}
add_action('wpdatatables_get_one_level_deep_json_data_from_array_as_string', 'parseNestedJSON',10,3);
If you use this hook then it will be used arrayValuesSeparator which is break tag <br> and all array values will be parsed in cell one under another.
If you need another separator then you can use a second hook that accepts 3 params as well
where, as a separator, a comma is set, like in the example below:
/** * Change array elements separator
* @param $arrayValuesSeparator
* @param $jsonURL
* @param $tableID
* @return bool|mixed
*/
function changeArraySeparator($arrayValuesSeparator, $jsonURL, $tableID){
//use only for tables that have specific json url
   if($jsonURL == 'https://swapi.dev/api/people'){
      return ', ';
   }
   return $arrayValuesSeparator;
}
add_action('wpdatatables_set_one_level_deep_json_data_separator', 'changeArraySeparator',10,3);
Certain APIs are locked, password protected, and can’t be accessed without some authentication. wpDataTables support basic authentication and also custom headers where you can provide details needed for authentication for that specific JSON.
Let’s explain how you can use it.

wpDataTables now supports basic authentication, so you need to populate these inputs if your nested JSON requires authentication for accessing the data. (for example Username and Password)

In Custom Headers, you can enter the key name and the key value (for example mostly used API key authentication) or additional parameters in headers that are going to be used to access the data within the API. Under the first key/value par there is an “Add row” button with which you can insert more header parameters.
They function as pairs, so if you plan on using Custom Headers, you will need to populate both fields.
Your wpDataTable has now been created and is ready to be used, but you might want to define some additional settings for the table in general or some of its columns.
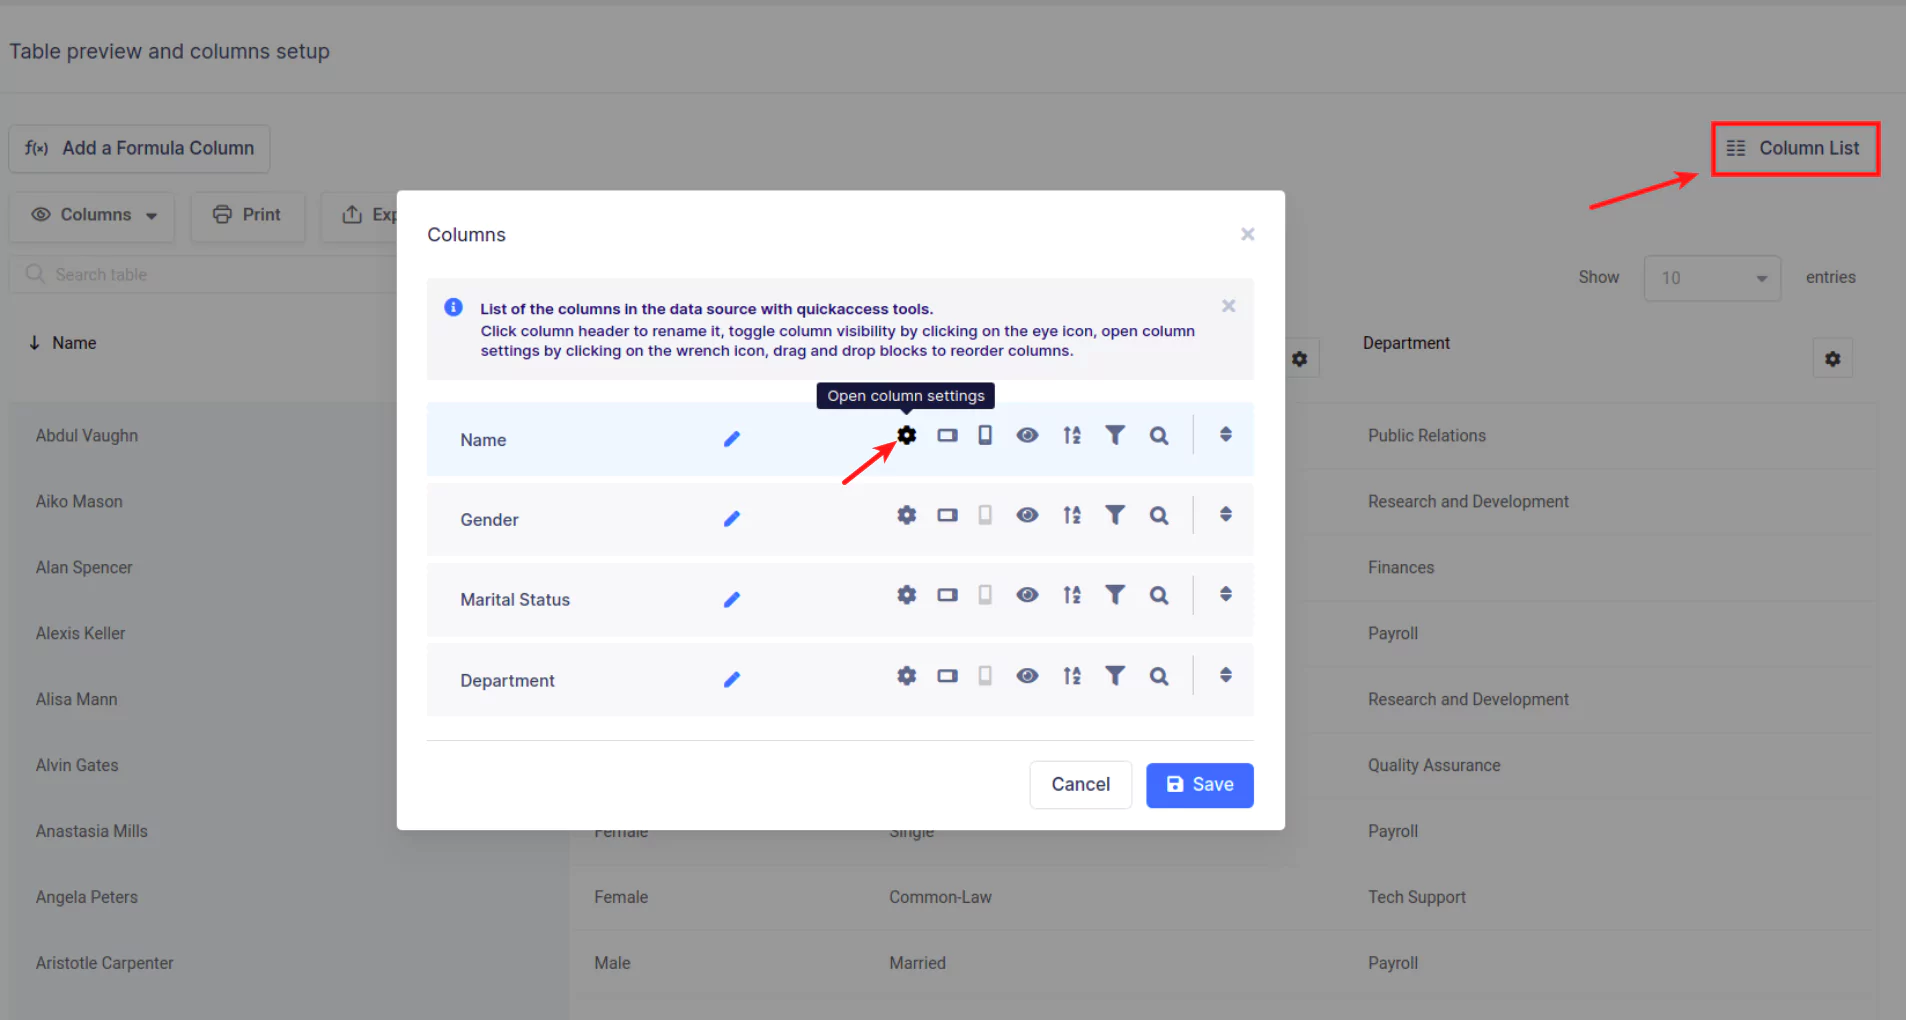
To achieve that you will need to open Column settings. Let’s say, as an example, that we want to change the filter type for the Gender column.
There are 2 ways to do that:
1. By clicking on the Column settings button
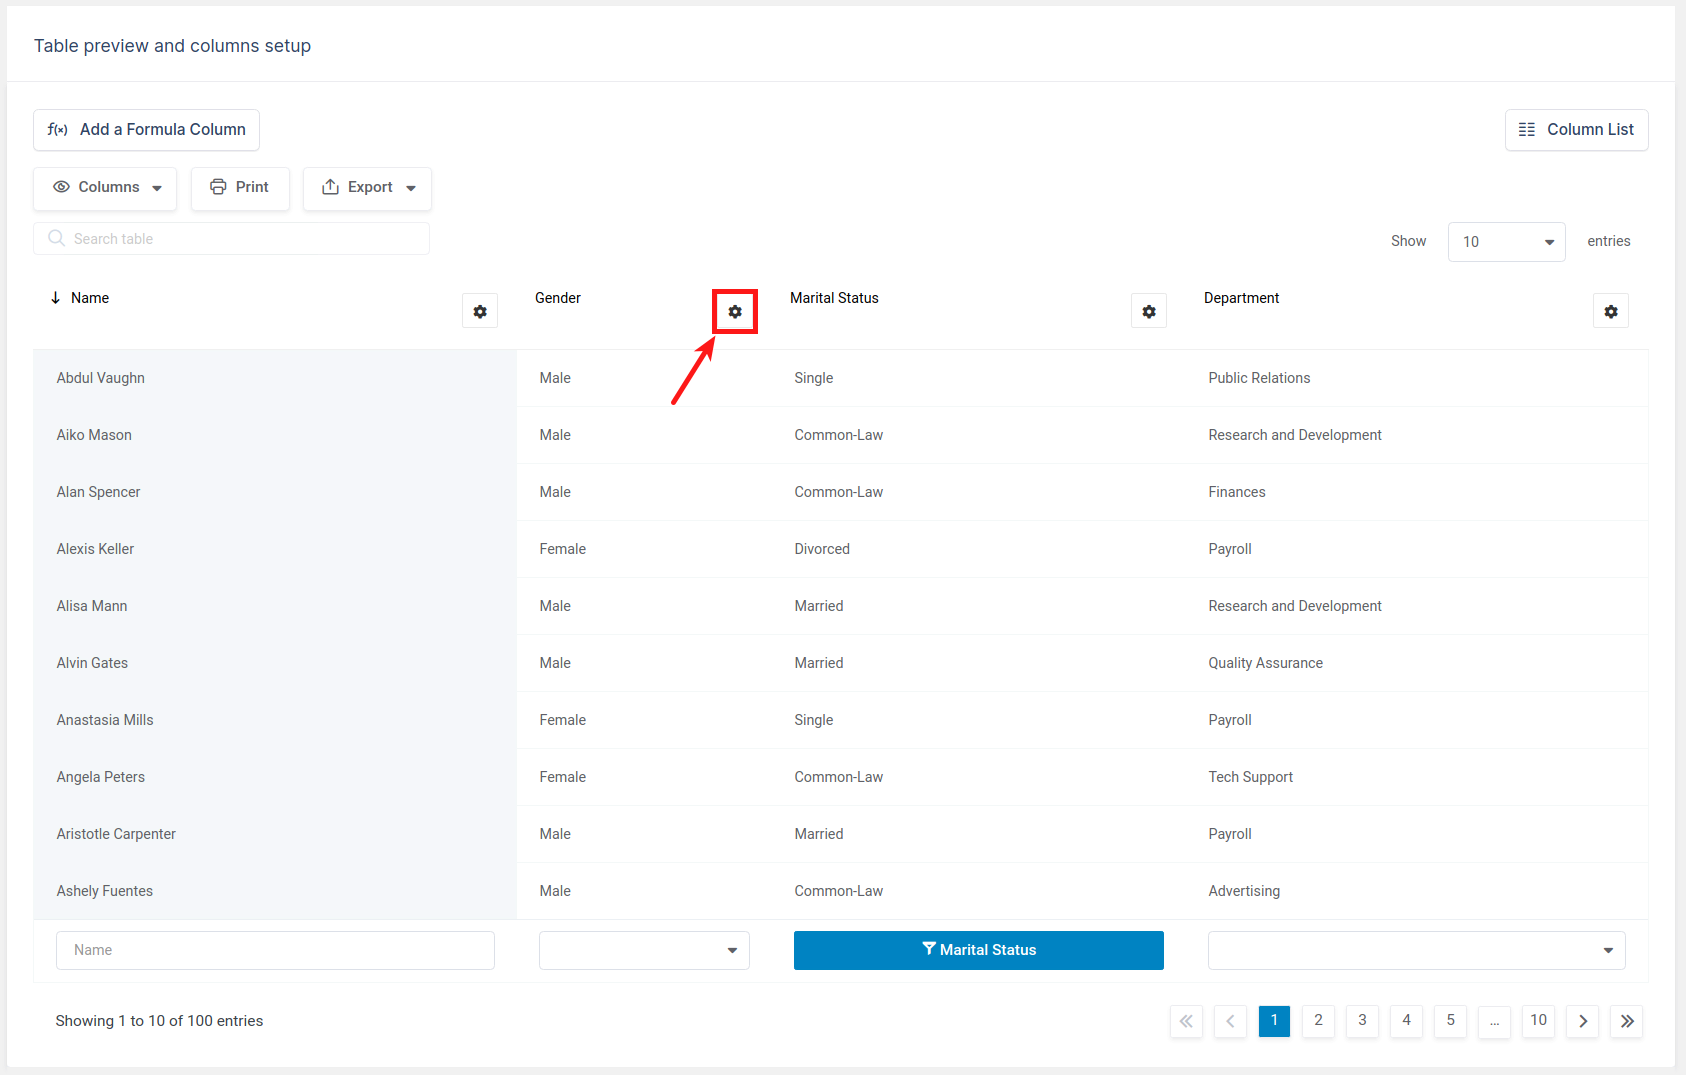
2. Or by clicking on the “Column list” button on top of the table.
In this dialog, you can quickly rename, reorder, or toggle visibility for columns, turn on/off sorting, filtering or a global search for columns.
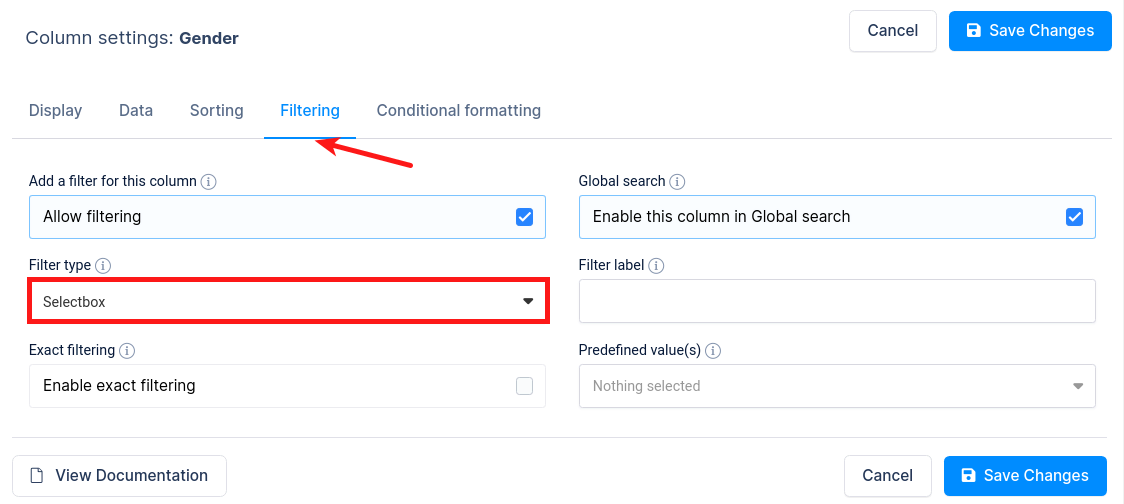
Now you can click on the Filtering tab and for the filter type select the Select box for Gender column.

When all the preparations are finished, and the configuration is done, you just need to insert the table into your post or page.
1. Open or create a new post or page.
2. Put the cursor in the position where you wish to place the wpDataTable.
3. Click the “Insert wpDataTable” button in the editor.
4. Locate the wpDataTable that you created in steps 1-3 and click OK.
5. Save a post or a page and open it in the front-end to see the result.
As an alternative, you can paste the generated wpDataTable shortcode manually.
If you are using Gutenberg editor, Elementor, or WPBakery page builder, you can check out the section for Adding wpDataTables shortcodes on the page.
To get your hands on wpDataTables Lite, please enter your email address below. We’ll send you a direct download link and keep you updated on existing features along with helpful tips and tricks!
