Table of Contents
Video tutorial
In this tutorial, we will learn how to create editable tables from an Excel or CSV imported data, or from a Google Spreadsheet using DataTables WordPress plugin. Let’s watch a live demo of the imported table first, and then go through the steps needed to create it.
Imported table example
In many cases, you might have an initial file with the table data, but this table needs to be regularly updated (e.g. if it is a price list, a catalog, etc.). wpDataTables has two options here for you:
- Creating tables linked to existing data source, in which case you will upload the file and initialize the table, whereupon it will be read every time on page load. Then you can overwrite this file to update the data. Such tables won’t be editable within WordPress, and if they are larger than 3000-5000 rows, the page load and generation time will be slow.
- Importing table data to WordPress. The initial data will be read and imported from the provided file or a Google Spreadsheet. You can select to skip certain columns, or add columns. You can edit both the structure and the data within the table at an any point later, but the table won’t be synced with the source file as is the case with the first option; e.g., if you change something in CSV or in source Google Spreadsheet, your wpDataTable data will stay the same because the data will be already imported to the database.
In this tutorial, we will learn how to create a editable tables from an Excel or CSV imported data, or from a Google Spreadsheet. Let’s watch a live demo of the imported table first, and then go through the steps needed to create it.
| wdt_ID | Company | Phone number | Creation date | Sector |
|---|---|---|---|---|
| 1 | Cursus In Incorporated | (002) 45726441 | 25/11/2003 | IT |
| 2 | Adipiscing Company | (00606) 7742008 | 22/09/2005 | IT |
| 3 | Adipiscing Lacus Corporation | (05646) 4683131 | 08/07/2008 | IT |
| 4 | Pede Company | (04752) 4145339 | 24/12/2007 | IT |
| 5 | Ut Cursus Luctus Institute | (068) 40241523 | 02/01/2002 | IT |
| 6 | Felis Limited | (001) 91497961 | 13/07/2004 | IT |
| 7 | Sit Amet Industries | (087) 17370346 | 15/01/2013 | IT |
| 8 | Non Arcu Vivamus Associates | (0406) 82754651 | 21/05/2015 | IT |
| 9 | Blandit Congue In Limited | (07333) 6155072 | 02/08/2010 | IT |
| 10 | Tortor Company | (035889) 956803 | 04/04/2008 | IT |
| wdt_ID | Company | Phone number | Creation date | Sector |
Create a wpDataTable and import your CSV file
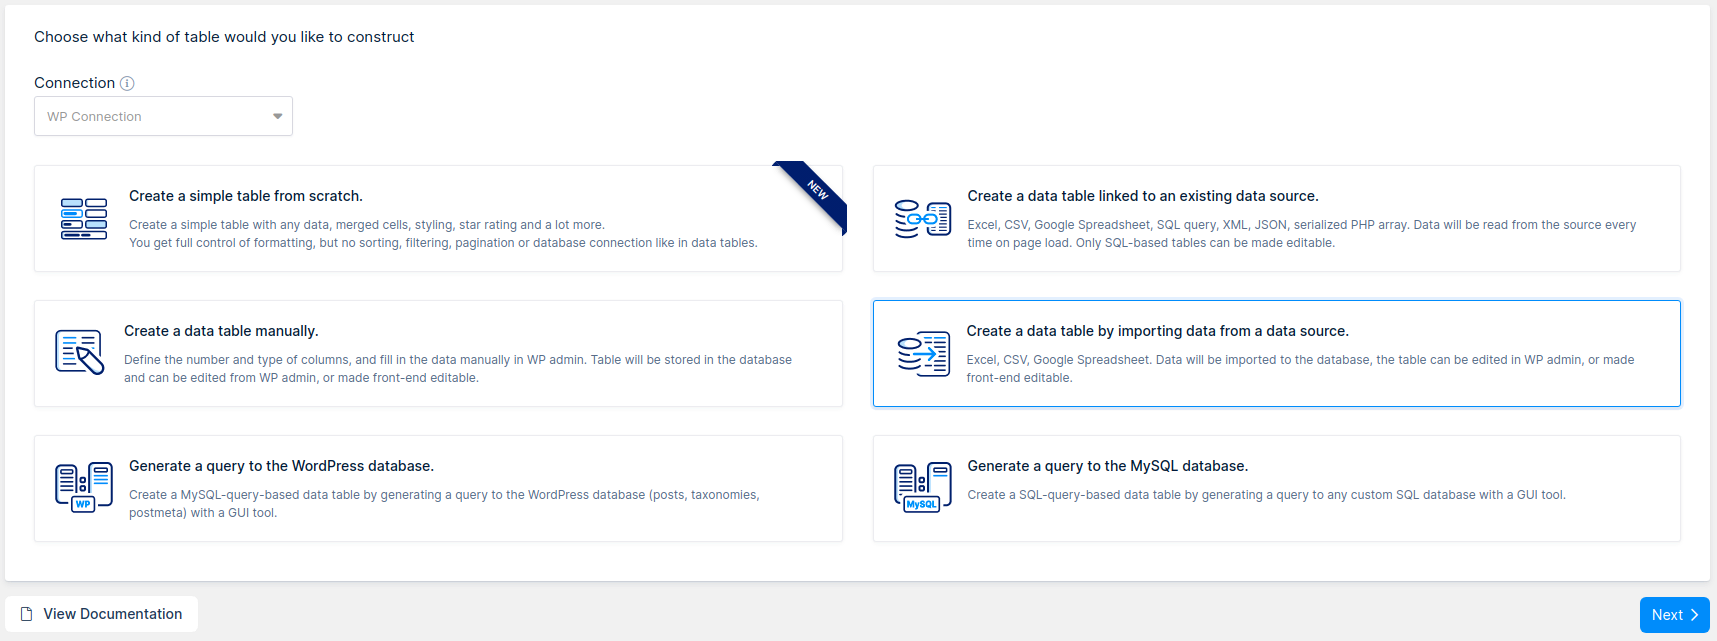
Go to wpDataTables -> Create a Table and choose Create a table by importing data from data source option.
Uploading the file for import

The next step will be to locate the file you want to import using the WordPress Media Library. Click on the “Upload” button to open the Media Library and choose your CSV or Excel file:
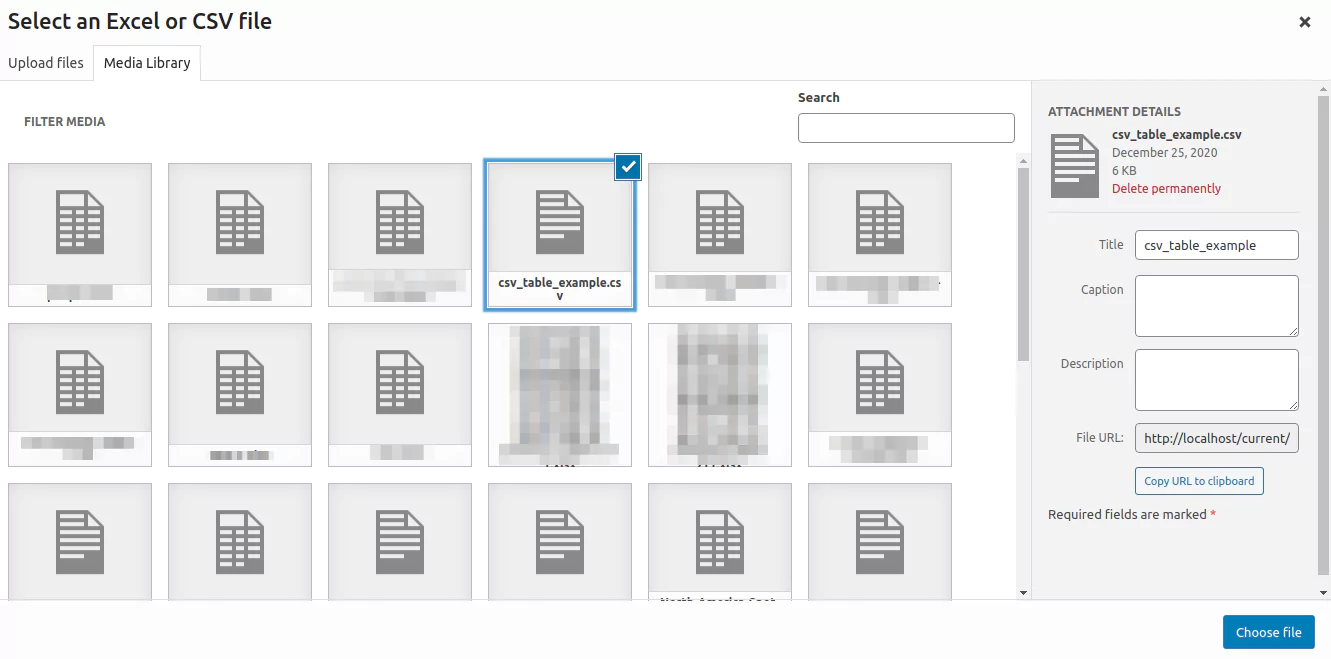
We will use this CSV file to create an editable table. You can download it and use it as well. Importing Excel files is also supported (XLS, XLSX).
To get from Excel to WordPress, you can either upload the file using the WP Media Library, or browse the file that was previously uploaded. After selecting the file click the “Choose file” button.
Preparing Google Spreadsheet for use in wpDataTables
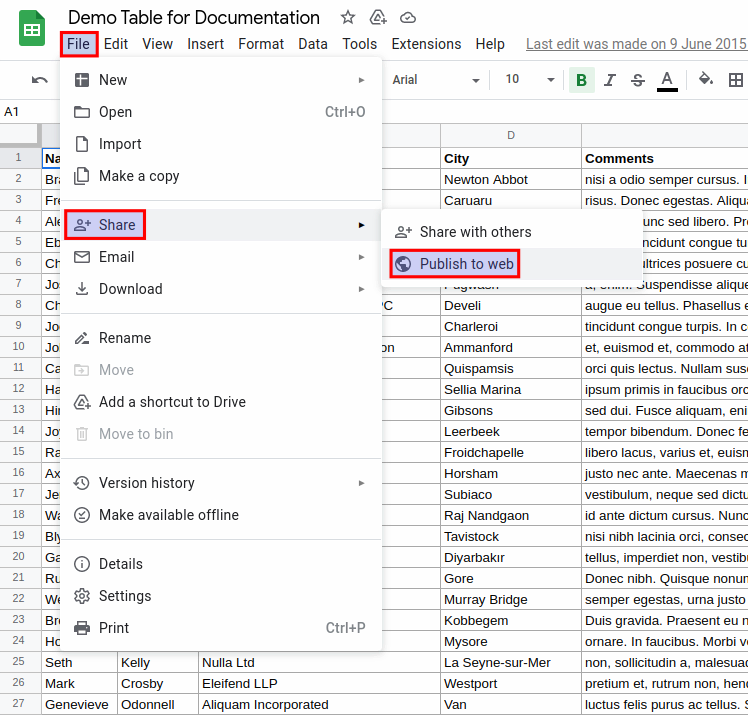
If you want to use a Google Spreadsheet, you first need to prepare your source data in Google Sheets.
Then, go to File -> Share -> Publish to web
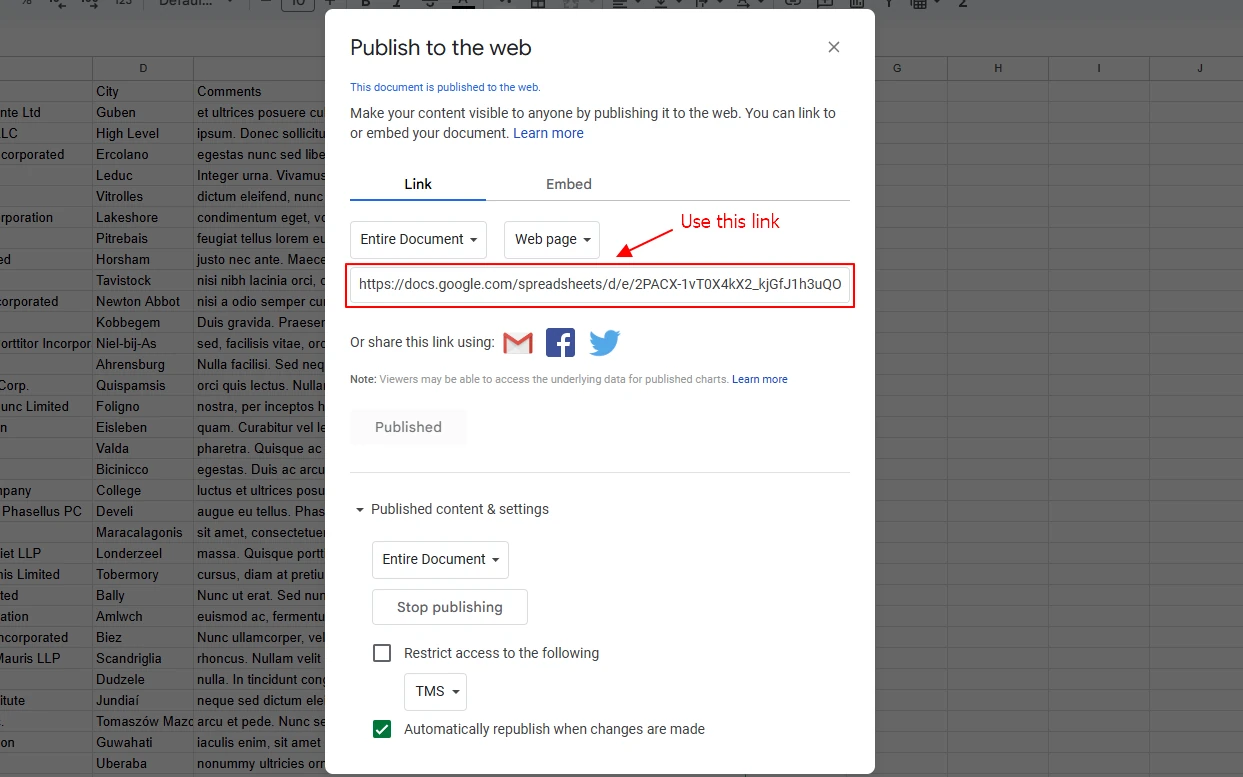
In the “Publish to the web” section:
-
Select “Entire document” and click Publish.
-
Copy the generated link — it will include “2PACX” in the URL.
Due to recent changes by Google, this type of link now works to simply publish the file — there’s no need to manually share it or adjust permissions.
Configuring wpDataTable after import
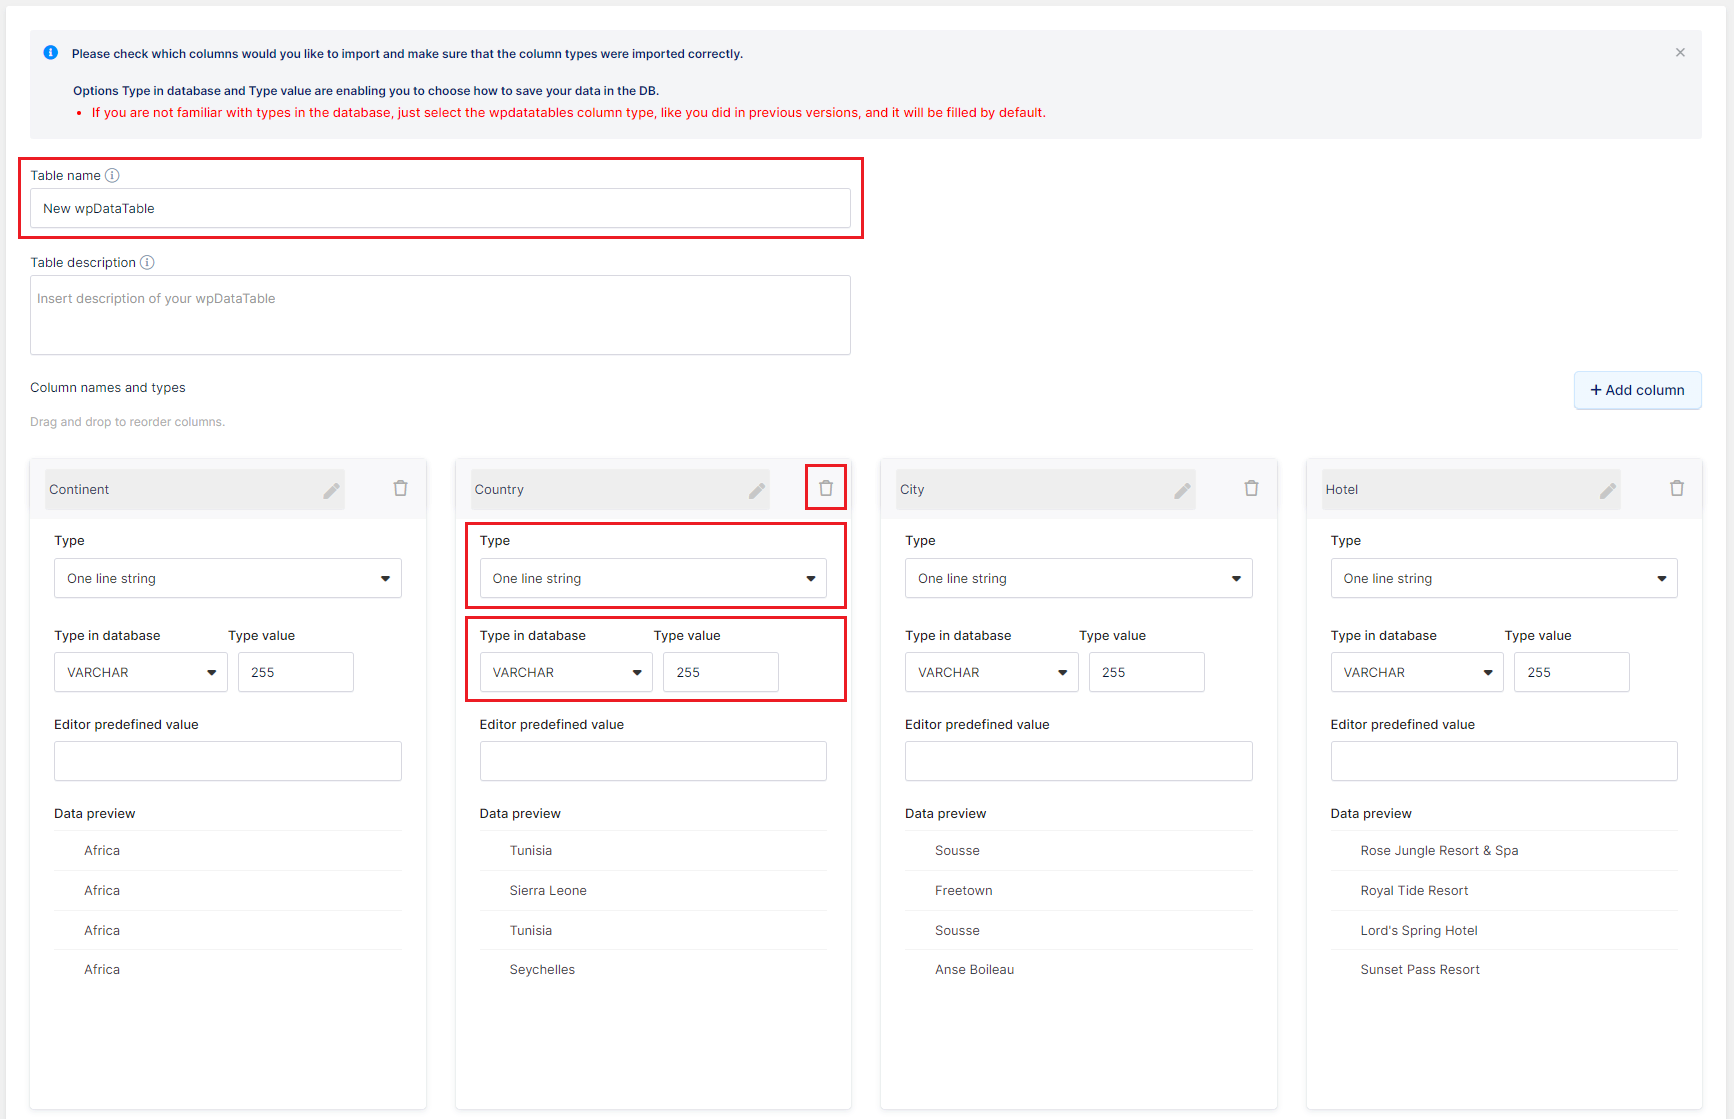
Now, wpDataTables will need to “take a look” at the source to initialize the table structure before we can create an actual wpDataTable. To do this, click “Next”. wpDataTables will initialize the column metadata and show you the pre-import table setup screen.
In this screen, you can configure the columns that will be imported, reorder the columns, or skip some columns during the import. You can also change the data type, and the database data type, and even add more columns.
Above the table name, you’ll see a notice about database column types. This allows you to change the column type that will be stored in the database.
The table name input will be used for the wpDataTable name and it will help you to identify it later and can optionally be displayed on the page above the table.
The Table Description allows you to describe the table, so you can easily see what’s in it in the wpDataTables list.
To reorder the columns during the import, drag & drop the column blocks with the mouse.
To remove (ignore) some columns during the import, just click the “trash can” button in the top right of the column block.
To add a column, click the “Add column” button after the column blocks.
For each column, you can redefine/define:
Column header – this is a header that will be shown above each column.
Type – this is a single selectbox that defines the column data type, editor input type for the back-end (and front-end) editor, and filter type.
Possible options:
- One-line string. This is the simplest text type suitable for short strings. The generated column will have a “string” (“text”) data type, a one-line text input filter type, and a one-line text input editor input type in the editor.
- Multi-line string. Another option for a text type. This is suitable for longer strings. The generated column will have a string data type, a one-line text input filter type, and a multi-line editor (“memo”) input type.
- One-line selectbox. This is an option for columns, where cells can have one of several concurrent options as a value (e.g. colors: “red”, “green”, “blue”). The generated column will have a string data type, a select box filter, and a select box editor input.
- Multi-line selectbox. This is an option for columns, where cells can have several concurrent options as a value (e.g. purchased modules: module 1, module 2, module 3). The generated columns will have a string data type, a select box filter, and a multi-select box editor input.
- Integer. This is an option for integer numeric columns. The generated column will have an integer data type, a number filter, and a text/numeric editor input.
- Float. This is an option for the Float numeric columns. The generated column will have a float data type, a number filter, and a masked text/numeric editor input.
- Date. This is an option for date columns. The generated columns will have a date data type, a date range filter, and a date picker editor input.
- Datetime. This option allows you to select both the date and the time in the column using a single input.
- The Time column is used to display only time.
- URL link. This is an option for URL link columns. The generated columns will have an URL link data type, a text filter, and a text editor input with URL validation.
- E-mail. This is an option for E-mail columns. The generated columns will have an e-mail link data type, a text filter, and a text editor input type with E-mail address validation.
- Image. This is an option for image columns. The generated columns will have an Image data type, no filter, and a text editor input.
- Attachment. This is an option for attachment columns. The generated columns will have a “URL link data type”, no filter, and a “Browse media library” input to attach files.
Type in database and the Type value allows you to select the type of column that will be stored in the database. For example, the selectbox type in wpDataTables will be added as VARCHAR with 2.000 characters in the database (by default). If you add multiple selectbox columns, it can cause the table to break because of the database character limit, so changing the type value to 255 characters should solve this issue.
Editor predefined value. This is an optional input, where you can define a default value of the column which will be pre-filled in the editor inputs, and in the filter inputs (which can be disabled). If the column type is a One-line selectbox or Multi-line selectbox, and some possible values are defined (see point #7), this input will become a dropdown of the possible values.
Possible values. This is a “taggable” input, which appears only for One-line selectbox and Multi-line selectbox types. Here you can define all the possible values by separating them with a comma.
Data preview shows the data preview (first 4 cells) for the initialized columns. Data preview does not show up for manually added column blocks.

To create the wpDataTable, click the “Create the table” button. A dropdown will appear, where you can choose whether you prefer to open the table in the standard editor, or in an Excel-like editor. After choosing one, the wpDataTable will be generated, and you will be redirected to the back-end editor.
You can read more about how to use the back-end editor here.
