How to create the Cryptocurrencies rank table?
By Aleksandar Vukovic on 01/11/19 in
The Cryptocurrencies rank table is a manual table, so we start by creating a manual table with 10 columns (one integer, and 9 string-type columns). We’re using the “Aqua” skin for our tables, but you’re welcome to try other skins as well.
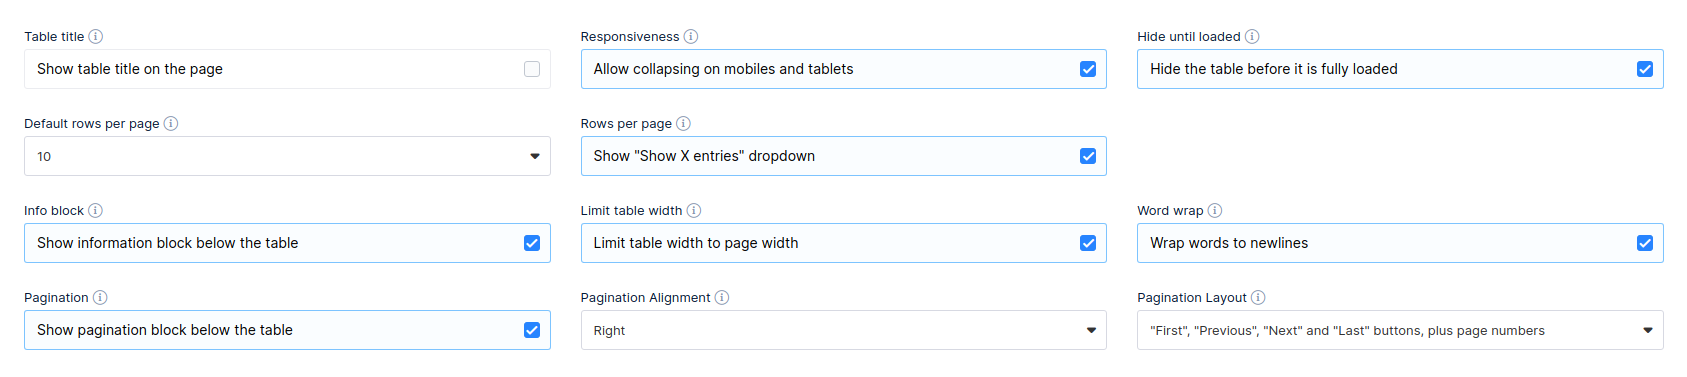
The table settings are:
Display tab:
Sorting and Filtering tab:

Editing tab:

Table Tools tab:

Placeholders tab is not being used in this case, so whatever data you have in those fields should not be changed.
1. First Column ( “#” ) – Only this column is an integer column, which is used as the default sorting column for the table. When creating the column, you need to enter a different name, though (in our case it’s “rd”), because “#” cannot be stored in the database, so simply set the displayed header to “#”:
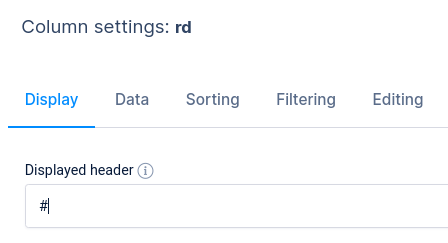
Settings for this column are:
Display tab:
- “Visible on front-end” enabled
- “Column width” set to “100”
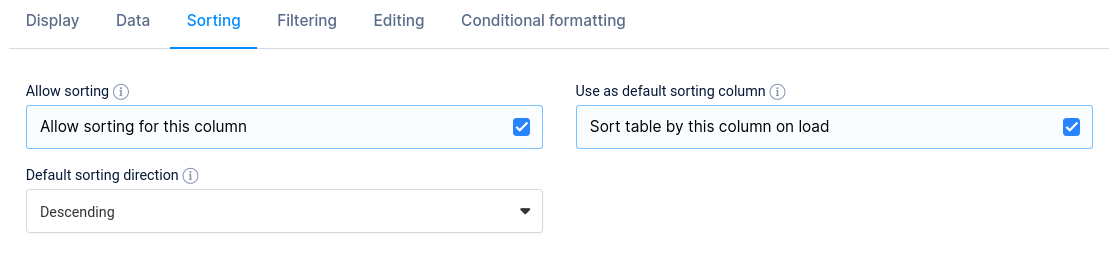
Sorting tab – Like mentioned before, this column is used as the default sorting column for the table:
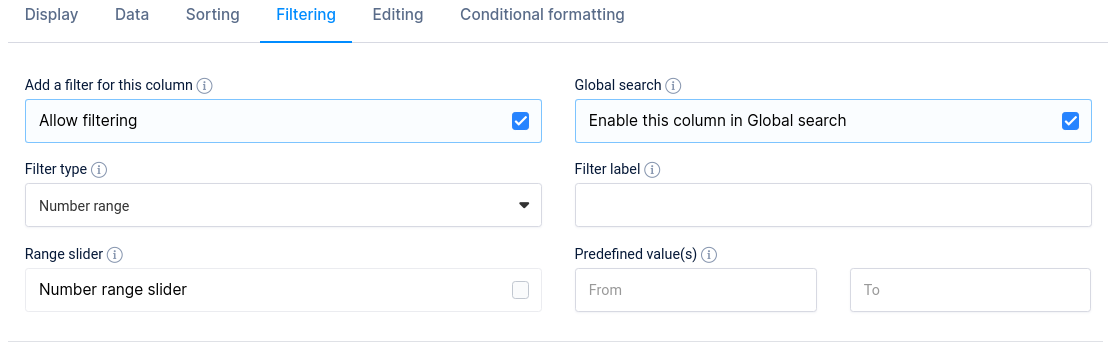
Filtering for this column is enabled, and we added a label to the filter – “Position”:
Editing has been enabled, and Editor-input type is set to “One-Line edit”, so you can enter data in back-end when creating the table.
There is no Conditional Formatting applied to this column.
2. Second column ( “Name” ) – This is a string column which requires some work. First, we open column settings and apply the following in the Display tab:
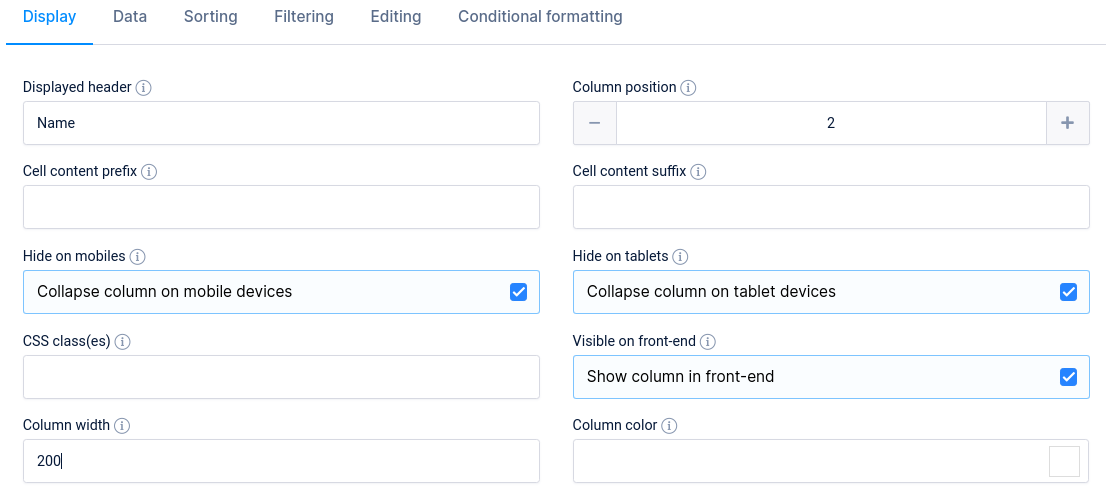
Here we’ve defined the column width to be 200px (please note that this is only possible if you enable Limit table width in table settings above the table), and added a CSS class “cripto-div”, which is used to vertically center the cells of this column. To define the CSS class, you will need to go to wpDataTables settings/Custom JS and CSS/Custom CSS, and add the following to the Custom CSS field:
.cripto-div {
   vertical-align: middle;}
.cripto-div span {font-size: 16px;font-weight: 600;margin-left: 5px;vertical-align: top !important;margin-top: 6px;}
The cryptocurrencies’ icons are all stored in a single .png file, which you can access on this link. You need to add a CSS class in Custom CSS field to be able to access the image:
.cripto-sprite {display: inline-block;margin: 0 2px;background-image: url(https://wpdatatables.com/wp-content/uploads/2018/12/cripto-sprite.png);width: 16px;height: 16px;}
.cripto-sprite{
    background-image: url(https://wpdatatables.com/wp-content/uploads/2019/02/Artboard.png);
    background-repeat: no-repeat;
    background-size:160px;
    width: 32px;
    height: 32px;
    margin-left:0 !important;
}
To access these icons individually, and add them in rows you need to add a CSS class which would locate the icon’s position in that .png file – to specify the coordinates, so to speak. To do that, you need to add a new class for every cryptocurrency. For example, the icon coordinates for Bitcoin are accessed with the following CSS:
.cripto-1{background-position: -734px -207px;}
Since we have 20 cryptocurrencies in that table, the full coordinates CSS which you need to add in Custom CSS field would look like this:
.cripto-1{background-position: -734px -207px;}
.cripto-1{background-position: -734px -207px;}
.cripto-2{background-position: -176px -64px;}
.cripto-3{background-position: -734px -48px;}
.cripto-4{background-position: -416px -639px;}
.cripto-5{background-position: -176px -96px;}
.cripto-7{background-position: -16px -96px;}
.cripto-8{background-position: -638px -557px;}
.cripto-9{background-position: -238px -160px;}
.cripto-10{background-position: -464px -623px;}
.cripto-11{background-position: -638px -399px;}
.cripto-12{background-position: -192px -655px;}
.cripto-13{background-position: -16px -336px;}
.cripto-14{background-position: -304px -639px;}
.cripto-15{background-position: -400px -687px;}
.cripto-16{background-position: -32px -80px;}
.cripto-17{background-position: -480px -463px;}
.cripto-18{background-position: -128px -687px;}
.cripto-19{background-position: -718px -64px;}
.cripto-20{background-position: -702px -395px;}

.cripto-1 {
background-position: 0 0;
}
.cripto-2 {
background-position: -32px 0;
}
.cripto-3 {
background-position: -64px 0;
}
.cripto-4 {
background-position: -96px 0;
}
.cripto-5 {
background-position: -128px 0;
}
.cripto-6 {
background-position: 0 -32px ;
}
.cripto-7 {
background-position: -32px -32px;
}
.cripto-8 {
background-position:  -64px -32px;
}
.cripto-9 {
background-position: -96px -32px;
}
.cripto-10 {
background-position:-128px -32px;
}
.cripto-11 {
background-position: 0 -64px;
}
.cripto-12 {
background-position: -32px -64px;
}
.cripto-13 {
background-position: -64px -64px;
}
.cripto-14 {
background-position:  -96px -64px;
}
.cripto-15 {
background-position:  -128px -64px;
}
.cripto-16 {
background-position: 0 -96px;
}
.cripto-17 {
background-position:  -32px -96px;
}
.cripto-18 {
background-position:  -64px -96px;
}
.cripto-19 {
background-position: -96px -96px;
}
.cripto-20 {
background-position: -128px -96px;
}
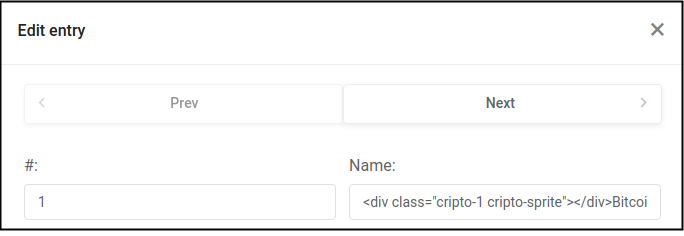
Then, when you edit the first row, you need to enter the following code, so the image is pulled and added in front of “Bitcoin” in that row:
<div class="cripto-1 cripto-sprite"></div>Bitcoin
Which would look like this in the edit modal:
So, to apply this for each row individually, you should add them in the edit modal one at a time using the lines of code below:
<div class="cripto-1 cripto-sprite"></div>Bitcoin
<div class="cripto-2 cripto-sprite"></div>XRP
<div class="cripto-3 cripto-sprite"></div>Ethereum
<div class="cripto-4 cripto-sprite"></div>Bitcoin Cash
<div class="cripto-5 cripto-sprite"></div>Stellar
<div class="cripto-6 cripto-sprite"></div>EOS
<div class="cripto-7 cripto-sprite"></div>Tether
<div class="cripto-8 cripto-sprite"></div>Litecoin
<div class="cripto-9 cripto-sprite"></div>Bitcoin SV
<div class="cripto-10 cripto-sprite"></div>TRON
<div class="cripto-11 cripto-sprite"></div>Cardano
<div class="cripto-12 cripto-sprite"></div>IOTA
<div class="cripto-13 cripto-sprite"></div>Monero
<div class="cripto-14 cripto-sprite"></div>Binance Coin
<div class="cripto-15 cripto-sprite"></div>Dash
<div class="cripto-16 cripto-sprite"></div>NEM
<div class="cripto-17 cripto-sprite"></div>Ethereum Classic
<div class="cripto-18 cripto-sprite"></div>NEO
<div class="cripto-19 cripto-sprite"></div>Waves
<div class="cripto-20 cripto-sprite"></div>Zcash
That covers the creation of the second column, and filling out its data.
3. Columns 3 – 10 all have the same CSS class applied to them – “aligncentarcell”. Go ahead, and apply this class in column settings for columns 3 – 10:
This class aligns the text horizontally in the center, using the following CSS:
.wpDataTablesWrapper table.wpDataTable td.aligncentarcell,
.wpDataTablesWrapper table.wpDataTable th.aligncentarcell
{ text-align: center !important; }
With this, you will have completed the custom setup of columns #3, #4 and #6 ( “Symbol”, “Market Cap” and “Circulating Supply” ).
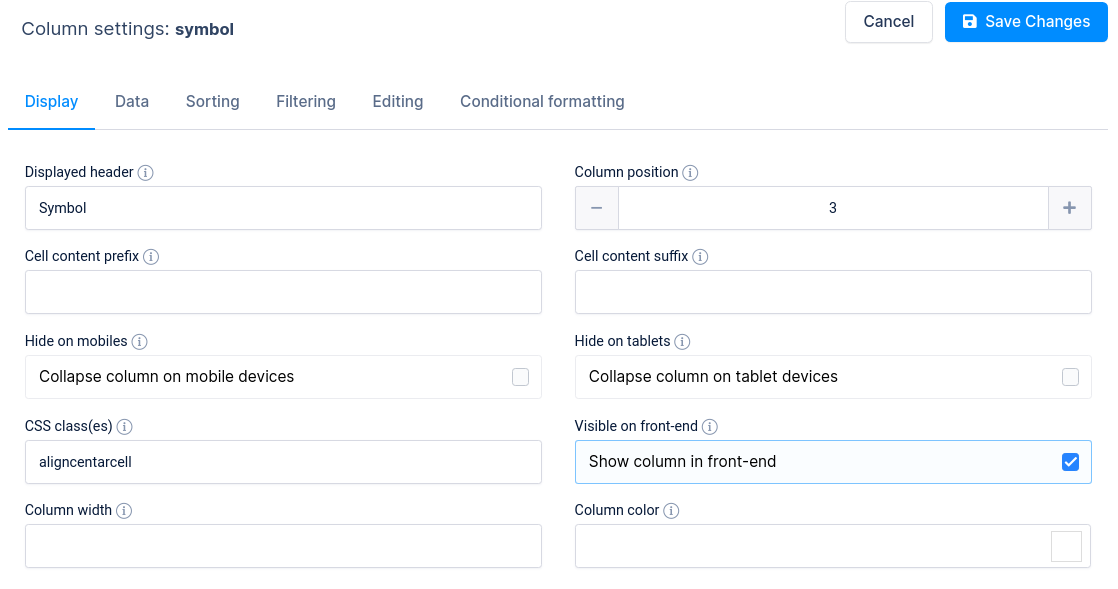
Third column ( “Symbol” ) – column settings:
Display tab:
- “Visible on front-end” enabled
Data tab: keeps default settings.
Sorting tab: Sorting is allowed.
Filtering tab: Filtering is allowed, filter type set to “Checkbox”, with no labels applied, no exact filtering, no pre-defined filter values, and filters are rendered in modal form.
Editing tab: One-line edit.
There is no Conditional Formatting applied to this column.
Fourth column ( “Market Cap” ) and sixth column ( “Circulating Supply” ) – columns settings are the same:
Display tab:
- “Visible on front-end” enabled
- “Hide on mobiles” enabled
- “Hide on tablets” enabled
Data tab: keeps default settings.
Sorting tab: Sorting is allowed.
Filtering tab: Filtering is allowed, filter type set to “Text”, with no labels applied, no exact filtering, no pre-defined filter values, and filters are rendered in modal form.
Editing tab: One-line edit.
There is no Conditional Formatting applied to these columns.
4. Since we already saved the “aligncentarcell” CSS class for the Fifth Column ( “Price” ), we need to add some Conditional Formatting to it. It uses only one rule:

This rule tells the table to call the “blue-text” CSS class when the cell value contains a dot ( . ). The CSS you need to apply in Custom CSS field is:
.blue-text{color: #0083c2 !important;}
The same CSS class will be used for the seventh column, but we’ll get to that after we go through settings for the fifth column:
Display tab:
- “Visible on front-end” enabled
- “Hide on mobiles” enabled
- “Hide on tablets” enabled
Data tab: keeps default settings.
Sorting tab: Sorting is allowed.
Filtering tab: Filtering is allowed, filter type set to “Text”, with no labels applied, no exact filtering, no pre-defined filter values, and filters are rendered in modal form.
Editing tab: One-line edit.
5. The seventh column ( “Volume” ) has settings similar to the “Price” column, but with a comma ( , ) instead of a dot ( . ) applied in the conditional formatting rule, so:

This rule tells the table to call the “blue-text” CSS class when the cell value contains a comma ( , ). Since the CSS class is already entered, there’s no need to repeat the process.
Display tab:
- “Visible on front-end” enabled
- “Hide on mobiles” enabled
- “Hide on tablets” enabled
Data tab: keeps default settings.
Sorting tab: Sorting is allowed.
Filtering tab: Filtering is allowed, filter type set to “Text”, with no labels applied, no exact filtering, no pre-defined filter values, and filters are rendered in modal form.
Editing tab: One-line edit.
6. Columns #8, #9 and #10 ( “% 1h”, “% 24h” and “$ 7d” ) have the same set up with only one difference:
Custom column width of “90” is applied in the Display tab when you access the column settings for columns #8 and #10, while column #9 has the custom width set to “100”. All other settings are the same for these three columns – there are a couple of Conditional Formatting rules applied:
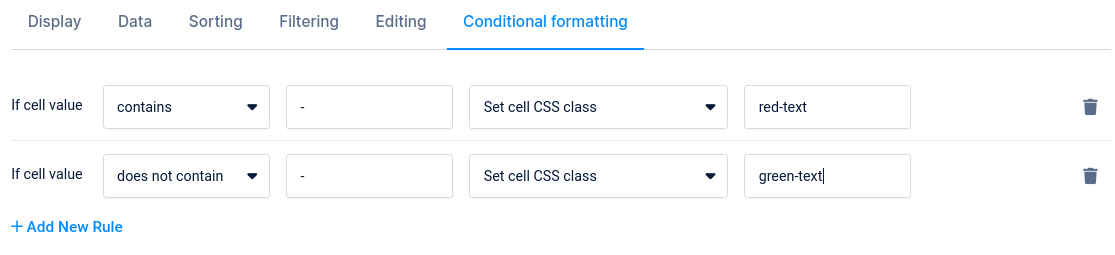
These rules tell the table to paint the values of a cell in red if there is a minus sign ( – ) present in that cell, and to paint the values in green if the sign is not present. So, we need to add a couple more CSS classes:
.red-text{color: #d94040 !important;}
.green-text{color: #009e73 !important;}
Same column settings apply to all three columns:
Display tab:
- “Visible on front-end” enabled
- “Hide on mobiles” enabled
- “Hide on tablets” enabled
Data tab: keeps default settings.
Sorting tab: Sorting is allowed.
Filtering tab: Filtering is allowed, filter type set to “Text”, with no labels applied, no exact filtering, no pre-defined filter values, and filters are rendered in modal form.
Editing tab: One-line edit.
That completes the creation of the Cryptocurrencies rank table, and if you followed the tutorial closely, you should have the same table in your database now.
