Table of Contents
Video tutorial
Example of a wpDataTable based on a generated query
WordPress and its plugins store the data in a specific MySQL database, usually referred to as “WPDB”. The structure familiar to users, is based on different post types, post custom (meta) fields, and taxonomies; all stored in a collection of MySQL tables. Querying these elements, however might be somewhat of a headache to someone not that familiar with relative database structures and building SQL queries.
wpDataTables has a built-in WPDB query constructor to help those users. It has a graphical user interface which allows a user to pick the post types, custom/meta fields, and taxonomies, and generates a query and a preview. You can modify the query as needed, and create a wpDataTable based on the modified query.
Let’s view a live example first, and then go through all the WPDB query constructor elements.
Our example runs on WP, and we would like to get the documentation data in a wpDataTable.
WPDB query generator

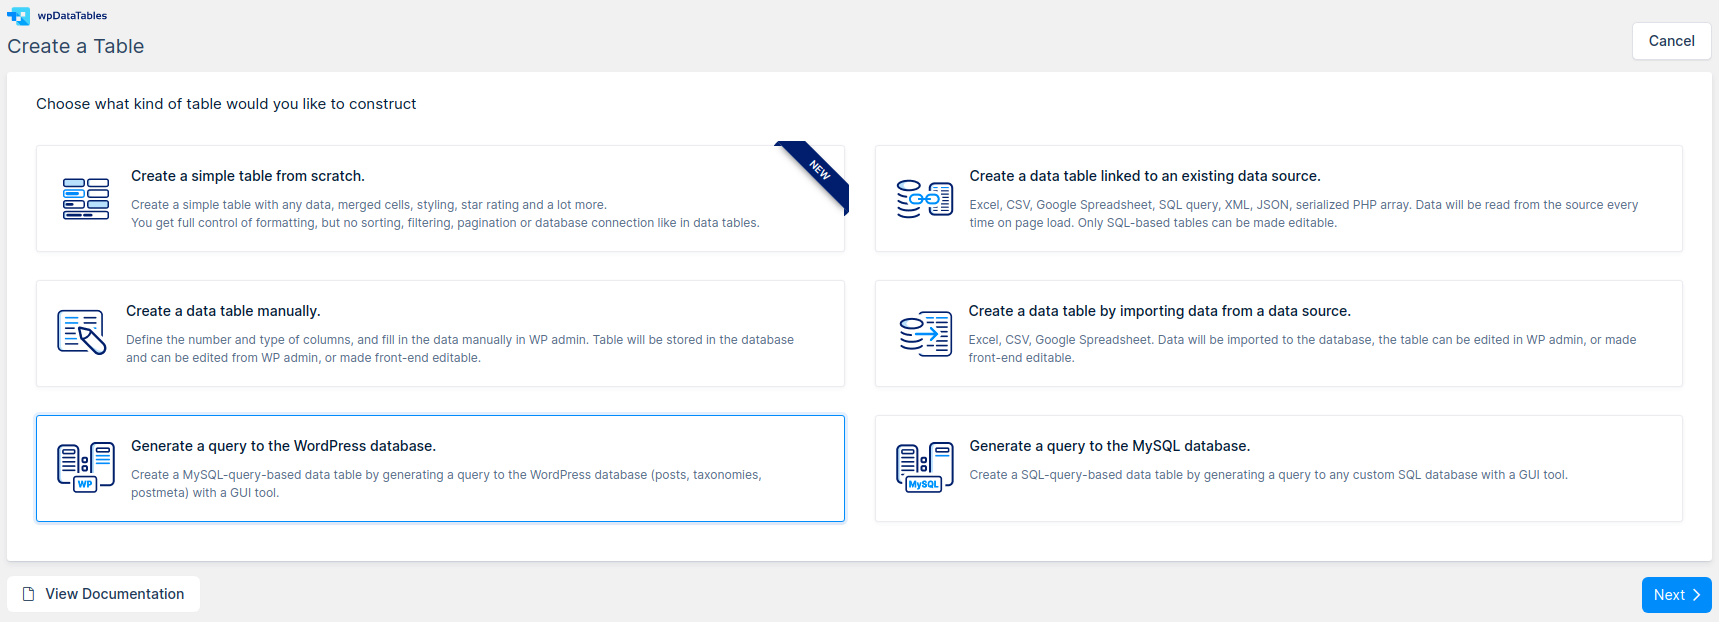
First we go to WordPress admin, open wpDataTables -> Create a Table, choose the fourth option: “Generate a query to WordPress database“, and click “Next“.
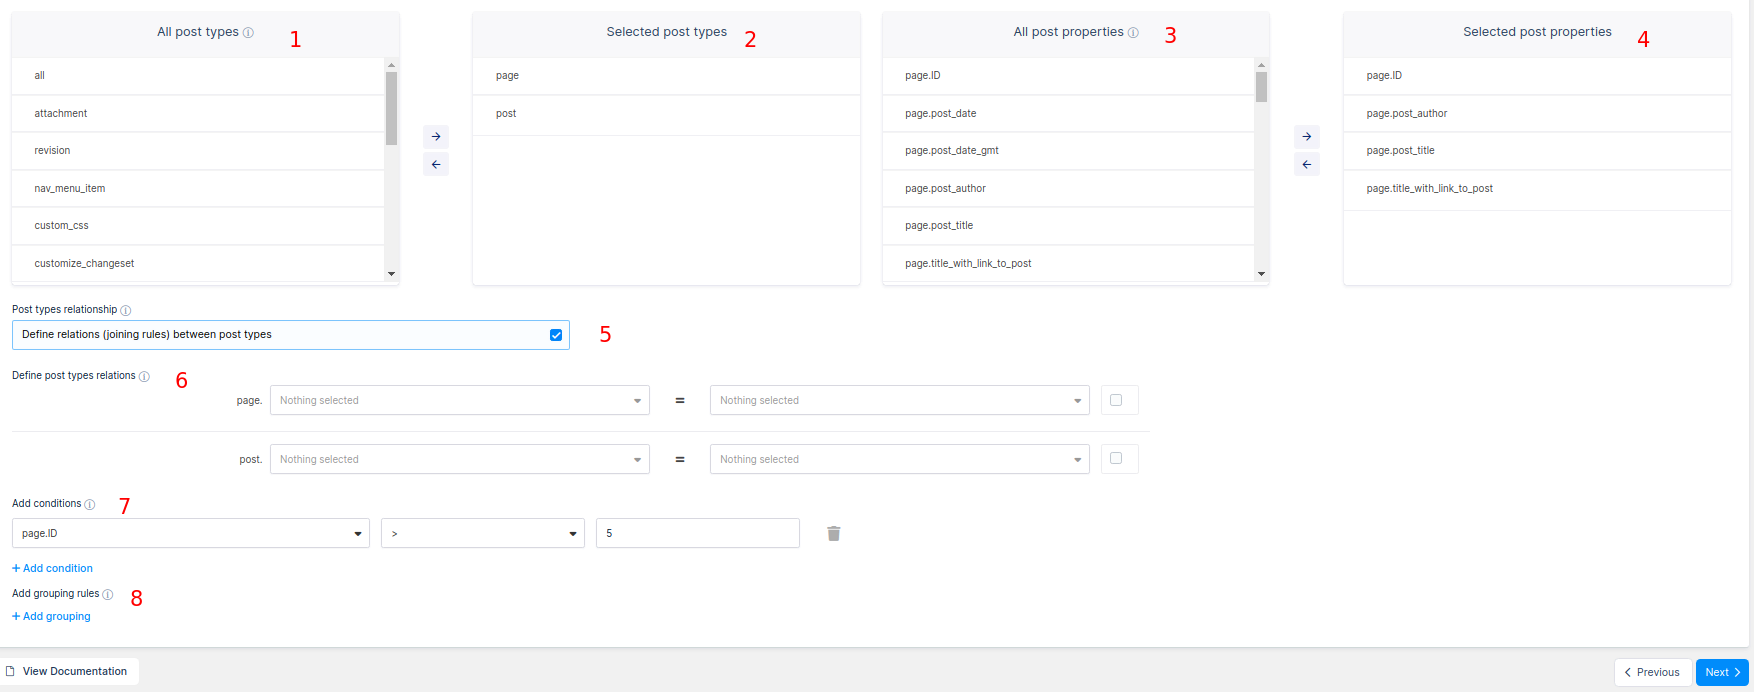
The documentation is stored in WordPress pages, so we choose “page” post type in the first selectbox, “page.ID“, “page.post_title“, “page.title_with_link_to_post”, “page.post_author”. For demo purposes we added one condition: “page.ID > 5“.
Now, we’ll exercise several WPDB query generator elements:
1. All post types. Here you can choose one or more post types for your table. This list is generated by WordPress, and it is ‘unique’ for each WordPress installation, since different themes, plugins or self-written code registers different post types. You can choose one or more post types. You can also select the “all” option if you want to fetch all posts that are independent from the type.
2. Selected post types. This box shows the post types you want to use in query. The box is empty when you first open the page. You can add post types from the All post types tables box, by selecting them and clicking on the ![]() button, or by dragging them.
button, or by dragging them.
3. All post properties. This selectbox is initially empty. It is filled when you choose one or more post types. In this selectbox, you will see the full list of parameters for each post type, in a form “post_type_name.paramter_name” (separated with a dot). Parameters for each post type include the “defaults” (title, author, etc.), and the full list of registered meta keys for the post types, and taxonomies.
4. Selected post properties. This box is empty when you first open the page. This box will show post properties that you want to use in your query. You can add columns from the All post properties box by selecting them, and clicking on the ![]() button or by dragging them.
button or by dragging them.


5. Post type relation rules configurator. This block appears if you choose more than a single post type. It helps you define how do the posts type relate in the query, i.e., should they be treated as “equal”? or, should there be some kind of “parent-child” relation?
The first option is “Define relations (joining rules) between post types“. If you choose this option, you’ll need to provide the relationship logic (see point 6) so the “INNER JOIN” or “LEFT JOIN” block would be generated for you. This can be used if you want to return, for example, a post with its children.
The second option is “Do not define relations between post types – do a full outer join“. In this case, all the rows will be treated as equal, and will be output in the same table without any additional logic.
6. Relation rules generation block. In this block you can define the relations between different post type properties that are required for joining them; e.g. “post.post_parent = page.ID“. The wizard generates as many blocks as there are post types chosen (e.g., 2 blocks for 2 post types), but you usually need to define one block less than generated (e.g., only 1 out of 2).
The first dropdown of each block represents fields of given post type, the second dropdown shows fields of all other post types, and the checkbox after the dropdowns allows you to define whether to use “inner join” (checked) or a “left join” (unchecked). Inner join means that only the rows that have matches for a given field in both tables will be returned. Left join means that all rows will be returned, even if there are no matches. You can read more about joining here.
7. Additional conditions block. This block allows you to define additional conditions: e.g., if you want only the rows where a certain field is equal to, greater than, or less than some value.
You can add as many conditions as you need with an ![]() button. In the first dropdown, you can select a field for defining the condition, and in the second dropdown, you can choose a comparison operator. It can be one of the following:
button. In the first dropdown, you can select a field for defining the condition, and in the second dropdown, you can choose a comparison operator. It can be one of the following:
- =, <, <=, >=, > – equal, less than, less than or equal, greater than or equal, greater than
- <> – not equal
- LIKE – comparison for a ‘fuzzy’ comparison with strings. For example, if you need to return all rows where a “post.post_title” starts with “abc”, you would define it similar to what is displayed on the screenshot on the right.
‘%’ sign here stands for a pattern, which means it will match any characters (and any number of characters). If you need to match a single character, you can use the ‘_’ sign.
- %LIKE% – this is a “Fuzzy” comparison with a predefined masked input; it will match any string that contains the defined substring.
- IN – allows you to match against a set of values, e.g., “post.ID IN 1,2,3,4,5,6”
You can always remove the condition blocks with the ![]() button.
button.


8. Grouping rules block. This block allows you to add grouping by a certain field. This may be needed when, for example, you want to display a post with all its tags. Without grouping, the post will be displayed as many times as the number of tags it has (e.g. repeated 5 times, if there are 5 tags assigned). But if you group by post title or post ID, the post will display only once, and the tags will be comma-separated.
A grouping rule block can be added with an ![]() button, it has only one dropdown with all the fields that are selected above, and it can be removed with a
button, it has only one dropdown with all the fields that are selected above, and it can be removed with a ![]() button.
button.
Query editor

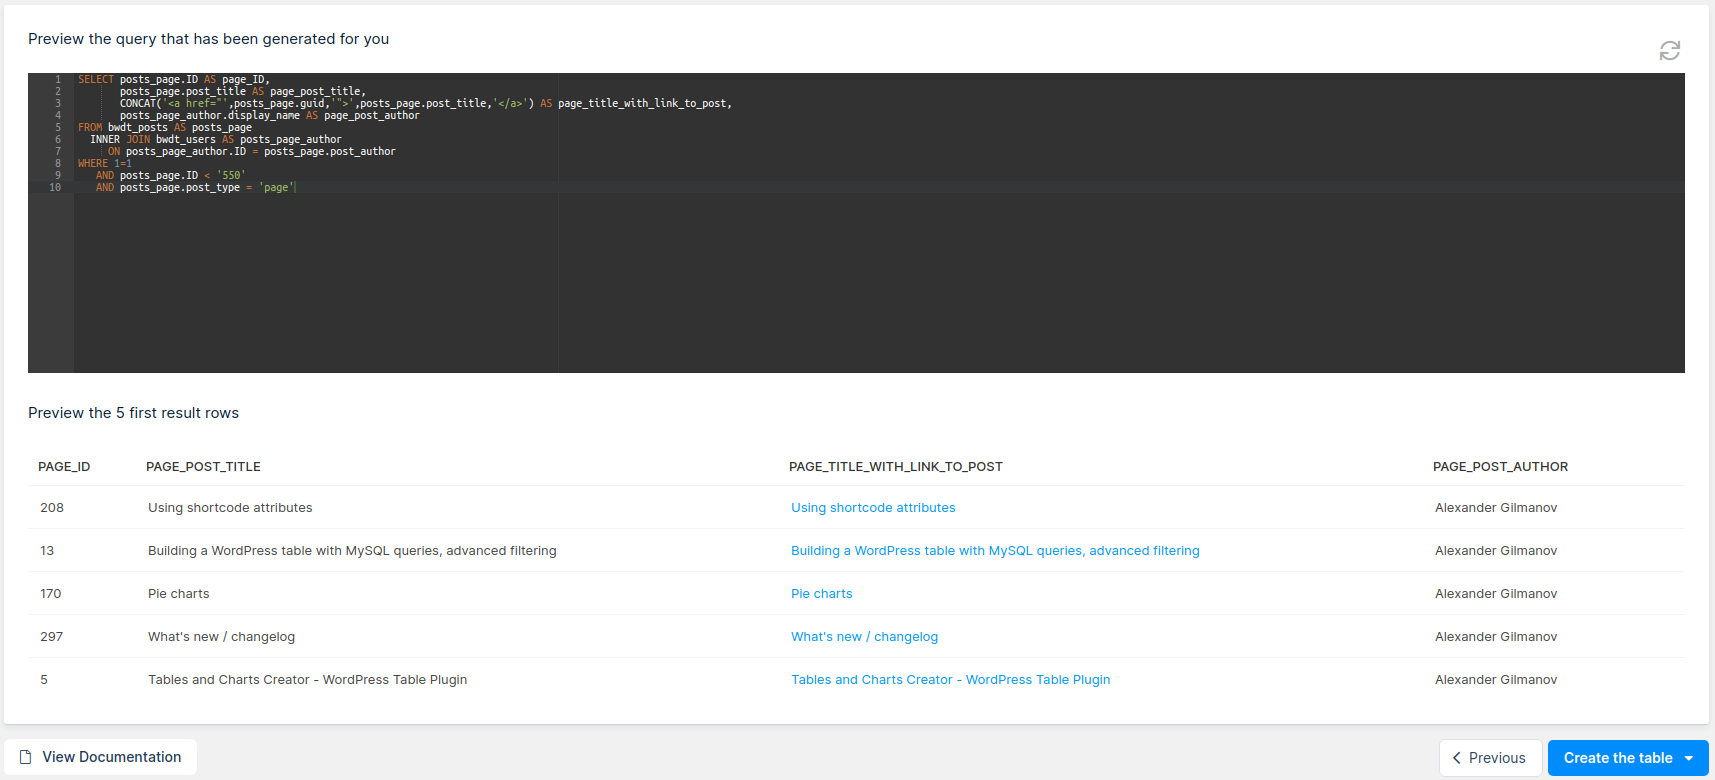
Next page is the query and result preview page. It has only a few elements:
1. Query editor. Here you see the query that wpDataTables generated for you. If you are not completely satisfied with it, you can edit it here.
2. Refresh button. If you edit the query, you’ll want to click this button to send it to the server, and fetch the results in the preview table.
3. Results preview. Here you can see the first few rows the MySQL server returns using the query provided. If you see “No data”, it signifies the MySQL server returned nothing, either because of an error in the query, or because it is simply returning an empty data-set even though the syntax is correct.
When you’re satisfied with the results, just click on “Create the table” to initialize a new wpDataTable and edit its settings. For example, you could provide more appropriate column names, configure responsiveness, or exercise other options.
If you have lots of pages, you can enable server-side processing for the table, so it will load faster and work faster on the front-end.
